Showing posts with label Christmas. Show all posts

Tuesday, December 24, 2013

Christmas Nails

Merry Christmas Y'all!!!  I hope you are having a fabulous day!!  I had so much I needed to do for today, but blood pressure issues kept me up almost night, so it looks like I need to schedule a nap too.  But I wanted to make sure that I got this mani up for you...especially after promising it on instagram yesterday.

So for today I have one of my favorite Holiday nails for you.  I think these are great for Christmas, New Year's or even just because:
I Used:
China Glaze- Just Be-Claws (red foil/shimmer)
Finger Paints- Sparkle Top Coat (gold micro glitter in milky/clear base)
Gold Striping Tape

This is an easy, elegant design.  I started with two coats of China Glaze Just Be-Claws, a gorgeous red foil/shimmer.  This is a gorgeous red that just screams the holidays.  Next came the gold striping tape.  This can be found at bornprettystore (discount code in the right margin, just click and it will take you to the site), Sally's Beauty Supply, a many other stores.    Just lay two strips down horizontally on your nails.  My biggest advice is to NOT wait until your polish dries completely.  If you do it when it's still tacky, the tape adheres much better.  But, once you lay the tape down, it has to stay there, you can't move it.  If you're not real comfortable with striping tape, go ahead and let your polish dry completely and just use two coats of top coat to help seal it.
Once that was done, I used Finger Paints Sparkle Top Coat and painted in between the tape.  Then I just topped it all of with one coat of Seche Vite top coat.

I hope y'all enjoyed today's design.  I also hope y'all have a Very Merry Christmas!!!  I'll have a post up for you in a couple of days, but I'll see you on facebook and instagram!!  And be sure to share your Christmas goodies with me there!!  Happy Polishing and Merry Christmas!!

Monday, December 23, 2013

Santa & Candy Cane Nails

Hey Y'all!!  Merry Christmas Adam!!  (Get it, cause Adam came before Eve??)  Do you have all your shopping done?  The now-a-teen and I finished everything today.  We really only had grocery shopping left. And dog food.  Yep, the hub sent the kid and I to get the dog food.  Not a big deal for the babies...huge deal for the big girls!!  Babies food=15 pounds, big girls food= 50 pounds.  But we are finally done!!  So as I promised on Instagram, here are my Santa Claus nails:
Left Hand
Right Hand
I Used:
China Glaze- White on White (white crème)
Orly- Unlawful (bright red crème)
LA Colors- Palm Tree (green crème)
Barielle- Pillow Talk (light beige crème)
Nailtini- Sparkler (clear top coat with red and holo glitter)
China Glaze- Liquid Leather (black crème)
Pure Ice- Jaguar (light gold metallic)
Finger Paints- Brushstroke Blush (very pale pink crème)
China Glaze- So Blue Without You (blue shimmer)
Liner Brush
Dotting Tools


I love the glitter I used on this!  I won it in a giveaway and my first thought when I saw it was, Christmas!  It's Nailtini Sparkler, a clear top cot with red and holographic glitter.  The polish was packed with glitter.  The photos show just one coat (with top coat to smooth it).  Love it!!
The Santa and Santa suit were done using a dotting tool.  And the candy canes were done using striping tape.

I hope y'all enjoyed today's nails!  I have one more design for you tomorrow, a more elegant than cute design, so be sure to check back!  Until then Happy Polishing!!


Wednesday, December 11, 2013

Nail Polish Canada Contest, Week 3: HOLIDAY MEMORIES

Hey Y'all!!  Today is the last of the Nail Polish Canada Contest and this week's theme is HOLIDAY MEMORIES.  As many of you know, I now live in North Georgia, you should know because I spend about 5 months complaining about how cold it is!  (And yes, it's really cold today too).  But I grew up in Central Florida where we celebrated a green Christmas every year.  So green in fact that my Dad put up the Christmas lights outside at night to avoid a heat stroke! 

And put out the lights he did!!  Every year the tv stations, newspaper, and a ton of people came by to see the house.  It's one of my happiest childhood memories so I decided that would be the theme of my nails this week, my Florida Christmas!! (only nail polish was used to create these, the list will be at the bottom of the post)
First, if you like my nails, PLEASE GO VOTE FOR THEM BY CLICKING HERE!!!
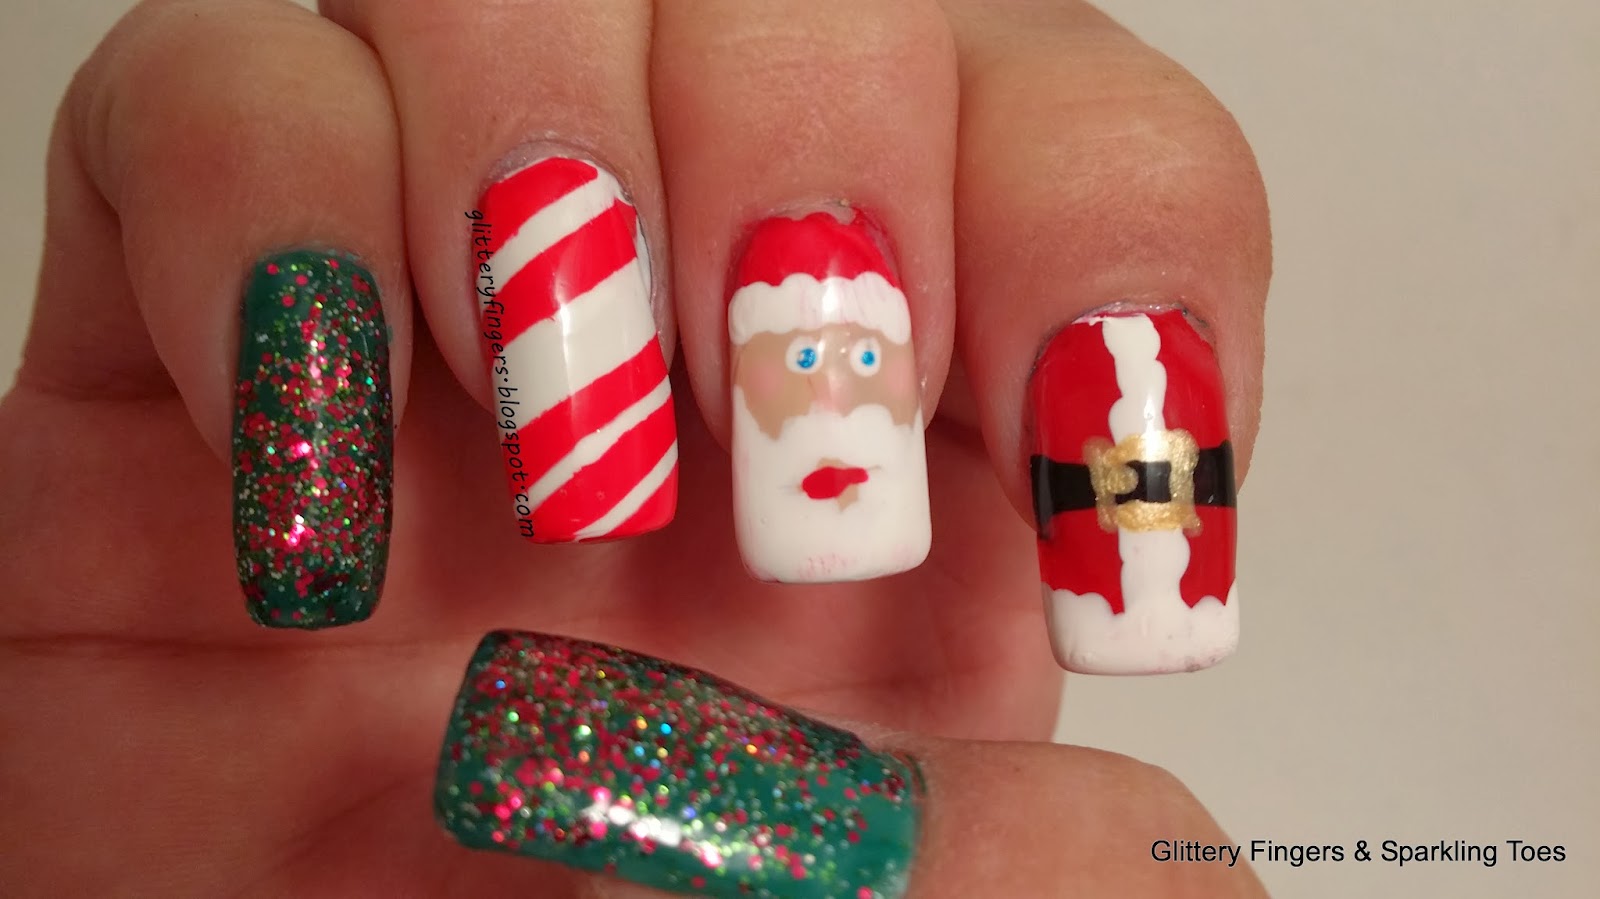
Now the fun part, explaining my Dad's decorations!!  The index finger and pinky have our palm trees that were in the front yard (yep, we had palm trees and orange trees!).  Dad would wrap them up in strings of Christmas lights...used a semi truck to reach the top!!  These were so pretty!!  My Mom always swore that Disney World got the idea of wrapping their trees in lights from us!  As for my middle finger, our backyard was pretty much taken up by our pool, but Dad would create a 45 foot Christmas tree over our pool by using a tall pole and strings of lights.  It was topped by a 5 foot star he made of white lights.  You could see our "tree" for miles!  Did I mention that Florida is super flat??

The ring finger is our Christmas tree!!  We always had fake trees (I'm allergic to the real) and my Mom always insisted that our tree be "snow" covered!  She was born in Kentucky and missed White Christmases...I think, lol.
As for my thumb, my poor Mom always wanted to put, in her words, "tacky, plastic. pink flamingos" in our front yard and my dad and I always said no!  So I wanted her to have her flamingos now  :)

If you like my nails, PLEASE, PLEASE GO AND VOTE FOR THEM!!! Just click here!

And treasure your family this year!  This will be my 7th Christmas without my Mother and 19th without my Father, and it's still really hard.  But I loved being able to do a manicure in their honor!  Happy Polishing!!!


I Used:
Sinful Colors- Sweet Nothing (light blue crème)
Finger Paints- Pink Perspective (neon pink)
Revlon- Cupid (pink crème)
China Glaze- So Blue Without You (blue shimmer)
Orly- Hook Up (yellow shimmer)
Sinful Colors- Snow Me White (white crème)
LA Colors- Palm Tree (medium green crème)
LA Colors- not named (red crème)
Barielle- No Not Now (beige shimmer)
Barielle- I Got A Headache (taupe shimmer)
OPI- Into The Night (dark blue shimmer)

Monday, December 9, 2013

Festive French Tips (Black & Gold)

Hey Y'all!  Happy Monday!  Did y'all have a great weekend?  Do you have all of your Christmas shopping done?  I've barely started :(  And I haven't gotten anything for the hubby yet.  He's so hard to buy for.  He's all, "I don't need anything.  I just want y'all to have what you want."  Is your mister like this??  Sounds all kind and stuff, but the now-a-teen and I wanna give him presents!  We like that!  Grrrr....  We should get him something hideous, then maybe he will tell us what he really wants.

Oh well, on to the nails!  Today I went with nails a little different for the holidays.  I think they still look festive, but if you're tired of red and green this gives you another idea.  I also think these would be great for New Year's Eve.  So I have black and gold French tips:

I Used:
China Glaze- Liquid Leather (black crème)
China Glaze- Mingle With Kringle (gold glass fleck)
Scotch Tape
Liner Brush

Super easy & super holiday-ish!  Start with two coats of China Glaze Liquid Leather.  Once that has completely dried, lay scotch tape down where you want the tip to be.  You can do it right on your nail line, or you can do it like I did and put it a little closer to your nail edge.  Paint the Mingle With Kringle and immediately remove the tape.
Dab a little polish onto a piece of paper or paper plate first.  Then using a thin liner brush, just draw little wisps...sweep the gold into black and the black into the gold. 

Hope y'all enjoyed today's mani!  Happy Polishing!!!

Saturday, December 7, 2013

12 Days of Christmas: Festive Colors/Glitter

Hey Y'all!!  Ok, what's wrong with me??  I usually have my posts up by like 2pm, and lately they're up around midnight.    But it's only 11'ish so technically I still got this up on the right day.  That counts right? 

So today's challenge is Festive Colors/Glitter.  This was really hard!  Y'all know how much I love my glitter and sparkle!!  I'm not kidding when I say I had like 20 bottles of "festive" glitter out trying to decide what to use.  I finally went with a pretty calm, classic Holiday look, red and gold:
I Used:
Orly- Unlawful (bright red crème)
Orly- Lavish Bash (gold/holo glitter topper)

This is such an easy, but very much Christmas-y look.  The pictures show two coats of Orly Unlawful, a pretty, bright red crème.  Then I topped it with Orly Lavish Bash, from their new collection.  Lavish Bash is a clear top coat with small gold glitter, small octagon holo glitter and small holo bar glitter.  Love this!!
I hope you enjoy today's look.  And if you haven't already,

Be sure to enter our giveaway for a $150 e-card to the site of your choice!!
Just CLICK HERE to enter!!!
 
And be sure to check out every one's designs below!! Happy Polishing!!


Friday, December 6, 2013

Review: Sinful Colors Silver Rainbows

Hey Y'all!!  TGIF!!! I would say I'm excited about the weekend, but I'm about today is the start of ten crazy, busy, stressful days!  And all because of the now-a-teen, lol.  She has mid-terms at her co-op, rehearsals literally all night, every night, then 6 performances in three days...and, well there's more, but enough of my first world problems.  On to the polish!!

I was lucky enough to actually find the Sinful Colors Christmas collection (usually it takes me months) and I bought a couple of them.  Today I have Silver Rainbows for you:
The picture shows one coat over two coats of Pure Ice Silver Mercedes and one coat of top coat.  Silver Rainbows is a clear based polish with bar glitter in blue, green, red and magenta/dark pink.  First off....where in the heck did they get that name??  I realize I put it over silver, but there is NO silver in the polish itself.  So why Silver Rainbows???  So, not the best name.
So past the weird name, I was really excited about this polish.  I'm one of the few people that really likes bar glitter and this one looked like the Holidays in a bottle!  The polish formula was good, it did require a little dabbing to get the coverage you see in the picks.  And despite tapping down the glitter to make sure that it didn't extend past the nail tip, it still is sticking out all over the place.
And what do I think of the actual polish?  I'm majorly disappointed :(  It looks like a hot mess to me.  Just no rhyme or reason to it.  And it didn't even sparkle that much.  I can't abide non-sparkly glitter!!  There should be a law against it!!  What do you think?

Have a great Friday!!  Happy Polishing!!

Thursday, December 5, 2013

The 12 Days of Christmas: Food

Hey Y'all!!  I'm late again, but I have my post up on the right day at least!  This time of year is just nuts...the now-a-teen had to perform and "excerpt" from the Nutcracker tonight and it took all night and half the day to prepare for and do, lol.
 

It's Day 3 of the challenge and today's theme is Food.  Food????  I can't draw food!!  So I went with a design I've been dying to try, Peppermint Swirls:
I Used:
China Glaze- White on White (white crème)
China Glaze- Adventure Red-y (red crème)
China Glaze- White Cap (sheer white crelly with micro gold glitter)
Liner Brush

Ok, this looked way better in my head, but I gave it a shot, lol. 
I started with three (yep, took three) coats of China Glaze White on White. Then topped it with one coat of White Cap, cause glitter makes everything better, right?  Except my pinky. Then using a liner brush and Adventure Red-y, I painted the swirls.  Or attempted to anyway.  On my pinkies, I placed the White Cap on just the red swirls.

So there's my attempt at peppermint candy :)  Be sure to check out what the other ladies came up with in the links below.  Happy Polishing!!


Wednesday, December 4, 2013

Nail Polish Canada Contest, Week 2: DECORATIONS

Hey Y'all!!  It's Week 2 of Nail Polish Canada's Contest and this week's theme is DECORATIONS!!  After a lot of thinking, seriously, a lot, I came up with a decorated tree for my entry:
For the Water Marble, I Used:
China Glaze- Def Defying (lime crème)
China Glaze- Exotic Encounters (medium green crème)
Ulta- Envy (foil finished dark green)
BornPrettyStore- Holographic 12 (dark green linear holographic)

For the Decorations, I Used:
Orly- Rococo A-Go-Go (purple foil polish with gold shimmer)
Zoya- Dream (dark blue with scatter holographic glitter)
White rhinestones

Shameless plug:  PLEASE HELP ME BY CLICKING HERE TO VOTE!!!!  PRETTY, PRETTY PLEASE<3 <3
If y'all like this design, I have a big favor to ask, please go vote for it by simply CLICKING HERE!!!  Thank you so much!!!  I really appreciate it!!
Happy Polishing!!

Friday, November 29, 2013

Nail Polish Canada Contest, Week 1: SNOW

Hi Y'all!  I hope you had a fabulous Thanksgiving, Hanukkah or Thursday yesterday!! I did!  But I ate WAY too much food!  That is a big part of the fun of Thanksgiving though, eating yourself into a food coma, lol.

Today I have a special post for you (and could really use a favor too)!  I was invited to participate in Nail Polish Canada's Holiday Contest.  There is one theme per week for three weeks.  The person with the most likes, wins!  So in a minute, I'm going to ask y'all to vote for my mani.  This week's theme is SNOW and here is my design:
Left hand
Right hand
I couldn't quite make up my mind, so I went with a few themes, trees, snowflakes and of course a snowman! 
Now if y'all could do me a big favor....please CLICK HERE to VOTE for my mani!!  I would appreciate it SO much!!!  Thank y'all!!  I have the best followers in the world!!

And after you vote for my design (wink, wink) be sure to enter our International Giveaway for a $150 e-card!!!

Have a fabulous Friday and Happy Polishing!!

I Used:
Milani- Cyberspace (light blue scatter holographic)
Sinful Colors- Snow Me White (white crème)
China Glaze- Dandy Lyin' Around (white crelly with silver shimmer)
Orly- Rapture (brown crème)
essence- Walk on the Wild Side (sage green polish with bright green shimmer)
Orly- Unlawful (bright red crème)
Sinful Colors- Black on Black (black crème)
Finger Paints- Vermillion $ Painting (orange with orange and gold shimmer)
Dotting Tools
Medium Liner Brush
Fine Detail Brush


Monday, December 31, 2012

Red French Tip

Hi again!  As promised, here's my second post of the day.  If you are looking for a more classic look, or something more elegant, I may have what you are looking for:
This is a matte/glossy French tip.  And I promise the hardest thing about this design was figuring out what to call it!

I Used:
Orly- Smolder (dark red shimmer)
NYC- Matte Me Crazy (matte top coat)
Pro FX- Quick Dry High Gloss Top Coat
Crystal Rhinestones

I started with two coats of Orly Smolder .  After that had dried completely, I taped off the ends of my nails (see my tips for creating the perfect French tips here) and then painted the nail beds with the NYC matte top coat.  Then I painted the tips with the Pro-FX high gloss top coat free hand.  You do need to paint the tips to give your nails a smooth finish and feel.

One special thing I did was use real crystal rhinestones as opposed to the acrylic ones sold in beauty supply stores.  You can find them at your local hobby/craft store.  I found mine at Michael's for under $5.00.  I do have two different sizes on too.  Start by placing a dot of the matte top coat in the middle of your nail.  Then place the largest rhinestone.  Then repeat, placing the smaller rhinestones around the larger one.'

I hope y'all enjoy it!  Have a fabulous New Year's Eve!! And be sure to post pictures of your nails and outfits on my facebook page.  Happy Polishing!!

Saturday, December 29, 2012

Purple and Gold Water Marble

Good Morning everyone!!  Did y'all get any sleep?  Me either!!  New laptop + new Wi-Fi in house + trying to figure out how to use new laptop = absolutely no sleep for me!!  But as a result, I'm able to get two posts on in one day!

So this is what I ended up wearing on Christmas, a gold and purple water marble:

NOTE:  Click here to see my step-by-step tutorial on water marbling.

I Used:
Milani- 3D (holographic gold)
Color Club- Glitter Wonderland (purple with blue & red shimmer)

I started with two coats of Milani 3D.  I bought this during CVS's secret clearance sale and love it! It's a gorgeous gold linear holographic.  Then I used it and Color Club's Glitter Wonderland for the water marble.  The Milani worked wonderfully for the water marble; the Color Club, not so much.  It acted really weird...when I would drag my toothpick through the bull's eye, the Color Club would spread out or break apart.  I've had polishes not spread, or dry too quickly, but I've never had one do this.  The only thing I can figure out is that it is the perfume in this collection that makes it water marble unfriendly.  But as long as you aren't looking for a complicated design, they will work.

The Milani worked like a dream.  And since I was able to snag the entire 3D Holographic line, I see a Spring water marble in my future.

I do like how it turned out despite the Glitter Wonderland.  Hope y'all like it too!  Happy Polishing!!

Tuesday, December 25, 2012

Santa Claus- 12 Days of Christmas Challenge

Merry Christmas Everybody!!!!  I hope Santa was good to everyone and left lots of polish in your stockings!  And I hope your houses are filled with love, laughs and the smell of a delicious Christmas dinner cooking!! 

The last challenge of the 12 Days of Christmas is Santa Claus!!  Since I knew I wouldn't have time to change my nails between Christmas Eve and Christmas Day (company staying and I have to cook dinner for 12) I have decided to use the manicure I did for the Nail Polish Canada contest, which I lost.  They may not have liked them, but I do.  Here is Santa's Sleigh with all the gifts tumbling out and heading to the chimneys of all the boys and girls.


To see the list of the materials I used, click here.  And be sure to check out every one's designs!  I hope y'all have a wonderful and blessed day!  Merry Christmas and Happy Polishing!!

Monday, December 24, 2012

Tinsel- 12 Days of Christmas Challenge

Merry Christmas Eve Everyone!!  I hope y'all have finished all your shopping, baking and wrapping and can relax and enjoy your family and paint your nails.

Today is the 11th day of the Christmas challenge and out of all of them, this was absolutely the hardest for me!!  I mean, tinsel?  I didn't have a clue.  I did like four designs, but kept coming back to my first one.  This one is my favorite.  And I think it would be fabulous for New Year's Eve too!
I Used:
Icing- Twilight
Loose silver holographic bar glitter

I started with two coats of Icing Twilight.  This is a gorgeous polish!  It's a black jelly with silver micro glitter.  The silver glitter really shows up in the picture above.  I used three coats to make it completely opaque, but two would have been fine.

When that had dried, I applied a thin layer of top coat and sprinkled the loose bar glitter over it.  The glitter was a fabulous find at Dollar Tree.  If you have one near you, go and check it out.  They have started carrying a lot of nail art supplies and everything in the store is $1.00.  On to the manicure, tap down the glitter so you don't have any sharp edges and finish with a top coat.

I don't know if it looks like tinsel, but it's glittering and sparkling all over the place so I'm happy!  And it's perfect for New Year's Eve!  I can not wait to see what everyone else came up with!  Be sure to visit their sites!!  Merry Christmas and Happy Polishing!!

Sunday, December 23, 2012

Elves- 12 Days of Christmas Challenge

Oh my goodness!  It's day 10 of my my very first challenge, only two days left.  That makes me sad :(  I've loved doing this challenge and love all the fabulous women I've met!  And I'm so thankful to have been a part if it.  I can't wait for the next challenge.

Now on to today's prompt: elves!  This was hard!  All I could think of were all the wonderful "elf" movie manicures everyone did.  I loved those!  Then I started thinking about all the cute Santa hats I've seen and thought, elf hats.
I Used:
Orly- White Tips
China Glaze- Liquid Leather
China Glaze- Adventure Red-y
LA Colors- Palm Tree
Pure Ice- Jaguar
Brushes
Dotting Tool

I started  with two coats of Orly White Tips (I'm out of my normal white polish and my family has banned me from buying any more polish until after Christmas!).  Then everything but the red was drawn freehand.  The red was made using my largest dotting tool.

These turned out cuter than I thought they would.  Now I'm off to shake my presents...um, I mean bake.  Yeah.  That's it.  Bake.  Be sure to check out every one's designs!  Happy Polishing!!

Friday, December 21, 2012

Wreaths (& Tutorial)- 12 Days of Christmas Challenge

Hi Everyone! So after my deliciously tacky Christmas tree ornaments, I went much more sedate with my wreaths!  I had two ideas for this manicure and ended up using both:
I Used:
Orly- Torrid (shimmery red)
Wet-n-Wild- SaGreena the Teenage Witch (medium green shimmer)
Wet-n-Wild- Sage in the City (green shimmer)
Color Club- Ho-Ho-Holly (green with gold shimmer)
Pure Ice- Silver Mercedes (silver metallic)
Dotting Tool (toothpick works perfectly well)
Liner Brush (again, toothpick works great)

NOTE:  I know I've listed three green polishes, but you really only need one.  The three was just to give depth to the wreath.

To start this manicure, I painted two coats of Orly Torrid.  When that dried, I placed four dots of green polish (with a dotter or toothpick) on my nails to guide me in making a circle:
Then just fill in your wreath:

For my accent nail, my middle finger, I made a "close-up" of the wreath.  To make this, start by placing dots in a semi-circle.  This will be the center of the wreath and will be covered up.  Then just draw lines outward from the center, using the three green polishes,

The bows were all made with Pure Ice Silver Mercedes and a liner brush (again, a toothpick works perfectly too).  Just draw two loops and two tails!   Then just dot on some ornaments on the whole wreaths. If the bow makes you nervous, just skip it and add more ornaments.

I promise this is an easy manicure, very Christmas-y and sure to get plenty of attention!  I hope y'all enjoy my design and all the other designs by these incredible bloggers!  Happy Polishing!!