Thursday, February 28, 2013

Review: Sinful Colors Spring '13 Collection Part I

Hello y'all!!  Woo-hoo!!  It's Thursday!  That means the weekend is very close.  Do y'all have any plans for the weekend?  How's the weather where y'all are?  It's supposed to be cold and windy here in the south.  And I do realize many of you are snowed in and thinking a weekend with a high of 40 would be great, but that's so not me.  Hurry up 70's and 80's!! 

I whine because I have Sinful Colors Spring 2013 Collection, Sugar Rush, for you today.  Or at least the first half.  And tomorrow I'll have the other half.  This collection is beautiful!!  And it has me longing for the sun, sandals flirty little dresses!

First up is Orange Cream:
This is three coats with a top coat.  All the polishes required three coats, otherwise they were a little streaky.  This was the only one that was thick and pulled some when painting my nails.  Just make sure that each coat is completely dry before starting the next coat and you will be fine.  Otherwise, this is a pretty, pastel peach that is just perfect for Spring.
Outside
Next is Sugar Rush:
This is a beautiful Robin's egg blue.  Above is three coats with a top coat.  Sugar Rush had a perfect formula, maybe a little on the thin side.  Because of this I would suggest three coats to avoid any streaking.  Here it is in the sun:
Please forgive the bubble, it's from my top coat not the polish.  I loved this one, such a pretty pastel blue!!

Next is Candy Coated:
This three coats with a top coat.  This is such a perfect, pastel lilac.  This was my favorite of the entire collection.  Big surprise, huh?  Dionne likes the purple best, lol!  But it really was so pretty on.  The formula was perfect (again, the bubble is in my top coat not the polish).  And now the outdoor picture:
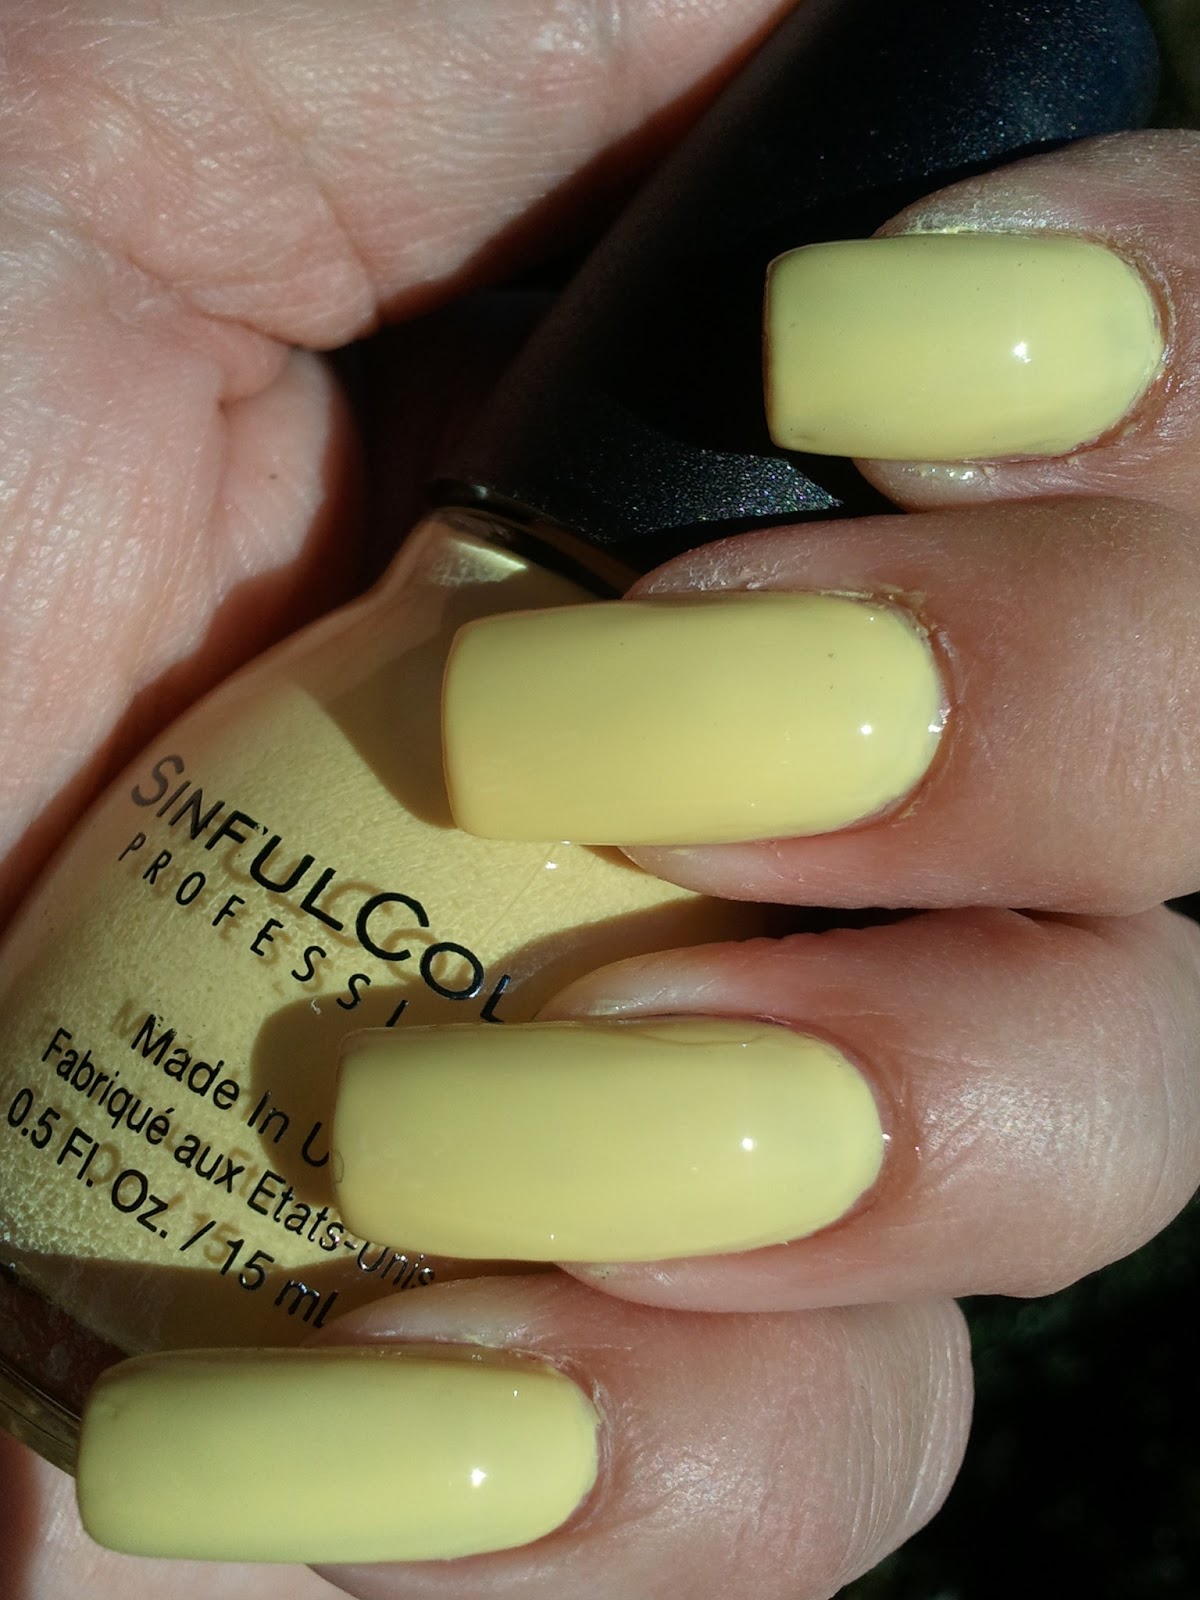
This is Unicorn:
This is such a beautiful, pale yellow.  I didn't really think I was going to like this, yellow being my least favorite color, but I really liked this.   This is three coats with top coat.  To me this polish just screams Spring.  Outside:
While I was buying these, I saw this turquoise glitter that I just had to have!!  It's Sinful Colors Lush Life.  This is one coat over Unicorn:
Isn't it fabulous?

Sinful Colors can be found at Walgreens, Walmart and Rite Aid for $1.99 each.  Hope y'all liked these and I will have the rest of the collection for you tomorrow.  Have a fabulous day y'all!!  Happy Polishing!!

Wednesday, February 27, 2013

ABC Challenge: H is for Harvest Moon & Hand Drawn

Hi y'all!!  I hope you are having a fabulous day.  We are having a weird Wednesday here in North Georgia...there is some bright, yellow thing glowing in the sky, lol.  We have had so much rain that the sun has been really rare this winter.

Anyway, on to the challenge!  This week is H and I have China Glaze Harvest Moon and some Hand drawn wisps for you.
I Used:
China Glaze- Harvest Moon (super shimmery copper)
Sinful Colors- Black on Black (black crème)
Liner Brush
Dotting Tool

I started with two coats of China Glaze Harvest Moon. I'm not sure what collection this is from since I bought it on clearance at Ulta, and I really don't know how I missed it!  This is a gorgeous, super shimmery copper that is just incredible. The above picture was taken out in the sun.  Don't you just love it??

Then I just drew random lines and dots with the Sinful Colors Black on Black.  I tried to make the lines similar, but not identical.  I'm not sure why, I just kept looking at each nail individually, lol.  But they are close enough that I think they match.  You could do them the same of course :)

I hope you like this week's challenge.  Join me in checking out the other lovely ladies' designs!  Happy Polishing!!


Tuesday, February 26, 2013

Purple Gradient Glitter

Hi y'all!!  Happy Tuesday!  Since this is our "hit the floor running" day, I have a quick post for you today.  I have a kind of gradient for you.  It's not quite a gradient, so I'm not sure what to call it, lol.  Anyway, here it is:
I Used:
Sinful Colors- Amethyst (medium purple crème)
Piggy Polish- Among the Stars (small round pink holo and micro purple glitters)

To accomplish this look, I started with two coats of Sinful Colors Amethyst.  I love, love, love this color.  Just a perfect purple.  The formula was perfect.  And of course for 1.99,  you can't go wrong.

To make the gradient, I started at the cuticle (for all but the ring/accent finger, there I started at thee tip) with the Piggy Polish.  Make sure there is only a little polish on the brush, and using the brush that came with the polish, brush towards the tip of your nail, but lifting the brush off of your nail by the halfway point.  Make sense?  You'll need to repeat this step to get the glitter thick enough.  Just remember, there is no perfect way to do this.  Your way is going to be fabulous!!  As long as you make sure there isn't a lot of polish on the brush and lift the brush 1/4 to 1/2 way up the nail, it's going to work!  For other ways to do gradients, click here.  And don't forget your top coat!

Have fun with this design, and as always, if you have any questions go to my contact page for my email address.  Have a fabulous day!!  Happy Polishing!!


Monday, February 25, 2013

It's Here!!! Review: Max Factor Fantasy Fire

Happy Monday Everyone!!!  I hope y'all had a fabulous weekend.  Mine was great!  It was the hubby's birthday Friday (which if you follow my facebook page you know because he couldn't help commenting on my nail polish purchases that day, lol), son I took the day off.  Despite gross weather, rain, wind and cold, it was fun.

But the big news is that my biggest lemming ever, Max Factor Fantasy Fire finally arrived!!!  This is picture heavy because this polish is unbelievably gorgeous!!!
Isn't it gorgeous??  And yes, the pictures are true to life!  This is two coats of Fantasy Fire over two coats of Orly Wild Wisteria, a very dark, vampy purple crème.

Fantasy Fire is a purple jelly with duochrome iridescence.  It's considered a dupe for Clarin's 230, but I love it just as much as the pictures I've seen of the Clarins.  Yes, only a picture...Clarins starts on ebay at $70.00 a bottle and goes way up from there.  Although duochrome means two colors and this polish gives off way more than two colors!!  There is green, blue, yellow, gold copper and red sparkly goodness in Fantasy Fire!!!
Even in low light there is glittery love!  The polish was a perfect consistency and went on smoothly and leveled perfectly.  I have no complaints about it!  It was everything I hoped for!  Since Max Factor is no longer sold in the USA, I did have to order this through ebay with an overseas seller.  Everything went perfectly.  I had no issues. The seller was from Poland and the polish cost me $11.99 plus $3.00 shipping and handling for the mini (this polish only comes as a mini, darn it).  Worth every penny!!!!
I will warn you that it's dangerous to wear this polish and drive.  Even though it was rainy and dreary on Friday, I couldn't stop looking at my nails because they were still glittering and shifting colors.  Thought the hubby was going to freak.  Bottom line on this polish?  If you have $15-20, buy this polish!!  It is SO worth it!!  Happy Polishing!!

Wednesday, February 20, 2013

ABC Challenge: G is for Glitter & Gradient

Hi Everyone!!  How is your Wednesday going?  I hope y'all are doing great!!  I have two posts for you today!  The first was my answer to the MABB Weekly Question, and here is the second, the ABC Challenge!!

This week is the letter G!!  And I have a Gradient using Glitter and China Glaze!!  (Did I win??  Did I use the most G's??? LOL!!) Not only that, I used two untried!!
I Used:
China Glaze- VIII (dark purple crème)
China Glaze- Atlantis
 
I can not even begin to tell you how much I love this manicure!!  First up is China Glaze VIII. An incredible, vampy, dark purple crème that stays looking purple on your nails.  So often the really dark crèmes end up looking black on your nails, but this was obviously purple.  I LOVE this polish!!  And the wear is incredible.  I'm on day 4 of wearing this and it is just now starting to wear away on the corners of my nails. 
 
Then I used China Glaze Atlantis to make the gradient.  I have seen pictures of Atlantis, heard bloggers talk about how gorgeous it is, and how it was hard to find.  I decided I had to try it.  After all, my parents and I were always obsessed with the myth of Atlantis and it glittered, so I had to possess it (my precious), LOL.  Everything you have heard about this polish is true!!  It is a aqua base with aqua and holographic micro glitter bomb!  I just can't tell y'all enough how much I love this polish!!  I'm so thrilled I finally got it. You may see it a lot!  The gradient was made by starting at my cuticle and, as I brushed down my nail, I slowly lifted the brush.
 
If you have read any of my previous blog posts, you know that I get bored with a manicure rather quickly.  I love painting my nails, so as soon as I'm done, I'm ready to start the next one.  Not with this manicure.  I've worn it for 4 days and I'm so sad that it has to come off.
 
Be sure to check out all the other fabulous ladies and their wonderful "G" manicures.  I can't wait to see what they have come up with!!  Happy Polishing!!


Metro Atlanta Beauty Bloggers Question of the Week

Photobucket
Each Wednesday, the Metro Atlanta Beauty Bloggers will answer a beauty-related question just for fun! This week's question is... What are your favorite Spring beauty/polish collections so far?

Wow!  What a great question.  I'm really looking forward to a couple of collections of nail polish.  One is China Glaze's Spring Collection.  I love that it's not just pastels, by far not my favorite thing, but there are bright, highly pigmented colors also.  I'm especially eager to get my hands on Tart-Y For The Party, a pretty purple, and Dandy Lyin' Around, a shimmery white.

I'm also looking forward to is Orly's Spring Collection:
 
The only color I'm not looking forward to in this collection is the green, Coachella Dweller.  For me it's an odd shade of green and reminds me of the plates my mother used when I was growing up.  And the name makes me think of cockroaches, lol.  Watch, I'll buy it anyway and it will be my favorite!
 
And here is Finger Paints Spring Collection:
Look at those colors!  A gorgeous purple cream AND a purple glitter???  I love the pinks too!
 
Oh wait.  Was I only supposed to pick one? No?  Thank goodness!  I've narrowed it down to the THREE polish collections I'm most excited about!
 
What about you?  What are you looking forward to the most?  Look through the links below to see other great Spring collections!!
 
 - - - - - * - - - - - Be sure to check out the other Metro Atlanta Beauty Bloggers' answers!
Ashley Elizabeth from Ashley Elizabeth's Beauty Blog
Dionne from Glittery Fingers & Sparkling Toes
Emma from Manicurity
Harri from TrailerHood Chic
Mandy from MandysSecrets
Pam from Pammy Blogs Beauty
Quinn from Mama Fashionista If you would like to see previous questions and answers, you can do so by viewing the Question Archive here. If you're a beauty blogger in the Metro Atlanta area and would like to join us, please visit our website! We would love to connect with you!


Tuesday, February 19, 2013

Review: Zoya Storm & Blaze

Hi y'all!!  How is your Tuesday going?  I hope this finds you all warm and cozy...and dry.  I cannot tell y'all how tired I am of rain.  Especially here in Georgia where the temperature can drop dramatically when it rains.

I told y'all I had a lot of polishes to review for you and I wasn't kidding. When Zoya did their three free polishes, I snapped my 3 up and then found some Zoya at Ulta (along with a bunch of other brands).  Today I have Zoya Storm and Blaze from their 2012 Christmas collection.  I was so excited to wear them, I couldn't make up my mind which one to wear first, so I wore them both :)
First up is Zoya Blaze, a crimson red jelly with scattered holographic micro glitter.  The pictures show two coats on all but my index finger, that one has three.  I had gotten a nick in the polish and added a third coat to repair it.  I'm surprised that it showed up so much in the photos. In real life you couldn't tell the difference.  But back to the polish.  Blaze is beautiful in person.  It is a rich red that has a lot of depth to it.  The holographic glitter isn't as obvious as in Storm, but it is there.  Just more sedated.  It looks almost like a jelly sandwich (where you put a coat of glitter between coats of jelly polish).  The formula was perfect.  Not too thin, and not thick even though it is a glitter polish.  It stayed on the nail and didn't flood the cuticles.  Bottom line:  a beautiful, deep red with a slight glitter.
Zoya Storm is my favorite of the two, but then subtle isn't even in my vocabulary, lol.  Storm is a black jelly polish with holographic micro glitter.  Although this is a scatter effect, it's almost linear in real life.  The formula on this one was just as perfect as Blaze.  But the glitter is much more evident and I'm not sure why.  I don't know if the glitter is able to shine through the polish better or if it just contains more glitter.  Whatever the answer, I love this polish!!  It is gorgeous in person.  This is one of those times I wish I had bought two bottles so I have a back up.  The pictures show two coats with top coat.  Bottom line:  a gorgeous, glittery black polish!

Removal was a breeze!  When removing, you would never know these were glitter polishes.  These polishes are gorgeous and not just for Christmas!  They will fantastic any time of the year when you want to add a little glamor or fun.

Be sure to check back tomorrow!!  I have the ABC Challenge for you and our biweekly MAAB question!  And just a hint, I love my combination for the challenge so much I'm already wearing it and hate the idea of taking it off!!  See you tomorrow!  Happy Polishing!!

Monday, February 18, 2013

Dotty Pedicure

Hi y'all!!  I told you I had a lot for you today!!  I hope you have checked out my new tip on saving your hands from acetone and my review of OPI Stay the Night Liquid Sand!!  And now I have a new pedicure for you.  I'm so sorry because I seem to forget to post my pedicures.  But that is going to change starting now!!  (fyi: any of the manicures I've posted with the exception of water marbles, can be done on your toes too!!)

So here is my current pedicure (and forgive the scrunched up toes, but man it was cold outside when I took these):
I Used:
Sinful Colors: Black on Black (black crème)
Orly- Purple Crush (purple neon)
Dotting Tools (check out my tip page for household alternatives)
Scotch Tape

I started by painting my toes, alternating between the purple and the black (remember to use a base coat, just like on your finger nails).  I did this because I could fit the design on my big toes only.  One of the many curses of having small feet!  That and never finding grown up shoes in my size!!  Grrrrr!!  Anyway, if your nails are bigger then paint all of them with the purple.  My big toe was painted first with the purple.

When the purple dried completely, place scotch tape diagonally across your nail and paint a thicker coat of black.  Immediately remove the tape.  Then using the opposite color, place dots along that diagonal line:
Alternate the color and sides you dot.  In other words, dot one black dot on the purple side, then one purple dot on the black side.  Do this all along the line and it will look like the dots are melting into the sides.  It doesn't have to be perfect.  No one is going to get that close of a look.  Mine are a tad off, but my feet are so darn far away!!  Once that line is finished, dab on dots in the opposite color to fill in the space.

If you can do this design on all your toe nails, yay!  If not, I just painted my toes, alternating between the purple and black and then dotted them with the opposite color.  Don't forget your top coat.

I hope y'all enjoy this pedi, and I promise to be more vigilant on posting my pedicures.  As always, if you have any questions let me know.  Leave a comment below or email me (address is on the Contact page).  Happy Polishing!!

How to Save Your Hands From Acetone

Hi y'all!!  Click here for a new tip on how to keep acetone from drying out your hands. (Bottom of the page).  Hope y'all find it useful!  Happy Polishing!!


Review: OPI Stay the Night Liquid Sand

Hi y'all!!  I hope everyone had a fabulous Valentine's Day and weekend.  Because of my little tests, we spent a quiet weekend at home, which was fabulous!!  Well, except for a dance rehearsal we were at home.  We rented some movies, (Brave, good movie; Hotel Transylvannia, which is one of the funniest movies I've ever seen...we were all dying laughing, and Ted, funny) and pigged out on junk food.  Just spending some down time together was wonderful.

But now, back to nail polish, lol.  Today I have a review of Stay the Night, one of the liquid sand polishes from the OPI Mariah Carey collection:
So I'm going to start with what I think is the biggest question about this polish...Are y'all like me and liked the look but was unsure about a "textured" finish?  I loved how it looked on the display, but wasn't sure if I could wear a textured finish.  I mean, I will put two or even three coats of top coat on my nails to get a smooth finish (don't worry, I always tell you when I need more than one).  I know this may sound weird but I love the feel of smooth nails.  But I bought this anyway....and loved it!!  It does have a different feel than other polishes, but it wasn't rough or uncomfortable.  It felt like the smoothest grit sand paper, or nail file.  I was actually shocked at how comfortable it was. 

Now for the polish/color itself:
It's gorgeous!!!   Sorry for the slightly blurred pictures, but the glitter wrecked havoc on my camera.  Stay the Night is a gorgeous textured polish in black matte with bright red glitter throughout it.  The glitter in this polish is phenomenal!  I don't know if it's because of the black textured finish, or because the black is matte, but the red seems to sparkle more than most polishes.  I know it doesn't seem it in the pictures, but the glitter is a show stopper!  Pictures show two coats without a top coat.

I only have one complaint, it doesn't wear well.  Here is a picture of the polish after about 30 hours of wear:
It may be hard to see here, but the red glitters started turning silver, and it started wearing away at the edges of my nails.  Although to be fair, that was after 3 loads of dishes without a dishwasher, four loads of laundry and two showers.  I didn't mind the wearing away, but hated the glitter turning silver.  Despite that, I love this polish!!  And I went back to buy more of the OPI's liquid sand!!  (review to come)  I would highly recommend trying this polish!!  It's very unique and gets a lot of attention!

Polish was bought and paid for by me.  All opinions are my own.

Wednesday, February 13, 2013

ABC Challenge: F, Valentine's French Tip

Ok that's a confusing title, lol!  It's time for our ABC Challenge!!  This week is F and I went with a Valentine's Day themed French tip.  I'm not really loving Valentine's Day this year...I have to go in for some tests on Friday and *shudder* the doctor has put me on a liquid diet until then!  Yep, no fancy dinner here...actually, no dinner here :(

But I've decided to put my bitterness aside, lol, and join in the Valentine's mani madness.  Here are my French tips:
I Used:
Orly- Frolic (bright pink crème)
Orly- Torrid (shimmery red)
Dotting Tools

I started with two coats of Orly Frolic, a gorgeous pink/neon-ish crème that I love!!  This is the first time I've used it and it's just such a perfect color.  Then using dotting tools (and remember you can use toothpicks)  I made the alternating hearts.  Just make two large dots then using the smallest dotting tool, drag the polish down to a point.  To add interest, and make room for more hearts, I alternated which way the hearts face.

I really like how this turned out, I think it looks cute.  And I'm not a fan of hearts.  I hope to have a new manicure for you tomorrow, but if not, I will see you as soon as the sedation wears off, lol!  Just in case, Happy Valentine's Day!!  And remember, anyone can be your Valentine, even your four legged friend! 

And if you like this design, please go to Orly's facebook page and vote for my manicure.  Thank you!!  Y'all are just the best and I SOOO appreciate each and every one of you!!

Be sure to check out all the fabulous designs in the links below!!  Have I told you how much I love these ladies?  See you soon and Happy Polishing!!

Tuesday, February 12, 2013

R31DC: Recreate a Manicure

Hi y'all!!  How are you doing today?  I'm on day 3 of solid rain.  Ugh!!!  It's so hard for me to get motivated when it's cold and rainy.  Although in all fairness, the sun did come out for about an hour just to tease us today.  But that's ok, at least I was able to get some pictures of my mani :D

So today is the last day of the Relaxed 31 Day Challenge.  So sad :(  Today's prompt is recreate a manicure.  I've known for a while I wanted to recreate Emma from Manicurity's camouflage manicure.  I haven't tried one of these yet and this seemed like the perfect opportunity!  Then Saturday night I was tricked by the hubby into watching "Battleship" and I knew I wanted to do the Navy's camouflage. Besides, my Daddy was a Navy veteran.  Here is my version:
And here is a sample of the Navy's camouflage (if you're like me and didn't know this even existed):

I Used:
China Glaze- Immortal (gray with blue shimmer)
City Color- Light Gray (light gray with silver shimmer)
China Glaze- Blue Iguana (blue crelly with pink and purple shimmer)
Sally Hansen- Petrol (dark blue crème)
Dotting Tool

I used China Glaze Immortal as my base and then, just as Emma did, I used two sides of a dotting tool to make the globs and slashes with the other three polishes.  But remember, you can use a toothpick, pin, or pen as a dotting tool.

I've had so much fun doing this challenge and absolutely adore the ladies in it.  I've made some great friends and I can't wait for the next challenge.  Be sure to check out their manicures in the links below.  Happy Polishing!!

Monday, February 11, 2013

Inspired by a Tutorial, R31DC

Hi y'all!  How's your Monday going?  I'm not a huge fan of Mondays (but then who is), and a Monday that is rainy and cold leaves me comatose.  Which unfortunately is the type of Monday we have here in Georgia today.  All I want to do is crawl back into bed and wait for Tuesday.  But I can't.  Sigh.

Anyway, today is the second to last day of the Relaxed 31 Day Challenge (another reason to be sad on this dreary day), and today's prompt is Inspired by a tutorial.  For this challenge I picked the chevron nail tutorial from Dressed Up Nails .  And here is my interpretation:

I Used (from lightest to darkest):
essence- grey-t to be here (grey with a purple shimmer)
Sally Hansen- Lacey Lilac (lilac cream)
Wet-n-Wild- On a Trip (purple crème)
Ulta- Celebutante (dark purple crème)
Orly- Wild Wisteria (very dark purple crème)
Small Liner Brush

I do love this look, but it was really time consuming and not great for a perfectionist.  I drew the chevrons free hand and the other nails are two coats of Ulta Celebutante.  One thing I would change is to paint a thin line of the lightest color down the middle of the nail to keep my center straight.  I will definitely be trying this again!

Be sure to check out the other wonderful ladies!  I hope y'all have a fabulous (and dry) Monday and Happy Polishing!!


Friday, February 8, 2013

Inspired by the Supernatural

Hi y'all!!  Are you ready for the weekend?  Do you have any big plans?  I don't.  But that's ok, I've had 3 big and busy weekends in a row, so I'm looking forward to a quiet weekend.

It's hard to believe but the Relaxed 31 Day Challenge is almost over.  There are only two challenges left :(  I've loved doing this challenge and I'm really going to miss it, but I have to admit, I'm looking forward to getting back to reviewing and swatching polish for y'all.  With this month containing my birthday and anniversary, I have some great new polishes to show you!!  Ok, so today's prompt is Inspired by the Supernatural.  I had no idea what to do for it.  Then on Wednesday in my other challenge (ABC Challenge) someone did Egyptian nails.  I would have loved that, but she had a stamping plate, which I don't, and I'm not sure I could draw it.  Then I remembered seeing this neat set of fake nails at the mall with the teenager on Sunday and decided to copy them.  I wish I could tell you who made them, but I do remember that they were in the Icing store (by Claire's).  And here they are:
I Used:
Sinful Colors- Black on Black
Nina Ultra Pro- French White
Wet-n-Wild- On a Trip
China Glaze- Frostbite
Liner Brush
Dotting Tool

These look supernatural, right?  I love them!!  Although they are freaking out my now teenager, lol.  I'm looking forward to taking her to dance tomorrow and seeing if I freak out the other dance moms, LOL!!  Be sure to check out what the other ladies came up with for supernatural, I can't wait to see!  Happy Polishing!!