Showing posts with label yellow. Show all posts

Tuesday, June 30, 2015

Neon Summer Flowers

Hey Y'all!  Ugh!  Do any of y'all have kids?  If you do, you know how much they love to share with Mommy...especially their germs!  Well, even though mine is a teenager, she still felt the need to share her cold with me.  Only, it seems to always make me sicker than it does her!  But I'm finally feeling well enough to get this post up :)

Since it is "officially" summer here (quotation marks because, really?  The temps have been in the high 90's for a month and heat index in the 100's, but no.  Now it's summer), I decided to do a summer neon version of my Spring Flowers:
I Used:
China Glaze- White on White, white crème
LA Colors- Black crème (name is missing)
Color Club- Sweet Getaway, ultra bright neon pink crème (scented)
China Glaze- DJ Blue My Mind, ultra bright blue neon crème
Studio M- Grape Escape, bright purple neon crème
Studio M- Lemon Drop, bright yellow neon with gold shimmer
For the tutorial, just check out the Spring Flowers post.  I loved how this turned out.  And as you may know, I'm more of a bright and bold colors than a pastel colors kind of gal.  This was fun to wear, and I did get a lot of compliments on it.
One mistake I made is above...don't put the purple on the black background.  You couldn't really even see it in person.  Oh well. 

I hope y'all enjoyed today's mani.  Happy Polishing!!

Thursday, June 11, 2015

Spring Flowers

Hey Y'all!!  So as you may know, I'm not much of a pastel, flower kind of gal.  But occasionally, I am.  That's what happened today.  I saw a painting and was inspired to try this Spring Flower mani.
I Used:
KBShimmer:  Shore Thing, a medium minty green crème
Color Club:  Disco's Not Dead, butter yellow crème
Color Club:  Wicker Park, pinkish lilac crème
Finger Paints:  Sea Temptress, textured white polish with teal flakies
Liner Brush
I started this mani with two coats of KBShimmer, a pretty pastel mint crème that was a dream to use.  Then using Color Club Disco's Not Dead and Wicker Park, I painted splotches in random areas of my nails.  Then I made my mistake.  I ramdomly topped some of the splotches with Finger Paints Sea Temptress.  If you recreate this, do not use a textured polish.  Seriously.  It's really hard to paint a straight line over a textured polish!  And the flakies didn't even show up!
Then I used a basic black polish (sorry, I forgot which) and a fine liner brush to paint the petals.  The petals were basically parentheses.  And in some of the flowers, I painted little dots for the seeds.  Then just top everything with a top coat.

Other than the bad lines over the flakies, I really liked this design.  I hope you do too!

Happy Polishing!!

Wednesday, April 15, 2015

First Water Marble of Spring

Hey Y'all!  How's your Spring weather going?  Hopefully better than ours.  It's been raining since Sunday!  And not just a little rain, but deluges.  It's the kind of rain that: 1) makes you want to sleep all day, but dang it, you have to get up and do something useful with your life, 2) makes the normally nice, warm weather both cold and muggy somehow, so you are chilly and a little sweaty, and the worse part, 3) makes all our old, beautiful trees fall over.  But today's mani was done over the weekend, when we still had some sun.

So for today I have my first Water Marble of Spring:
I Used:
Orly:  Key Lime Twist, a green leaning yellow ultra bright crème
Orly:  Frosting, white with a gold shimmer
Ok, so I had high hopes for this water marble.  The two Orly polishes looked great sitting next to each other, there was a lot of contrast between them...yeah, not so much.  They both worked great in the water marble, but you can barely tell them apart.  I do love these two colors, so I will be ding more with them soon; just not together.

I hope y'all are having a fabulous day!  Happy Polishing!!

Wednesday, March 25, 2015

The First Mani of Spring

Hey Y'all!  So, it's theoretically Spring here in the south...  This is such a "fun" time of year, lol.  Today is supposed to be a warm 73 degrees, tomorrow 79...and Saturday is supposed to be 56.  Have I mentioned how much I hate the cold recently?  So despite the overcast and rainy day today, it is supposed to be warm and it is officially Spring, so I have a Spring mani for you today:
I Used:
Sinful Colors: Yellow Out There, a bright yellow jelly with small holographic bar glitter
Finger Paints:  Aloha Lei, an orange glass fleck shimmer
Make Up Sponge
I started by using Sinful Colors Yellow Out There on my pinky and middle fingers and on my thumb.  Yellow Out There is a bright, pretty jelly polish with very small holographic bar glitter.  The pictures show three coats with top coat.  This was a pretty typical jelly polish in that even after 3 coats, there is still a very visible nail line.  I can't wait to try this in a jelly sandwich!  And why I love the holographic bar glitter, I wish there was more!

Next I painted my index and ring finger with Finger Paints Aloha Lei, a bright orange glass fleck shimmer.  I loved this color!  Pictures show two coats with top coat.  I was a bit disappointed in the wear time.  I had to wait until the next day to take the pictures in the sun and as you can see, I already have some wear.  On my middle finger, I used a make up sponge to sponge on a gradient.
While I'm not loving all the weather changes, I do love this mani!

I hope y'all are enjoying Spring where you are, without snow!  Have a fabulous day and Happy Polishing!!

Wednesday, May 28, 2014

Pastel Gradient

Hey Y'all!!  Have you ever had one of those days that no matter how hard you try you just can't get anything accomplished?  If yes, then welcome to my Wednesday! The teen spent the night at  a friend's house so I thought, yay, I'll get a ton done!  Nope.  Didn't get one thing done.  Started a bunch of stuff, but didn't finish the first thing.  Except this post.  Which is going up late.  Dang.

Oh well.  I do have a fun twist on gradient nails for you today, a four colored square gradient:
I Used:
Sinful Colors- Snow Me White (white crème)
Sinful Colors- Unicorn (pastel yellow crème)
Sinful Colors- Cream Soda (pastel peach crème)
China Glaze- At Vase Value (pastel mint crème)
China Glaze- Lotus Begin (pastel lilac crème)
Make Up Sponge

I started with two coats of Sinful Colors Snow Me White to help the pastels show up more.  Then, after wetting and wringing out a cheap make up sponge (from the dollar store), I painted the pastels in a square pattern on the sponge:
Then I just sponged them on to the nails in an up and down motion.  It took three coats to get the colors to where I wanted them.
Don't forget to top with top coat.

Hope y'all enjoyed today's post!  I'm going to give up on doing anything useful for the day and veg in front of the tv!  Happy Polishing!!


Thursday, May 22, 2014

Tahitian Sunset (or Peach/Orange Gradient)

Hey Y'all!!  I've missed y'all so much!!  I told you things were insane, and they have been!  The end of the year is always so busy, but this year seemed even busier than normal.  And if all that wasn't enough, I thought I would enter a nail art competition.  Ah, stress.  And even though I'm losing the competition, I at least have a bunch of nail art designs coming up for you!  And if you follow me on Instagram, you can see all the designs :)

For today I have what I'm calling Tahitian Sunset because it reminds me of Tahiti:
I Used:
Sinful Colors- Hot Chili (dark rusty orange with micro holographic glitters)
Sinful Colors- Coral Riff (bright coral with subtle blue shimmer)
Sinful Colors- Anchors Away (yellow creme with strong orange undertones)
Make Up Sponge
Y'all know how I do gradients (and if you don't, just click gradient under the labels in the left hand column), so I'll skip the directions.

These Sinful Colors all came from their Simmer Down collection.  I can not tell you how much I love this collection!!  All the colors remind me of sultry, tropical nights!  And all the formulas worked beautifully!
I hope y'all have a fabulous day!!  Happy Polishing!!

Tuesday, April 29, 2014

Spring or Summer Daisy Pedicure

Hey Y'all!!  So as promised, I would give you the tutorials for the designs used in the May issue of Atlanta Parent.  I did three designs for the article, so here's tutorial number 1.  This was my favorite design, but they didn't use it.  Oh well.  These daisies will be perfect for Spring and Summer!
I Used:
Wet-n-Wild- Cursed (orange jelly)
Wet-n-Wild- Get Lucky (yellow crème)
Finger Paints- First Edition (dark neon purple)
White Rhinestones
Medium Dotting Tool (toothpick would be perfect here)

This is a quick and easy pedicure.  I started with three coats of Wet-n-Wild Cursed.    Drop a couple of drops of your polish(es) on a piece of paper to dip your dotting tool into.  Next I started making the flowers with a medium sized dotting tool.  Start with a small dot to show the center of your flower.  Then make five slightly larger dots around that dot.  A toothpick would work perfectly for this.  Be sure to leave a little space between your center dot and your petals for the rhinestone.
Next, apply your top coat.  Make sure to make it a pretty thick coat, and do only one nail at a time.  Before it dries (or move on to the next nail), drop your rhinestone in the middle of your flowers.  Then press them down very easily.  This will set the rhinestone down into the top coat and give you a very secure stone.  I wore this design for a long time without losing a stone.

Hope y'all enjoyed today's pedicure!!  Two more to go!  Happy Polishing!!

Friday, April 18, 2014

Rainbow Splatter

Hey Y'all!!  TGIF!!!  I don't think I've ever been more excited to see a week end!!  I've decided that Friday is the end of the week, cause I can't take anymore bad days!  The teen and I have a bunch of running around to do, so let me get to today's post!

I have a Rainbow Splatter for you:

I Used:
Sinful Colors- Snow Me White (white crème)
Orly- Grave Mistake (dark red crème) on pinky only
Sinful Colors- Feel The Vibe (bright orange crème) on pinky & ring fingers
Sinful Colors- Chick Chick (bright yellow crème) on ring & middle fingers
Sally Hansen- Kelp Out (green crème) on middle and index fingers
Sinful Colors- Jolt (bright blue crème) on index fingers & thumbs
Sinful Colors- Go Go Boots (purple crème) on thumbs only
Plastic Straws
Beauty Secrets Nail Polish Thinner

So splatter nails are not my favorite technique...by far!  Although I did change how I did it this time, it was still kind of hard and messy.  For this mani I started with two coats of Sinful Colors Snow Me White.  Once that dried, I put tape around my fingers to help with the clean up.  Then I put a few drops of polish on a paper plate and added about 4 drops of thinner to it.  For what polish was put on what finger, check the list above.

Then just dip the straw into the polish and blow.  Which is easier said than done, lol.  For me, only one out of every 15 blows worked.  I was finally getting the hang of it on the last nail, of course.  I will advise you put down a newspaper.  And blow gently.

I hope y'all enjoyed today's post!  Happy Polishing!!


Wednesday, April 16, 2014

Multicolored Water Marble

Hey Y'all!!  Happy Hump Day!!  I'm so happy this week is half over!  I've had so many computer issues...it was driving me nuts!  I know, first world problems, but it's so frustrating when things don't work!!  Like, suddenly, all my pictures on my blog are missing (Monday's problems)!  But it's going to be a better rest of the week, right?  Just lie to me and say yes!

Anyway, as you may know (and if you don't, shame on you), my blogging buddies and I have entered a contest at Preen.me under the name Polish Mavens!  Just CLICK HERE to see, share and like our entries!!  Pretty please!!  So this week's theme is multicolored and here is my first entry:
I Used:
China Glaze- White On White (white crème)
Sinful Colors- Chick Chick (bright yellow crème)
Sinful Colors- Energetic Red (bright red orange crème)
Sinful Colors- Jolt (bright blue crème)
Sally Hansen Triple Shine- Kelp Out (bright green crème)

If you want to see my water marble tutorial, just click here.
Please excuse the dry hands.  I was out in the cold and wind all day and this was the only chance of getting a picture in the "sun".  I know it's not sunny, but this was as close to sun as I was getting.

If you want to vote for our manicures, just go to our page and like and share our photos!  You can also go to instagram and like our photos, that will count as a vote too!

Thanks so much Y'all!!  And Happy Polishing!!

Thursday, April 10, 2014

Spring Flowers

Hey Y'all!!  I'm so happy that we finally are having some Spring weather during our Spring Break.  And sad, because the week is almost over and then it's crazy busy until the end of May.  I'm already tired just thinking of it!  But to celebrate the gorgeous weather, I have some Spring Flowers for you:

I Used:
Sally Hansen Triple Shine- Dive In (light blue crème)
China Glaze- White On White (white crème)
Sally Hansen Triple Shine- Kelp Out (bright green crème)
Sally Hansen Triple Shine- Vanity Flare (medium purple crème)
OPI- Hey Baby (bright pink crème)
Zoya- Darcy (bright yellow crème)
Liner Brush
Plastic Wrap
Dotting Tool

This is a fun and easy mani, it just requires a few steps (but not a lot of time).  I started off with two coats of Sally Hansen Triple Shine Dive In, a pretty light blue crème.  It looked like the sky to me.  When that was dry, I balled up some plastic wrap and dipped it in China Glaze White on White.  Then just dabbed it on my nails for clouds.

I used a liner brush to make the grass.  Just start at your free edge and sweep up.

Then use a dotting tool, pen or toothpick to make the flowers.  Then just top everything off with top coat!

Hope y'all enjoyed today's mani!  What's your favorite part of Spring Break?  For me, the warmer weather and longer days!  Ok, the un-fun part of being a grown up...I'm off to the grocery store.

Happy Polishing!!


Monday, April 7, 2014

Review: Wet-n-Wild Street Art Collection, Part 1

Hey Y'all!!  How are you?  I've missed you.  I'm so sorry I've been missing the last couple of days.  I have two excuses though!  One, I had to work on an exciting project!!  Which, I can't tell you about for another three weeks, but it's a very fun thing!  Second, I was so sick for the last few days.  But it's a cold, rainy, yucky day here, so I'm going to work on getting caught up on all my posts!

And this is a fabulous one!!  I have the new Street Art Collection from Wet-n-Wild.  I have to tell you, I'm beyond happy about the bold, colorful collections for this Spring and Street Art is fabulous!!  All polishes were bought by me for $0.99 each.  Let's get started!

Get Lucky

Get Lucky is a bright, highly pigmented yellow crème.  Pictures show three coats with top coat.
The formula was fine.  It was very streaky, but that's pretty typical of any yellow polish.  It did smooth out perfectly in three coats.  And the intense yellow is worth it!  So bright and pretty!

Cursed

Cursed is a bright orange jelly.  Photos show three coats with top coat.
The formula for Cursed was great!  It took three coats to make it opaque, but it kept it's wonderful squishiness.  There wasn't any balding or streaking.

Temptation
Temptation is a highly pigmented salmon crème.  Pictures show three coats with top coat.

The formula for Temptation was good.  There was some streaking which is why it took three coats.  And, both acrylic and natural ladies, be sure to wear a base coat because there was a little staining.  Although the stains disappeared after the next mani.  Even though this was the hardest of the six to apply, it is well worth the effort.

These colors were all gorgeous!  I love each and every one of them!  And for only 99 cents each, you can't lose!  There are three more colors in this collection, and I'll have those up for you next!

And don't forget to enter the fabulous GIVEAWAY sponsored by Coupons.com!!

Stay warm, and if you have sun, enjoy it for me!  Happy Polishing!!


Wednesday, March 19, 2014

Spring Reciprocal Gradient Tutorial

Hey Y'all!!  Happy last day of Winter!!  Finally!!  So, I've decided to continue my rebellion against
Winter with another Hurry Up Spring nail art design!  This may seem complicated as there are a few more steps than normal, but it doesn't take long and is so worth it!  So here is my Spring Reciprocal Gradient:
I Used:
China Glaze- White on White (white crème)
Sinful Colors- Unicorn (pale yellow crème)
Sinful Colors-Cream Soda (pastel peach crème)
Sinful Colors- Cotton Candy (pastel pink crème)
Sinful Colors- Mad About Hue (lilac crème)
Make Up Sponges
Scotch Tape

Start this Spring mani with two coats of white, I used China Glaze White on White.  I started with a white base coat to make sure the colors pop.
Next, paint thin lines of nail polish on a damp make up sponge.  Make sure that the lines are about the same length as your nails.  The order of colors is:  yellow, peach, pink and purple:
I made the yellow and peach a little thicker since the colors are so light.  Then dab the colors on your nails.  Remember to move the sponge around a little to make sure the colors blend.  This will require two coats, but they dry fast.
Once that has dried, place scotch tape on both sides of your nails making a vertical stripe.  I painted the stripe white, again to make sure the colors show.  Then repeat the sponging going the opposite way:
This takes two coats too.  Immediately remove the tape after the second coat.  Top your design with top coat and you're done!
I hope y'all enjoyed today's nail art!  Have a fabulous day and Happy Polishing!!


Monday, March 3, 2014

My "I Don't Care If It's Still Winter I Want Spring" Nail Art

Hey Y'all!!  Happy Monday!  Did you have a great weekend?  I had a pretty good one.  The weather yesterday was gorgeous! 72 degrees.  Ahhhh...a hint of Spring.   Sadly, just a hint.  Today's weather STINKS!!  Cold, windy, rain, temperature of 50.  This makes me so sad.  So I'm rebelling!!  I've had it with Winter!  I don't care what the calendar says, I'm starting Spring!  Today! 

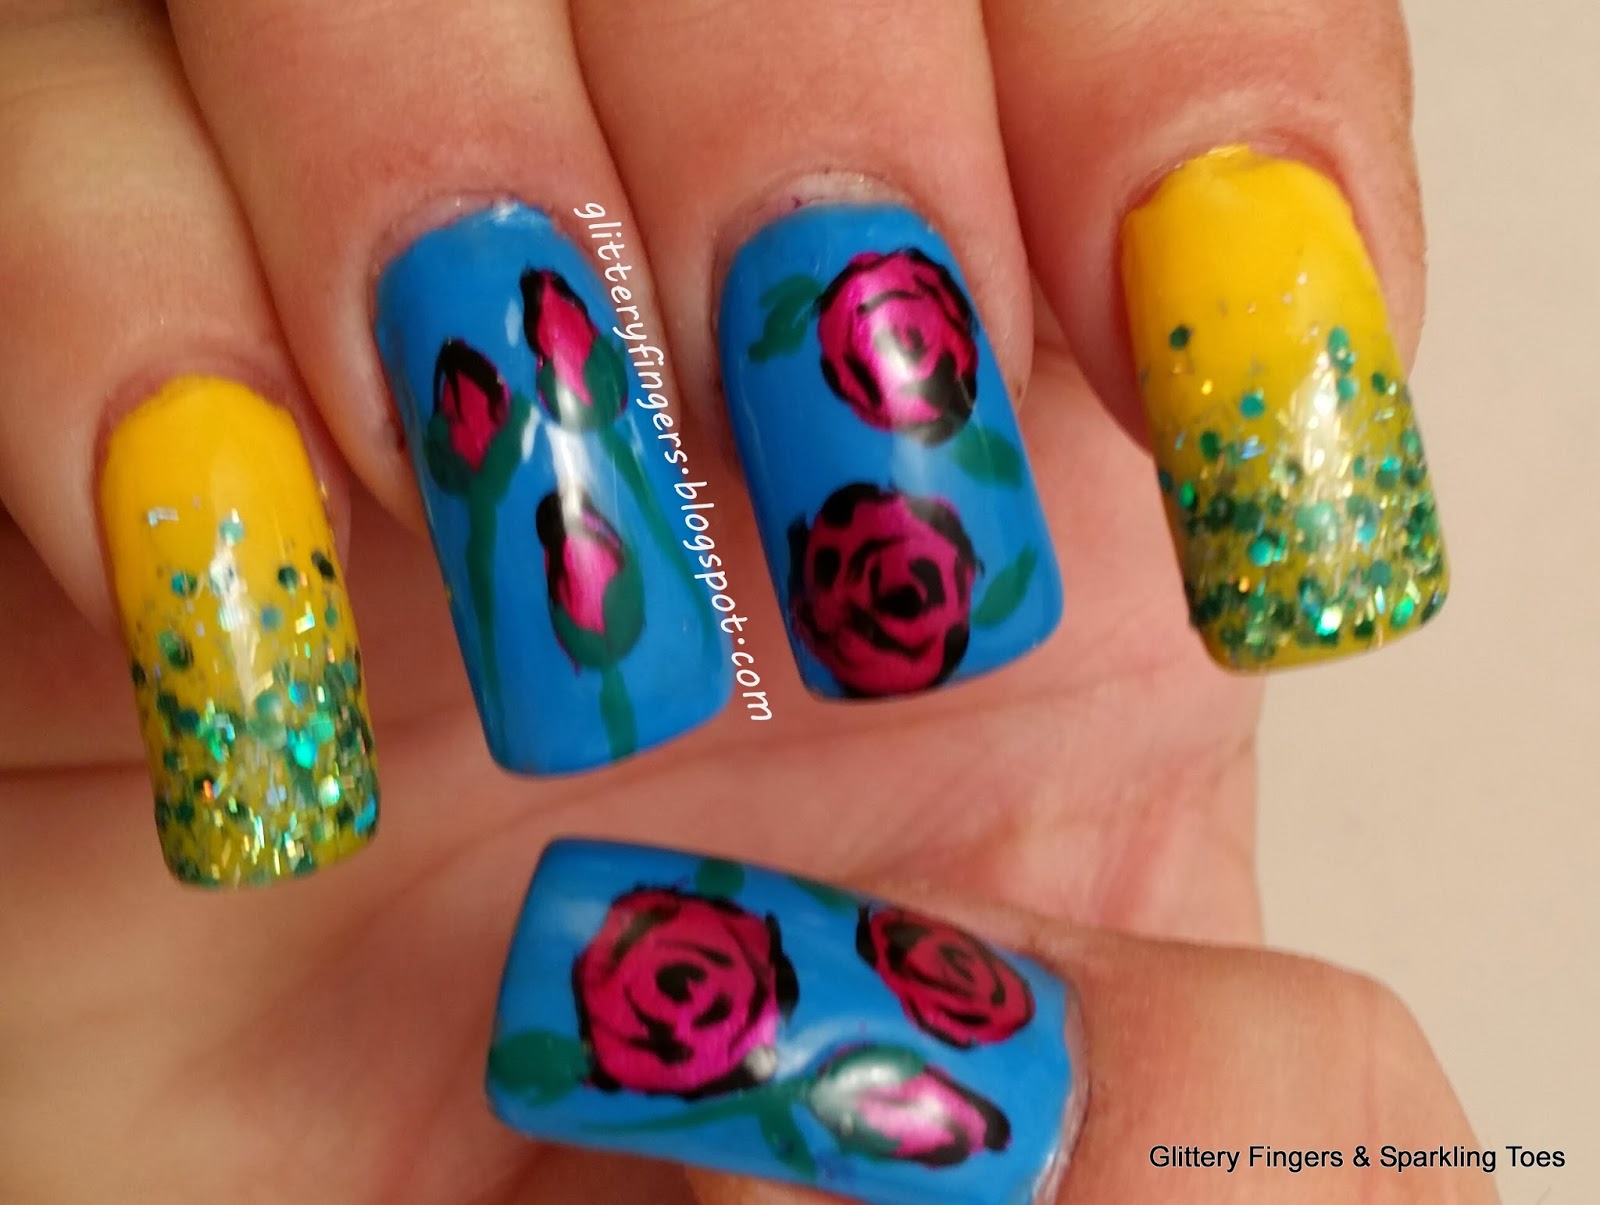
So here's my "I Don't Care If It's Winter, I Want Spring" nail design:
Left Hand
Right Hand
I Used:
Zoya- Darcy (bright yellow crème)
Lakme- Aqua Blast (bright blue crème)
OPI- Flashbulb Fuschia (bright fuchsia shimmer)
LA Colors- Palm Tree (green crème)
China Glaze- Liquid Leather (black crème)
Orly- Monster Mash (green holographic medium glitters and small green holographic bar glitters in light green jelly base)
Large Dotting Tool
Very Fine Detail Brush

Now for the tutorial :)  To start, paint your nails yellow and blue.
I used Zoya Darcy in my index and pinky fingers, and Lakme Aqua Blast on the rest.  Then, using OPI Flashbulb Fuchsia and a large dotting tool (the biggest. a pen would work great), make large blobs and teardrop shapes:
These do not need to be perfect.  In fact, perfect would look odd.  For the rose buds, use a green polish, and make leaves covering the lower part of the bud.  Then a straight line for the stem.  On the bud, use black polish to outline the bud and add one curved line from the tip to the bottom to outline one of the petals.
For the roses, using black nail polish, start in the center of the blob and make a little c.  Then make varying sizes of shaky c's going all the way to the outside edge.  On the very edge, make sure you don't completely fill in the line....leave some of the blob showing.
Then on your yellow nails, use your glitter polish to make a gradient.  Start 3/4 of the way down your nail and paint towards your tip.  Then 1/2 way and then 3/4 of the way.  Don't forget the top coat to save your hard work!

Join me in fighting Winter!!  If we all decide that we've had enough, I just know it will go away.  It has to!  Join the fight!!!!

And Happy Polishing!!