Showing posts with label gold. Show all posts

Thursday, June 11, 2015

KPT Same Fall Different Beginning

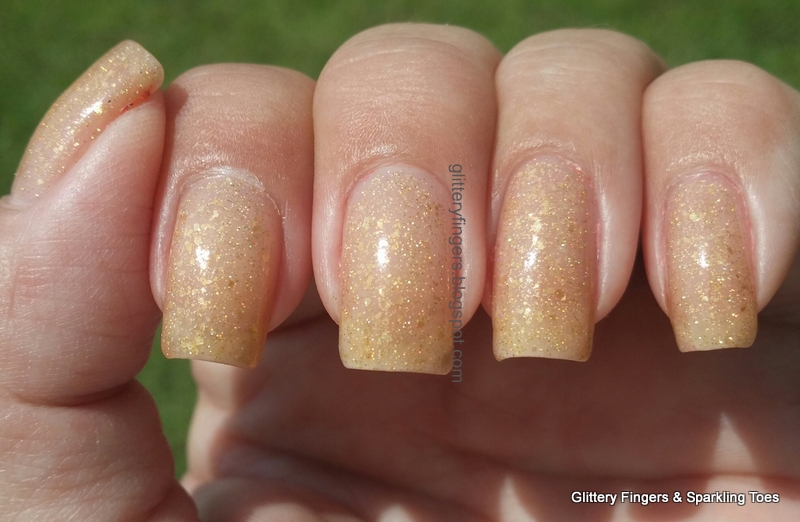
Hey Y'all!  I'm so excited because today I have my very first KPT Polish!  Again, thanks to the fabulous Liz from A Mani Maniac!  Love her!!  She sent me KPT Same Fall Different Beginning:
I'm so sad, because no matter how hard I tried, I couldn't get this polish to show all it's glory in the photos :(

KPT Same Fall Different Beginning is a very sheer nude with subtle scatter micro holographic glitters and micro and flake gold glitter.  The pictures show three coats with top coat.  Yep that's 3 coats so I wasn't kidding about it being sheer.
The formula was wonderful.  It applied smoothly without any issues.  And the finish is still sheer, you will still have a visible nail line.  But you won't care! This polish is so gorgeous!!  And very subtle.  This would be perfect to wear to the office.  Or in/to a wedding!  Any where you have to be more conservative, but still want to be you!
This was my first KPT, but won't be my last!

Have a fabulous day!  Happy Polishing!!

Wednesday, April 1, 2015

Red and Gold Sequin and Gradient Mani

Hey Y'all!!  Happy Hump Day!  How is your week going?  Mine is ok.  It's that time of year when I'm miserable...pollen.  Everywhere!  I can't stop sneezing.  And the worst part is that the pollen isn't even that bad yet :(  But at least I still have a post for you :)

So here is today's mani:
I Used:
OPI:  Over & Over A-Gwen, a red crème
OPI:  Love. Angel. Music. Baby., a satin gold metallic
Orly: Lavish Bash, a micro gold glitter with holographic bar glitter in a clear base
Red and Gold Sequins
To start this mani, I painted my thumb, pinky and ring finger with OPI Over & Over A-Gwen, a pretty, bright red crème.  Then I painted my index and middle fingers with OPI Love. Angel. Music. Baby., a satin finished gold metallic.  Once that was all dry, I used the brush that came with the polish to dab on Orly Lavish Bash to form the gradient.
To place the sequins, I used a dotting tool and Seche Vite top coat.  I just put a dot of the top coat on my nail where I wanted to place the sequin, then sunk the sequin down into the dot.  Try to get the sequin as flat to your nail as you can.  Otherwise, they will pop off pretty easily.  Then just top off everything with top coat!

I hope you enjoyed today's mani!  Happy Polishing!!

Wednesday, March 18, 2015

NOTD: Finger Paints Gilded Chrome

Hey Y'all!!  How are y'all doing today?  I'm exhausted.  Long, long day yesterday and up early today.  The teen has a field trip then dance class and rehearsal so let's get right to today's post.

So for today, I went gilded, Finger Paints Gilded Chrome:
I won this from Finger Paints (it was one of three polishes).  I wasn't feeling too well today and decided I wanted a lot of bang for very little effort.  Then I remembered the polishes I won from Finger Paints!  Pictures show two coats of Gilded Chrome with two coats of top coat.
Gilded Chrome is a textured, heavily glittered pack polish in a clear base.  It is PACKED with glitter!!  The glitter is multi sized, goldish silverfish colored.  It gives the look of slightly tarnished silver.  I LOVED how this looked!  Some of the glitter has a more matte effect while the bigger glitter is super reflective. 
While I loved the look, I wasn't that impressed with the polish.  First I had to use a top coat because the texture was SO rough I was scratching myself.  And it hurt.  It took two coats to get it smooth enough for me to be able to live with it.  Second, the wear was horrible.  In less than a day, I was chipping.  A lot.  Although I did get complete coverage in two coats.  I'm really on the fence about it.  I loved the way it looked on the nail, but hated the way it felt and how little wear I got from it.  I will probably wear it out for a special night, but only for that night.

I hope you enjoyed today's post!  Happy Polishing!!

Monday, March 16, 2015

St. Patrick's Day Mani

Hi Y'all!!  I'm back!  I'm so excited to be back!  And I mean it this time.  I am so sorry for being gone so long.  And so thankful to all of you who have stuck with me.  I have been posting on facebook, instagram and twitter, so if you aren't following me on them, click the buttons on the right!

So where have I been?  First, this summer I received some bad health news.  I was diagnosed with Chronic Kidney Disease.  Right now I am in the beginning stages of it, so I am ok.  Then I lost three uncles in three weeks, found out some shocking family news, was stung by a scorpion (in my house!) and found out I am allergic to them and on Thanksgiving Day, I crushed my fingers destroying my nails.  Then I got an infection in two of my nails.  It's been a whirlwind of not such good things, lol.

But I am excited to be blogging again (and I already have a few designs ready for the rest of the week).  So, since tomorrow is St. Patrick's Day, I have a Paddy day mani for you:
I Used:
Celestial- T's In A Tizz (green linear holographic)
Sweet Heart Polish- Sands of Time (light gold metallic)
China Glaze- Dandy Lyin' Around (white with white micro glitter)
Poparazzi- Never Too Rich (multi sized green holographic glitter in a clear base)
Orly- Lavish Bash (gold micro glitter and bar holographic polish in clear base)
Liner Brush
This was an easy and fast mani design!  I started by painting my thumb and pinky with Celestial T's In A Tizz, a beautiful Kelly green linear holographic polish...thanks Gini!!  Then on my index and ring fingers, I used Sweet Heart Polish in Sands of Time, a soft gold metallic...thanks Liz!!
Then China Glaze Dandy Lyin' Around on my middle finger, it's a pretty, soft white with white glitter.  Then I topped the gold with Poparazzi Never Too Rich, a clear base with multi sized green holographic glitter.  Poparazzi is a new polish at CVS that seems to have replaced Spoiled.  While I loved how this looks, it took a lot of fishing for glitter to get that look.
Then, using a liner brush and Celestial and Orly polishes, I created a waterfall on my middle nail.  Then top coat over all my nails.

I really hope y'all like today's mani!  I think I'm ready for St. Patrick's Day!  Happy Polishing!!


Monday, July 28, 2014

Pink & Bronze Fan Brush Design

Hey Y'all!!  Happy Monday!  I hope you had a good weekend.  We didn't do much which was a nice change.  We caught up on our "America's Got Talent" shows...love that show!  And just spent time loving on our fur babies and each other.  Plus I spent time trying to teach my 90+ pound fur baby that she can't do the same things as the 9 pound fur baby.  In other words, no Tillie, you can't run across the room and jump in Mommy's lap...you are going to squish Mommy!  But I do make that fun sound when she lands on me and all the air rushes out of my body...she likes that sound.

I do have a new design for you today...I think I've finally figured out how to do a Fan Brush design:
I Used:
Studio M- Hot Zone (neon pink with blue shimmer)
Orly- Hot Tropics (neon magenta with a gold shimmer)
Sinful Colors- Gold Medal (antique gold/bronze gold metallic)
Fan Brush
I started this manicure with two coats of Studio M Hot Zone, a gorgeous neon pink with a blue shimmer.  Next comes the fan brush.  This takes practice, at least for me, lol.  Put a little polish on a piece of paper (or foil, or paper plate) and dip your fan brush into the polish.  Then dab the excess polish off.  You want to remove the majority. Then, just run the fan brush vertically across the nail.  Start on one side, then start on the other side of the nail.
You may have to go over the nail several times to get the look you want.  I also went over the nails with the base color, using the fan brush, to make it stand out more.  Once you get the look you want, top off with top coat.

I hope you enjoyed today's mani!  Happy Polishing!!


Tuesday, May 27, 2014

Born Pretty Store Review: Arabesque Water Decals

Press Sample

Hey Y'all!!  I'm so excited about today's review, I'm going to get right to it! Today I have Born Pretty Store Arabesque Water Decals.  This is a rather large sheet that comes with gold and black curly-q designs:
And they are absolutely gorgeous on the nail!  First up, the black:
And now the gold:
Aren't these beautiful??  I can't tell you may compliments I received on these!  And they are so easy to apply.  Here is my other hand:
To apply, simply paint your nails and let them dry completely (the polishes used are listed at the bottom of this post).  Then cut out the design you wish and dip in water for about 10 seconds.  Remove the decal from the plastic backing and place on your nail.  As long as the decal is wet, it is very easy to move around so you don't have to worry about getting it exactly right the first time.  I do suggest using tweezers to place them.  Once the decal is where you want it, gently pat dry.  It only takes a couple of seconds to dry.  Then just top with top coat.  Any excess or any on your skin is easily removed with acetone.

It took all but about an inch of each color to do a full mani, so if you like them, I suggest ordering more than one!

Not only are they gorgeous on, they lasted a long time!  I wore each design for 6 days!  And the best part?  These can be yours!  Easily!  They are $4.99 a sheet, but with the code NE5J61, you can get a 10% discount!!!  And free shipping world wide!!

Just CLICK HERE TO ORDER!!!  And don't forget the discount code:  NE5J61 

The polishes I used are:  Studio M- Volt of Light (yellow neon with a subtle blue shimmer) and Orly Saturated (dark purple neon)

I hope you enjoyed today's review!  Happy Polishing!!

Friday, May 23, 2014

Studded Mint & Gold Half Moons

Press Sample

Hey Y'all!!  Happy Friday!!  Anyone have plans for the holiday weekend (here in the US it's Memorial Day)?  We only have plans to do nothing!  We've gone for 4 straight weeks, so we plan to be complete couch potatoes this weekend.  Plus the hubby has to work today and Friday.  But it will be so nice to sleep in!

For today I have an elegant twist on the Half Moon, Studded Mint & Gold Half Moons:
I Used:
Sally Hansen Insta-Dri- Mint Sprint (dark mint/turquoise crème)
Sally Hansen I Love Nail Art Stud Kit- gold studs

Preen.me sent me a bunch of fun and fabulous Sally Hansen products to try (and you will see them all in up coming posts)!  And this design leaped out to me the second I saw the products!  I think this is such a modern and elegant take on half moons and is a whole lot easier to do!
Start with two coats of Sally Hansen Insti-Dri in Mint Spring.  Loved this polish!  It was a dream!  And to be honest, you can get away with just one coat.  I can't...I just have to do two.  I just do.  Plus I think the mani last longer with two coats, but that is just my opinion.
The gold studs are part of the Sally Hansen I Love Nail Art stud kit.  It comes with gold studs, and black and white rhinestones and a rubber tipped stick to help with placing them.  This is such a fabulous kit!  And it contains a lot of studs.  After completing this many you could barely tell I used any of them! 

For the next step, you need to work with one nail at a time.  Paint a pretty thick coat of top coat then working quickly, place the studs.  I chose to place them in a more triangular shape...makes me think of art deco, which I love.  Once all the studs are placed, apply another coat of top coat to secure your look!

I hope you enjoyed today's look!  Happy Polishing!!

Thursday, April 17, 2014

Turquoise Plastic Wrap

Hey Y'all!!  How's your Thursday going?  Mine sucks!!  Hubby has food poisoning from something he ate at work.  At WORK!!  Not from my cooking!!!  But yucky and unfun day ahead.

So let me get right to the post!  Today I have Turquoise Plastic Wrap Nails for you:
I Used:
Summer Brights- No name (turquoise satin finish)
Orly- Love. Angel. Music. Baby. (gold satin finish)
Orly- 4 In The Morning (black satin finish)
Plastic Wrap

I started with two coats of Summer Brights, a no name satin finish turquoise.  Then, using balled up plastic wrap, I dabbed on first the black, then the gold.
And since I wanted everything to be nice and glossy, I did top it off with top coat.
Sorry for the short post, but I guess I should go take care of the sick hubby :(

Hope y'all have a great day!  Happy Polishing!!

Monday, March 31, 2014

Spring Water Marble

Hey Y'all!!!  I am SO sorry I've been missing the last week.  I woke up Tuesday with the plague!  Ok, maybe it wasn't the plague, but it felt like it.  I had bronchitis, sinus infection, fever, I was miserable.  But I'm on the road to recovery!! And I have a fabulous week of posts for you!  Including tomorrow!  There are 100 fabulous reasons to visit the blog tomorrow...no April Fool's joke.

But for today, I have a Spring Water Marble for you!!
I Used:
Orly- Cheeky (medium peach with gold shimmer)
Zoya- Raven (black crème)
Pure Ice- Jaguar (gold shimmer)
I added the black because it's still cold and that makes me mad!!  Also because I love black and peach together, lol.

Be sure to look under popular post in the right hand column for Fall Water Marble, for step-by-step directions for water marbling.

I hope y'all enjoyed today's post!  Don't forget to come back tomorrow for the big surprise!!  Happy Polishing!!


Tuesday, March 11, 2014

TIOT: Sparitual Strength Diamond Shimmer

Hey Y'all!!  How are you?  If you're in the US, have you adjusted to Daylight Savings Time?  I think my computer has.  At least it's loading today's post!  I on the other hand am having a harder time getting use to it.  But I do love how it stays light longer.  And it means warm weather is on the way.  It's 77 here today...of course it will be 28 on Thursday so it's short lived :(  And I hate going to the bathroom in public in the winter!!  As though the stalls aren't small enough I have to wrestle a big coat too!!!  Not happy!

Ok, enough complaining. On to Try It On Tuesday!  Today I have Sparitual Strength Diamond Shimmer:
Strength Diamond Shimmer is a medium dusty rose with a gold, almost glass fleck shimmer.
Look at that sparkle in the sun!!  It's beyond gorgeous, and sparkled like mad!
Pictures show two coats with top coat. The formula was good.  I didn't have any trouble with streaking or balding.  The only real issue I had was it took a little longer to dry than normal, but it wasn't a real long time.
While Sparitual is sold all over, like in Ulta, I bought this at TJ Maxx for just $3.99.  And I have to say, I'm pretty happy with it!

Have a fabulous day y'all!!  Happy Polishing!!


Friday, February 14, 2014

Valentine's Day Mani

Hey Y'all!!  Happy Valentine's Day!!  Do y'all do anything special for Valentine's Day?  The hubby and I never really have.  Mainly because our anniversary, my birthday, our now-a-teen's birthday and his birthday all hit late January through February.  Then if you include parents, his siblings, aunts and uncles...it's insane!  So, truth be told, we are usually too broke for Valentine's, along with being way over sweets by then!

Also, I'm not much of a heart and flower kind of person, which is why you only see one Valentine's mani each year, but I did come up with one this year.  And I really like it.  Simple:
I Used:
LA Colors- red crème (no name)
Finger Paints- Oh My Gauche (small gold glitter in clear base)
Fine Detail Brush

I started with three coats of LA Colors in a red crème.  I'm kind of sad about this...it didn't give me a completely opaque look, even after three coats.  But it's one of those things I didn't notice until I was editing the pictures.  Oh well.
Anyway, once that dried, I used a very fine detail brush and hand drew the hearts.  Then filled them in using the same brush.
Don't forget the top coat!

Be sure to share your Valentine's Day plans with me, especially since I don't have any :(

And, if you haven't already, be sure to enter my GIVEAWAY!!!  Today's the last day!

Happy Valentine's Day and Happy Polishing!!

Monday, January 20, 2014

Gwen Stefani French Tips

Hey Y'all!!  First, wow!!  Thank you for all the love on facebook!!  I hit 1,100 likes this weekend and am thrilled!!!  Thank you, thank you!!  I'm gonna start collecting goodies for a Thank You Giveaway!! 

That was the icing on an already fabulous weekend!  See, today is my wedding anniversary.  24 years today.  I was 5 when we got married.  No, seriously, I was.  Would I lie to you?  Anyway, the hubby took me shopping.  We hit Saks Fifth Avenue and Sephora.  But before that, we went to lunch at our absolute favorite Italian restaurant, Ippolito's!  Yummy!!  That's where I ate a ton of garlic. Garlic makes me burp.  Garlic makes me burp like a 300 pound man named Bubba.  That explains why, in the middle of Saks Fifth Avenue, I let loose with a burp that would put any Bubba to shame.  Yep.  I did that.  I also quickly looked at my husband with a disgusted look and said, "Really?  Control yourself!"  Yep, I did that too!

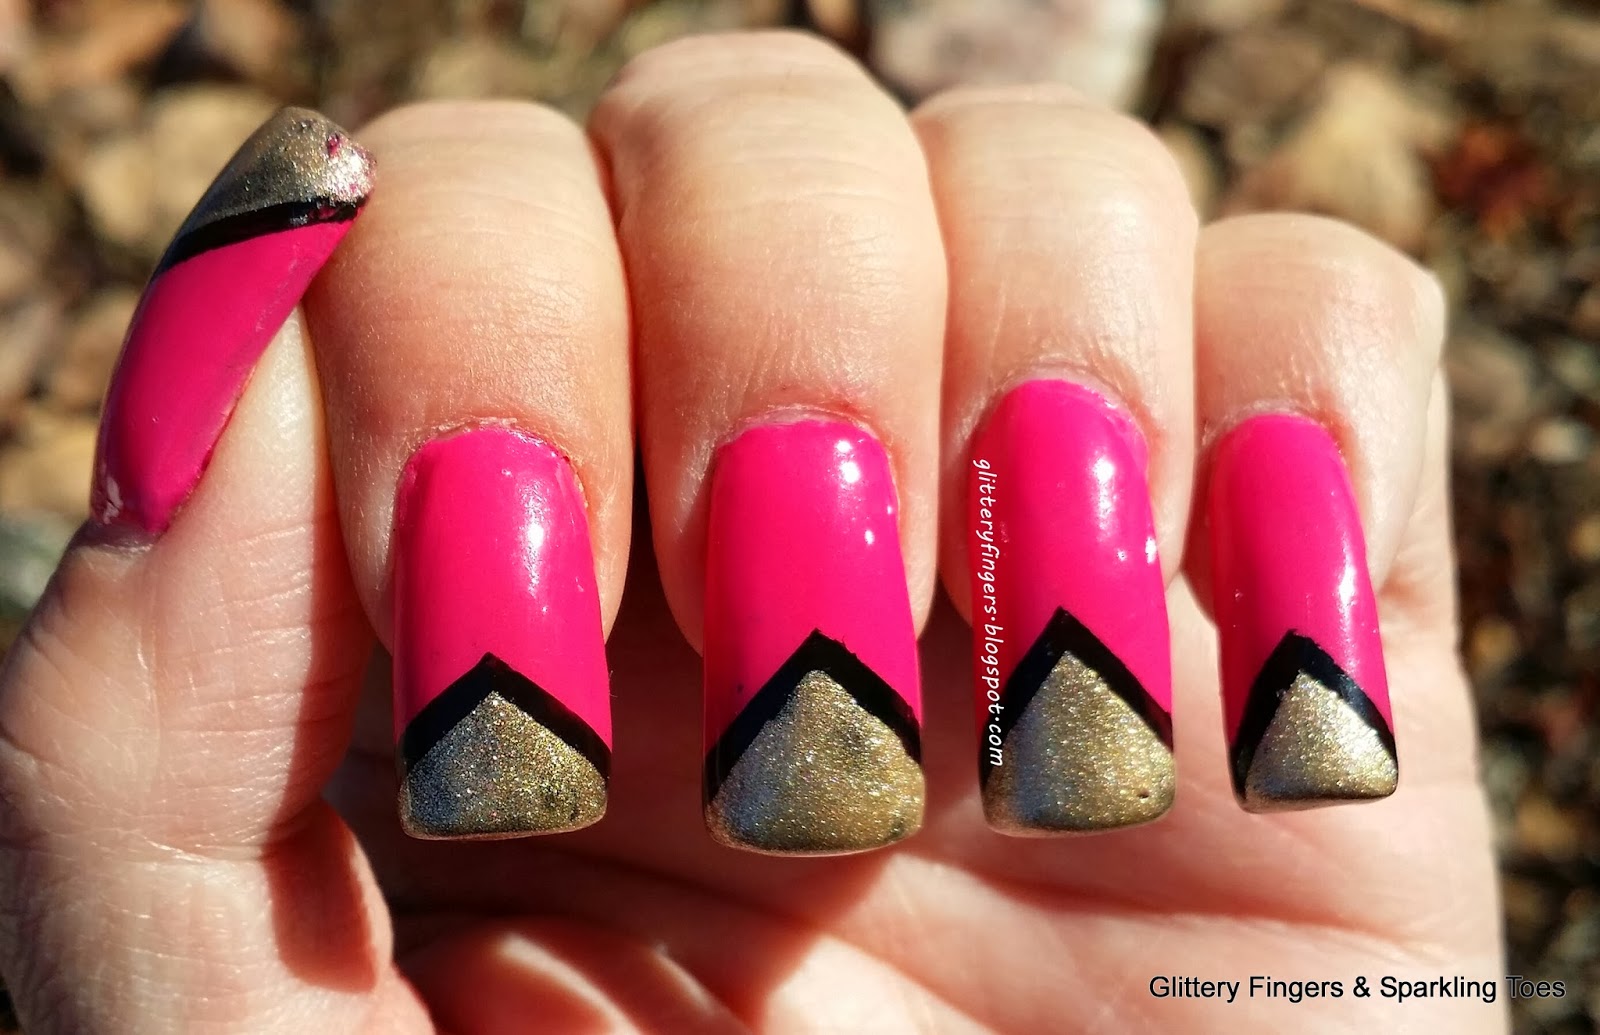
Ok, on to today's post.  Today I have French Tips using the new OPI Gwen Stefani collection:
I Used:
OPI- Hey Baby (bright pink crème)
OPI- Love. Angel. Music. Baby (gold shimmer satin finish)
China Glaze- Liquid Leather (black crème)
Striping Tape

This was a fun and easy mani to do, it just takes a little patience because you have to wait for each color to completely dry before moving on to the next step. (I'll do a review of the polishes on a later post)

To start, paint two coats of OPI Hey Baby.  Remember to let it dry completely.  Then using striping tape (or you could use scotch tape), tape off a wide V at your nail tip:
Fill in with your black polish and immediately remove the tape and let dry.  Then tape off all but a small edge of the black V:
Then fill in with OPI Love. Angel. Music. Baby.  Remove the tape immediately.  Now you can either leave it just like this to keep the satin finish of the gold, or use a top coat over the whole design.  I used a top coat because I wanted to wear this for a couple of days and wanted to make sure it would last.
I hope y'all enjoyed today's design!  And thanks so much for stopping by!!  I'll be back tomorrow with a Try It On Tuesday polish.  And remember, if you tell anyone about the burp in Saks....my hubby did it!

Happy Polishing!!


Friday, January 3, 2014

Colorful Waves-Inspired by Robin Moses

Hey Y'all!!  Now before I start this, I realize that SO many of you are in way colder places this morning, but I'm a Florida girl and this, this right here, just ain't right!  I'M SO COLD!!!!!  It's in the low 20's and the wind chill is in the low teens.  I'm not made for this weather!  I'm from Florida!  I still live in the deep south!  And if that wasn't enough, Tuesday's high is supposed to be 27 degrees!!!!!  WTH????? And that's the day we're out for 13 straight hours!!!  I'm not going to make it!

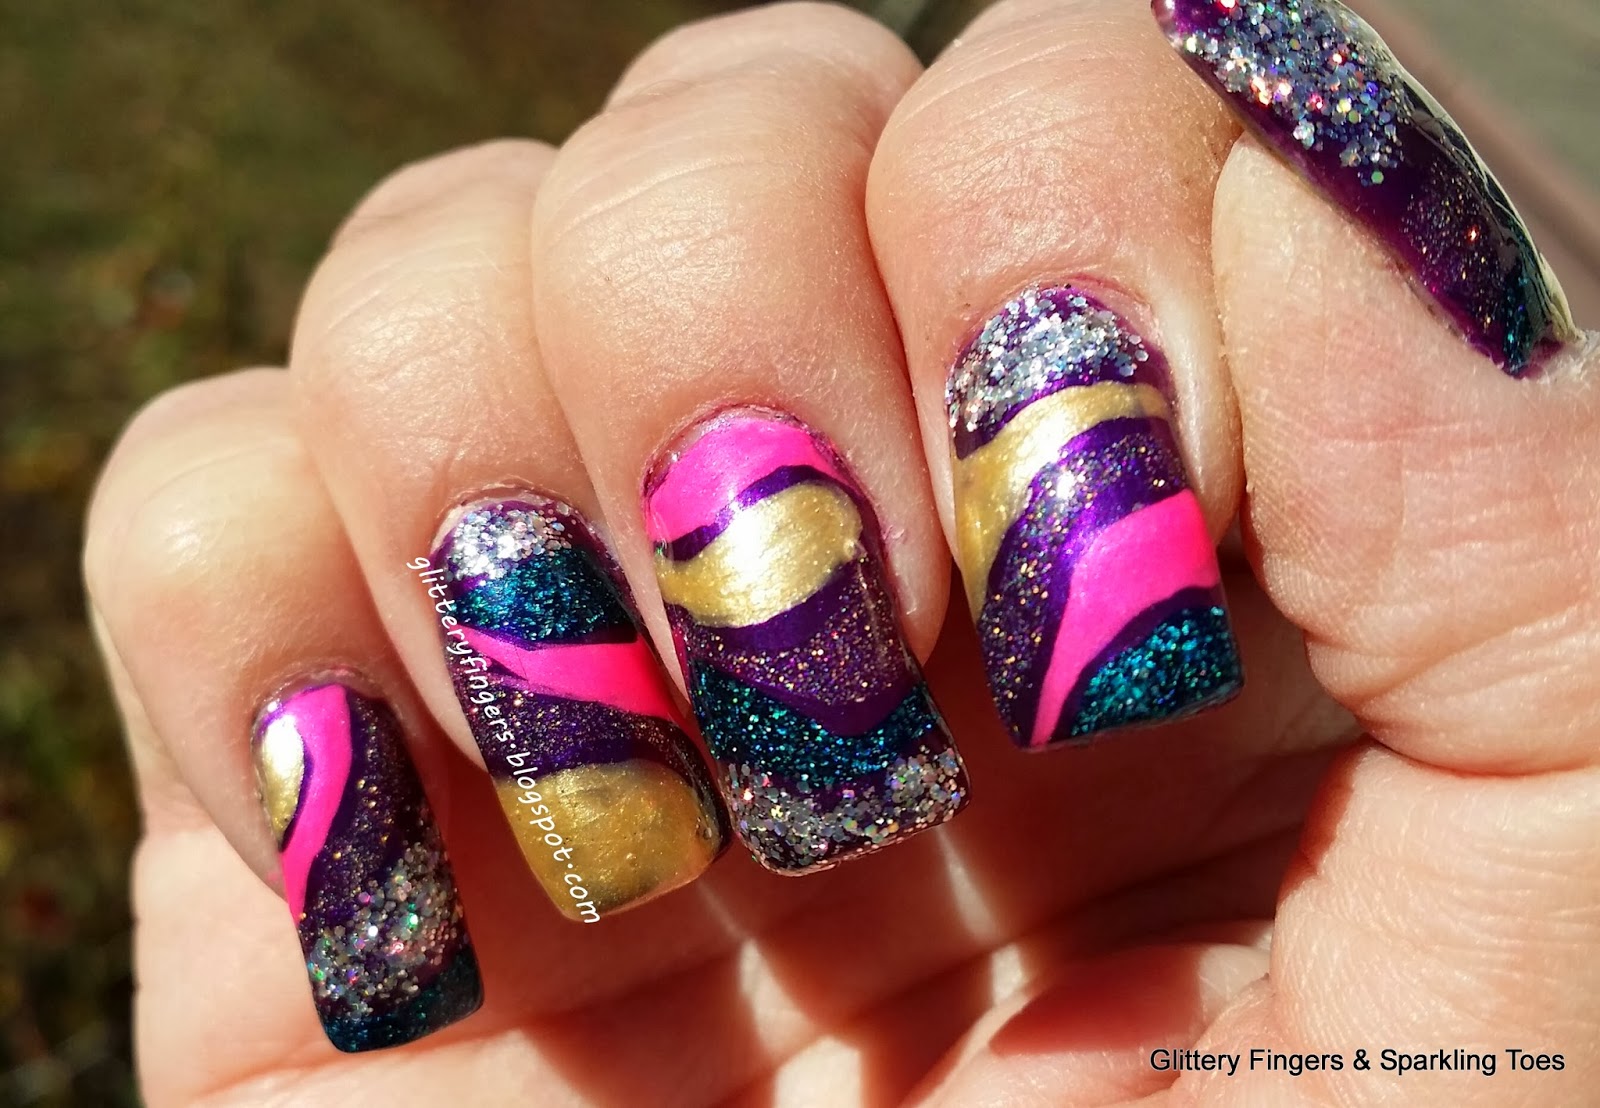
So, for my possible last post because I may freeze and have to wait to thaw out, I have some Colorful Waves inspired by the incredible Robin Moses!
If you don't know who Robin Moses is, you have to go right now to her you tube channel and see for yourself.  She is incredible!!  She is such an artist!!  And she makes it look so easy (it isn't), she's just chatting and joking away while meanwhile she is painting these incredible portraits.  I'm such a huge fan!!  And it isn't that often she does something that I think I can do, but this time she did!!  To see her fabulous design, and to get the tutorial, simply click here to see the video.

She used glitter polish, foil and loose glitter for her design, and I used all nail polishes for mine.

I Used:
Butter London- HRH (frosty dark purple)
China Glaze- Pink Voltage (neon pink)
China Glaze- Nova (small and medium holographic glitter in clear base)
Finger Paints- Sparkle Top Coat (milky base with micro gold glitter)
LA Girls- Teal Dimension (teal jelly base with micro holo glitter)
Pure Ice- Jaguar (light old frost)
 
 
I hope y'all enjoyed today's design.  And in all seriousness, y'all be careful out there.  For everyone living in the US, this cold front is serious.  Make sure you stay warm!

Stay inside and check out Robin Moses' You Tube channel!  I'll see y'all later!!  Happy Polishing!!

Monday, December 30, 2013

New Year's Eve Waterfall

Hey Y'all!! I'm back!!  Sorry for being gone since last Wednesday, but Mr. Glittery had the rest of the week off so we spent some family time together.  Christmas was pretty great.  It was just us this year, so it was quiet and calm, lol.  I even got some things from my wish list!  Some will be making an appearance soon.  So how was your Christmas??  Did you get what you were hoping for?  Are you ready for 2013 to be over?  Are you going to any parties?  Have I asked you enough questions??

Probably, lol.  So let's get right to the nail design.  Today I have a New Year's Eve Waterfall for you:
I Used:
China Glaze- Liquid Leather (black crème)
Pure Ice- Silver Mercedes (silver foil)
Pure Ice- Jaguar (gold foil)
Liner Brush

Let me start by saying, I do my waterfall designs a little different than everyone else.  Everyone else makes very close lines that are all, basically, the same length and width and tend to not end in a point but are more blunt.  I love that look.  I like to do mine with vary lengths, widths and tapered points.  That's just me.  I have to be different o_O!  You can do yours however you like.  There your nails!  Have fun with it.
I started with three coats of China Glaze Liquid Leather.  Yep, three coats.  My one constant concern with China Glaze polish is that it tends to be thin, and this batch of Liquid Leather was really thin!  Then just take a thin brush and, alternating silver and gold, paint thin lines from your tip towards your cuticle, lifting the brush as you go.
That's it!  I love this look for New Year's Eve.  It's subtle glitz.  Of course you can glam this up or down as much as you like.  To make it even more subtle, try using darker colors like blue and purple.  Or glam it up with silver and gold shimmers or glitters.  Make it your own!

I have a few more New Year's Eve designs coming up or you, so be on the lookout!  Until then, Happy Polishing!!