Hey Y'all! How's your week going? Mine is going good. We finally got sun yesterday, after nine straight days of rain. But then it got down to 45 degrees last night. I can't wait until we get sun and warmth!
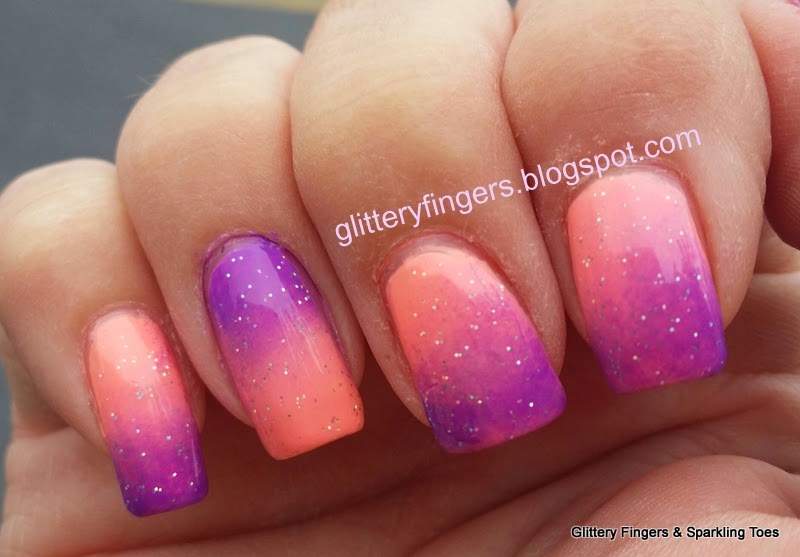
So during all the rain I decided I needed to brighten my nails up with this China Glaze Ultra Bright Gradient:
I Used:
China Glaze: More To Explore, an ultra bright peach neon crème
China Glaze: Plur-ple, ultra bright blue based purple neon crème
Orly: Shine On Crazy Diamond, micro holographic glitter in a clear base
Make Up Sponge
First, I love these new "Ultra Brights" from China Glaze. They are neon without being neon and without the matte/waxy finish. They are actually glossy. I guess that's why they are calling them ultra bright instead of neon, lol.
I also love the peach and purple combination! I love how they look together. My bestie liked it too...I think. She gave me the back handed compliment of, "I never would have thought to put these two colors together, but surprisingly, I like it." LOL! Nothing like a true friend to tell you the truth.
It kind of reminds me of a galaxy, but in unicorn land. Or maybe a sunset on a tropical island.
I hope you enjoyed today's mani! And I hope you have a wonderful day! Happy Polishing!!
Showing posts with label Gradient. Show all posts
Wednesday, April 22, 2015
Monday, April 13, 2015
Black & Silver Holographic Gradient
Hey Y'all!! How's your Monday going? We just had our Spring Break last week (which is why I didn't post), and I am so not ready to get back into the swing of things. There is just SO much happening in the next 5 weeks...I need more rest! And we didn't even do anything over the break. Pathetic, I know, lol.;
But on to today's mani, a black and silver holographic gradient:
I Used:
Color Club: Harp On It, a silver linear holographic
Celestial: Reaper Crew, a black linear holographic
Make Up Sponge
I love how this one turned out! I started with one coat of Color Club Harp On It, a silver linear holographic polish. Once that was completely dry, I sponged on the Color Club and Celestial Reaper Crew, a true black linear holographic polish.
When sponging on the gradient, I decided to do it vertically and alternated the colors. So it goes from side to side and silver to black to black to silver, etc. And despite sponging on the polish, it still had the linear effect. It wasn't as prominent as just brushing on the polish, but it was still there.
I hope you enjoyed today's mani! Happy Polishing!!
But on to today's mani, a black and silver holographic gradient:
I Used:
Color Club: Harp On It, a silver linear holographic
Celestial: Reaper Crew, a black linear holographic
Make Up Sponge
I love how this one turned out! I started with one coat of Color Club Harp On It, a silver linear holographic polish. Once that was completely dry, I sponged on the Color Club and Celestial Reaper Crew, a true black linear holographic polish.
When sponging on the gradient, I decided to do it vertically and alternated the colors. So it goes from side to side and silver to black to black to silver, etc. And despite sponging on the polish, it still had the linear effect. It wasn't as prominent as just brushing on the polish, but it was still there.
I hope you enjoyed today's mani! Happy Polishing!!
Wednesday, April 1, 2015
Red and Gold Sequin and Gradient Mani
Hey Y'all!! Happy Hump Day! How is your week going? Mine is ok. It's that time of year when I'm miserable...pollen. Everywhere! I can't stop sneezing. And the worst part is that the pollen isn't even that bad yet :( But at least I still have a post for you :)
So here is today's mani:
I Used:
OPI: Over & Over A-Gwen, a red crème
OPI: Love. Angel. Music. Baby., a satin gold metallic
Orly: Lavish Bash, a micro gold glitter with holographic bar glitter in a clear base
Red and Gold Sequins
To start this mani, I painted my thumb, pinky and ring finger with OPI Over & Over A-Gwen, a pretty, bright red crème. Then I painted my index and middle fingers with OPI Love. Angel. Music. Baby., a satin finished gold metallic. Once that was all dry, I used the brush that came with the polish to dab on Orly Lavish Bash to form the gradient.
To place the sequins, I used a dotting tool and Seche Vite top coat. I just put a dot of the top coat on my nail where I wanted to place the sequin, then sunk the sequin down into the dot. Try to get the sequin as flat to your nail as you can. Otherwise, they will pop off pretty easily. Then just top off everything with top coat!
I hope you enjoyed today's mani! Happy Polishing!!
So here is today's mani:
I Used:
OPI: Over & Over A-Gwen, a red crème
OPI: Love. Angel. Music. Baby., a satin gold metallic
Orly: Lavish Bash, a micro gold glitter with holographic bar glitter in a clear base
Red and Gold Sequins
To start this mani, I painted my thumb, pinky and ring finger with OPI Over & Over A-Gwen, a pretty, bright red crème. Then I painted my index and middle fingers with OPI Love. Angel. Music. Baby., a satin finished gold metallic. Once that was all dry, I used the brush that came with the polish to dab on Orly Lavish Bash to form the gradient.
To place the sequins, I used a dotting tool and Seche Vite top coat. I just put a dot of the top coat on my nail where I wanted to place the sequin, then sunk the sequin down into the dot. Try to get the sequin as flat to your nail as you can. Otherwise, they will pop off pretty easily. Then just top off everything with top coat!
I hope you enjoyed today's mani! Happy Polishing!!
Wednesday, March 25, 2015
The First Mani of Spring
Hey Y'all! So, it's theoretically Spring here in the south... This is such a "fun" time of year, lol. Today is supposed to be a warm 73 degrees, tomorrow 79...and Saturday is supposed to be 56. Have I mentioned how much I hate the cold recently? So despite the overcast and rainy day today, it is supposed to be warm and it is officially Spring, so I have a Spring mani for you today:
I Used:
Sinful Colors: Yellow Out There, a bright yellow jelly with small holographic bar glitter
Finger Paints: Aloha Lei, an orange glass fleck shimmer
Make Up Sponge
I started by using Sinful Colors Yellow Out There on my pinky and middle fingers and on my thumb. Yellow Out There is a bright, pretty jelly polish with very small holographic bar glitter. The pictures show three coats with top coat. This was a pretty typical jelly polish in that even after 3 coats, there is still a very visible nail line. I can't wait to try this in a jelly sandwich! And why I love the holographic bar glitter, I wish there was more!
Next I painted my index and ring finger with Finger Paints Aloha Lei, a bright orange glass fleck shimmer. I loved this color! Pictures show two coats with top coat. I was a bit disappointed in the wear time. I had to wait until the next day to take the pictures in the sun and as you can see, I already have some wear. On my middle finger, I used a make up sponge to sponge on a gradient.
While I'm not loving all the weather changes, I do love this mani!
I hope y'all are enjoying Spring where you are, without snow! Have a fabulous day and Happy Polishing!!
I Used:
Sinful Colors: Yellow Out There, a bright yellow jelly with small holographic bar glitter
Finger Paints: Aloha Lei, an orange glass fleck shimmer
Make Up Sponge
I started by using Sinful Colors Yellow Out There on my pinky and middle fingers and on my thumb. Yellow Out There is a bright, pretty jelly polish with very small holographic bar glitter. The pictures show three coats with top coat. This was a pretty typical jelly polish in that even after 3 coats, there is still a very visible nail line. I can't wait to try this in a jelly sandwich! And why I love the holographic bar glitter, I wish there was more!
Next I painted my index and ring finger with Finger Paints Aloha Lei, a bright orange glass fleck shimmer. I loved this color! Pictures show two coats with top coat. I was a bit disappointed in the wear time. I had to wait until the next day to take the pictures in the sun and as you can see, I already have some wear. On my middle finger, I used a make up sponge to sponge on a gradient.
While I'm not loving all the weather changes, I do love this mani!
I hope y'all are enjoying Spring where you are, without snow! Have a fabulous day and Happy Polishing!!
Monday, March 23, 2015
An Ombre Gradient Skittle
Hey Y'all!! Oh. My. Goodness!! I tried to get this post up on Friday, but my computer kept updating. Does anyone else keep putting off updating their computer until it has hours worth to do? No? Just me? Oh well. Happy Monday! I hope y'all had a fabulous weekend. We had a quiet one. The teen went to a friend's house and the hubby and I went out to a nice dinner. And slept! This time of year wears me out. Not only does the teen have a million things to do and a million places to be, the weather kills me. In one week we can have 30's, 80's, sun, tropical storms, wind...all leading up to everything about to be covered in an inch of pollen.
But on to today's mani! I have something I'm calling an Ombre Gradient Skittle:
I Used:
China Glaze: One Track Mind (a deep cobalt blue crème)
Orly- Tiara (small silver glitter in a clear base)
Finger Paints- Ho Ho Happy Holidays (micro silver and light blue glitter in a clear base)
Icing- Sapphire (a medium blue micro glitter in a clear base)
China Glaze- Feeling Twinkly (a dark blue glitter in a clear base)
Make Up Sponge
To start this mani, I painted two coats of China Glaze One Track Mind, a deep cobalt blue crème. Then using a make up sponge, I sponged on the glitter polishes. They are:
Pinky: Orly Tiara, a silver glitter
Ring Finger: Finger Paints Ho Ho Happy Holidays, a silver and light blue glitter
Middle Finger: Icing Sapphire, a medium blue glitter
Index Finger: China Glaze, Feeling Twinkly, a dark blue glitter
Thumb: all the above
When sponging on the glitter, start about three quarters of the way down your nail. Then go back and sponge on just the tip of your nail to give you a more concentrated glitter. For the thumb, paint stripes of the polish on the make up sponge and dab on your nail. It is really important to use a sponge at least for your thumb...the sponge will soak up the excess clear polish leaving you a more concentrated glitter. I did two coats on my thumb. Then just add the top coat.
I hope you have a fabulous day! Happy Polishing!!
But on to today's mani! I have something I'm calling an Ombre Gradient Skittle:
I Used:
China Glaze: One Track Mind (a deep cobalt blue crème)
Orly- Tiara (small silver glitter in a clear base)
Finger Paints- Ho Ho Happy Holidays (micro silver and light blue glitter in a clear base)
Icing- Sapphire (a medium blue micro glitter in a clear base)
China Glaze- Feeling Twinkly (a dark blue glitter in a clear base)
Make Up Sponge
To start this mani, I painted two coats of China Glaze One Track Mind, a deep cobalt blue crème. Then using a make up sponge, I sponged on the glitter polishes. They are:
Pinky: Orly Tiara, a silver glitter
Ring Finger: Finger Paints Ho Ho Happy Holidays, a silver and light blue glitter
Middle Finger: Icing Sapphire, a medium blue glitter
Index Finger: China Glaze, Feeling Twinkly, a dark blue glitter
Thumb: all the above
When sponging on the glitter, start about three quarters of the way down your nail. Then go back and sponge on just the tip of your nail to give you a more concentrated glitter. For the thumb, paint stripes of the polish on the make up sponge and dab on your nail. It is really important to use a sponge at least for your thumb...the sponge will soak up the excess clear polish leaving you a more concentrated glitter. I did two coats on my thumb. Then just add the top coat.
I hope you have a fabulous day! Happy Polishing!!
Wednesday, July 23, 2014
Ombre, Gradient and Stripes
Hey Y 'all!! Happy Hump-Day! I hope y'all are having a fabulous day. I feel better today. Yesterday stunk, I had a headache that just would not go away! But 11 1/2 hours of sleep cured that! I can't believe I slept that long. But now, at least I feel better! And I have a new post for you!
For today I have an Ombre/Gradient and Stripe design for you:
I Used:
China Glaze- White on White (white crème)
China Glaze- Pelican Gray (pale gray with a silver shimmer)
China Glaze- Silver Lining (clear base with small silver glitter)
China Glaze- Black Diamond (shimmery black)
Striping Tape
Make Up Sponges
I love how this mani turned out, but I have to say doing the stripes was a pain in the butt. That's why two nails are gradients.
For the stripes I placed the striping tape diagonally then painted the colors in the order listed in the "I Used" section. The ombre was also done diagonally.
I hope y'all enjoyed today's design! Happy Polishing!
For today I have an Ombre/Gradient and Stripe design for you:
I Used:
China Glaze- White on White (white crème)
China Glaze- Pelican Gray (pale gray with a silver shimmer)
China Glaze- Silver Lining (clear base with small silver glitter)
China Glaze- Black Diamond (shimmery black)
Striping Tape
Make Up Sponges
I love how this mani turned out, but I have to say doing the stripes was a pain in the butt. That's why two nails are gradients.
For the stripes I placed the striping tape diagonally then painted the colors in the order listed in the "I Used" section. The ombre was also done diagonally.
I hope y'all enjoyed today's design! Happy Polishing!
Wednesday, May 28, 2014
Pastel Gradient
Hey Y'all!! Have you ever had one of those days that no matter how hard you try you just can't get anything accomplished? If yes, then welcome to my Wednesday! The teen spent the night at a friend's house so I thought, yay, I'll get a ton done! Nope. Didn't get one thing done. Started a bunch of stuff, but didn't finish the first thing. Except this post. Which is going up late. Dang.
Oh well. I do have a fun twist on gradient nails for you today, a four colored square gradient:
I Used:
Sinful Colors- Snow Me White (white crème)
Sinful Colors- Unicorn (pastel yellow crème)
Sinful Colors- Cream Soda (pastel peach crème)
China Glaze- At Vase Value (pastel mint crème)
China Glaze- Lotus Begin (pastel lilac crème)
Make Up Sponge
I started with two coats of Sinful Colors Snow Me White to help the pastels show up more. Then, after wetting and wringing out a cheap make up sponge (from the dollar store), I painted the pastels in a square pattern on the sponge:
Then I just sponged them on to the nails in an up and down motion. It took three coats to get the colors to where I wanted them.
Don't forget to top with top coat.
Hope y'all enjoyed today's post! I'm going to give up on doing anything useful for the day and veg in front of the tv! Happy Polishing!!
Oh well. I do have a fun twist on gradient nails for you today, a four colored square gradient:
I Used:
Sinful Colors- Snow Me White (white crème)
Sinful Colors- Unicorn (pastel yellow crème)
Sinful Colors- Cream Soda (pastel peach crème)
China Glaze- At Vase Value (pastel mint crème)
China Glaze- Lotus Begin (pastel lilac crème)
Make Up Sponge
I started with two coats of Sinful Colors Snow Me White to help the pastels show up more. Then, after wetting and wringing out a cheap make up sponge (from the dollar store), I painted the pastels in a square pattern on the sponge:
Then I just sponged them on to the nails in an up and down motion. It took three coats to get the colors to where I wanted them.
Don't forget to top with top coat.
Hope y'all enjoyed today's post! I'm going to give up on doing anything useful for the day and veg in front of the tv! Happy Polishing!!
Thursday, May 22, 2014
Tahitian Sunset (or Peach/Orange Gradient)
Hey Y'all!! I've missed y'all so much!! I told you things were insane, and they have been! The end of the year is always so busy, but this year seemed even busier than normal. And if all that wasn't enough, I thought I would enter a nail art competition. Ah, stress. And even though I'm losing the competition, I at least have a bunch of nail art designs coming up for you! And if you follow me on Instagram, you can see all the designs :)
For today I have what I'm calling Tahitian Sunset because it reminds me of Tahiti:
I Used:
Sinful Colors- Hot Chili (dark rusty orange with micro holographic glitters)
Sinful Colors- Coral Riff (bright coral with subtle blue shimmer)
Sinful Colors- Anchors Away (yellow creme with strong orange undertones)
Make Up Sponge
Y'all know how I do gradients (and if you don't, just click gradient under the labels in the left hand column), so I'll skip the directions.
These Sinful Colors all came from their Simmer Down collection. I can not tell you how much I love this collection!! All the colors remind me of sultry, tropical nights! And all the formulas worked beautifully!
I hope y'all have a fabulous day!! Happy Polishing!!
For today I have what I'm calling Tahitian Sunset because it reminds me of Tahiti:
I Used:
Sinful Colors- Hot Chili (dark rusty orange with micro holographic glitters)
Sinful Colors- Coral Riff (bright coral with subtle blue shimmer)
Sinful Colors- Anchors Away (yellow creme with strong orange undertones)
Make Up Sponge
Y'all know how I do gradients (and if you don't, just click gradient under the labels in the left hand column), so I'll skip the directions.
These Sinful Colors all came from their Simmer Down collection. I can not tell you how much I love this collection!! All the colors remind me of sultry, tropical nights! And all the formulas worked beautifully!
I hope y'all have a fabulous day!! Happy Polishing!!
Friday, April 11, 2014
Pink Dot Gradient
Hey Y'all!! TGIF!!! I hope y'all have had a great week! Have you entered the Coupons.com Givaway yet??
So I have another Spring mani for you, a Pink Dot Gradient:
I Used:
OPI- Taupe-Less Beach (light taupe crème)
China Glaze- Wish On A Starfish (light pink with gold shimmer textured polish)
OPI- Hey Baby (bright pink crème)
OPI- Flashbulb Fuchsia (bright fuchsia with silver shimmer)
Dotting Tools
I started with two coats of OPI Taupe-less Beach. Then using a couple of different sized dotting tools, start making the dots.
Starting at the cuticle, your going to make a "C" shape with the dots. The polishes I used, from lightest to darkest, are China Glaze Wish On A Starfish, OPI Hey Baby, and OPI Flashbulb Fuchsia.
Have a fabulous Friday!! Happy Polishing!!
So I have another Spring mani for you, a Pink Dot Gradient:
OPI- Taupe-Less Beach (light taupe crème)
China Glaze- Wish On A Starfish (light pink with gold shimmer textured polish)
OPI- Hey Baby (bright pink crème)
OPI- Flashbulb Fuchsia (bright fuchsia with silver shimmer)
Dotting Tools
I started with two coats of OPI Taupe-less Beach. Then using a couple of different sized dotting tools, start making the dots.
Wednesday, April 9, 2014
Spring Leopard & Gradient
Hey Y'all!! So the teen is on Spring Break this week, and so far it's been warm & beautiful and cold wet...typical Georgia Spring I guess. And sadly, we don't have any plans, saving money for her summer dance camps. Do any of y'all have big plans for Spring Break?
But it is giving me time to do a bunch of nail art for y'all! And today I have Spring Leopard print and Gradient:
I Used:
Sally Hansen Triple Shine- Bait Me (pale gray/silver with silver shimmer)
Sally Hansen Triple Shine- Blow Bubbles (light pink shimmer)
Sally Hansen Triple Shine- Flame On (magenta shimmer)
Make Up Sponges
Dotting Tools
Since I've told y'all a lot, how to do gradients and leopard spots, I'll just tell you what colors I used where.
I painted my ring finger and thumb with the middle color, Blow Bubbles, and the rest of my nails with Bait Me, the pale shimmery grayish, white-ish silver. Ok, I'm not sure what color it is, but it's a beauty. The Blow Bubbles took three coats and the Bait Me took two.
The leopard spots were made using Flame On and the lines around them were made with Bait Me. The order of the gradient, from the cuticle to the tip, is Bait Me, Blow Bubbles and Flame On.
Also, I have a favor to ask! My friends (Over The Topcoat, Sunshine Nails and Sassy Paints) and I have entered a contest being held by Preen.me and we would SO appreciate it if you would vote for us!! Just click here!! We're the Polish Mavens! Thank y'all!!!!
Have a fabulous Spring Break and I'll see y'all tomorrow! Happy Polishing!!
But it is giving me time to do a bunch of nail art for y'all! And today I have Spring Leopard print and Gradient:
Sally Hansen Triple Shine- Bait Me (pale gray/silver with silver shimmer)
Sally Hansen Triple Shine- Blow Bubbles (light pink shimmer)
Sally Hansen Triple Shine- Flame On (magenta shimmer)
Make Up Sponges
Dotting Tools
Since I've told y'all a lot, how to do gradients and leopard spots, I'll just tell you what colors I used where.
Also, I have a favor to ask! My friends (Over The Topcoat, Sunshine Nails and Sassy Paints) and I have entered a contest being held by Preen.me and we would SO appreciate it if you would vote for us!! Just click here!! We're the Polish Mavens! Thank y'all!!!!
Have a fabulous Spring Break and I'll see y'all tomorrow! Happy Polishing!!
Wednesday, March 19, 2014
Spring Reciprocal Gradient Tutorial
Hey Y'all!! Happy last day of Winter!! Finally!! So, I've decided to continue my rebellion against
Winter with another Hurry Up Spring nail art design! This may seem complicated as there are a few more steps than normal, but it doesn't take long and is so worth it! So here is my Spring Reciprocal Gradient:
I Used:
China Glaze- White on White (white crème)
Sinful Colors- Unicorn (pale yellow crème)
Sinful Colors-Cream Soda (pastel peach crème)
Sinful Colors- Cotton Candy (pastel pink crème)
Sinful Colors- Mad About Hue (lilac crème)
Make Up Sponges
Scotch Tape
Start this Spring mani with two coats of white, I used China Glaze White on White. I started with a white base coat to make sure the colors pop.
Next, paint thin lines of nail polish on a damp make up sponge. Make sure that the lines are about the same length as your nails. The order of colors is: yellow, peach, pink and purple:
I made the yellow and peach a little thicker since the colors are so light. Then dab the colors on your nails. Remember to move the sponge around a little to make sure the colors blend. This will require two coats, but they dry fast.
Once that has dried, place scotch tape on both sides of your nails making a vertical stripe. I painted the stripe white, again to make sure the colors show. Then repeat the sponging going the opposite way:
This takes two coats too. Immediately remove the tape after the second coat. Top your design with top coat and you're done!
I hope y'all enjoyed today's nail art! Have a fabulous day and Happy Polishing!!
Winter with another Hurry Up Spring nail art design! This may seem complicated as there are a few more steps than normal, but it doesn't take long and is so worth it! So here is my Spring Reciprocal Gradient:
I Used:
China Glaze- White on White (white crème)
Sinful Colors- Unicorn (pale yellow crème)
Sinful Colors-Cream Soda (pastel peach crème)
Sinful Colors- Cotton Candy (pastel pink crème)
Sinful Colors- Mad About Hue (lilac crème)
Make Up Sponges
Scotch Tape
Start this Spring mani with two coats of white, I used China Glaze White on White. I started with a white base coat to make sure the colors pop.
Next, paint thin lines of nail polish on a damp make up sponge. Make sure that the lines are about the same length as your nails. The order of colors is: yellow, peach, pink and purple:
I made the yellow and peach a little thicker since the colors are so light. Then dab the colors on your nails. Remember to move the sponge around a little to make sure the colors blend. This will require two coats, but they dry fast.
Once that has dried, place scotch tape on both sides of your nails making a vertical stripe. I painted the stripe white, again to make sure the colors show. Then repeat the sponging going the opposite way:
This takes two coats too. Immediately remove the tape after the second coat. Top your design with top coat and you're done!
I hope y'all enjoyed today's nail art! Have a fabulous day and Happy Polishing!!
Monday, February 24, 2014
Black & Purple Gradient French Tips
Hey Y'all!! Happy Monday! I know, I know, that's an oxymoron, but I hope you're having a great day. I'm excited to start a new week, anyway. I have some fabulous posts for you this week, including a couple of beauty reviews, so be sure to be on the look out for them!
I'm also excited to show you today's nails! I'm going to call this Black & Purple Gradient French Tips:
I Used:
Finger Paints- First Edition (dark neon purple crème)
Sinful Colors- Black on Black (black crème)
Make Up Sponge
To create this design, start with two coats of Finger Paints First Edition, a gorgeous dark purple neon crème. Once that has dried completely, cut up a make up sponge, the wedge type (I buy mine at the dollar store). I just cut it into 3 or 4 pieces. Then run them under the faucet and wring them out. This makes them bigger and gives a softer look to your gradient.
Then paint a stripe of Finger Paints First Edition and a stripe of Sinful Colors Black on Black on to the sponge:
Doing both colors helps them to blend together. Then just dab on to your nails. If you want the French Tip look, make sure you keep the black just on the tip of your nails. You may need to do this two or three times to get the colors opaque. Then just top with top coat!
I hope y'all enjoyed today's mani; I got a ton of compliments on it! Y'all have a fabulous Monday! Happy Polishing!!
I'm also excited to show you today's nails! I'm going to call this Black & Purple Gradient French Tips:
I Used:
Finger Paints- First Edition (dark neon purple crème)
Sinful Colors- Black on Black (black crème)
Make Up Sponge
To create this design, start with two coats of Finger Paints First Edition, a gorgeous dark purple neon crème. Once that has dried completely, cut up a make up sponge, the wedge type (I buy mine at the dollar store). I just cut it into 3 or 4 pieces. Then run them under the faucet and wring them out. This makes them bigger and gives a softer look to your gradient.
Then paint a stripe of Finger Paints First Edition and a stripe of Sinful Colors Black on Black on to the sponge:
Doing both colors helps them to blend together. Then just dab on to your nails. If you want the French Tip look, make sure you keep the black just on the tip of your nails. You may need to do this two or three times to get the colors opaque. Then just top with top coat!
I hope y'all enjoyed today's mani; I got a ton of compliments on it! Y'all have a fabulous Monday! Happy Polishing!!
Thursday, February 13, 2014
Mish Mash Challenge: Black & White
Hey Y'all!! We survived the great ice storm of 2014!! We have been so fortunate!! We didn't lose power or, so far, any trees. Yay!! Now just hoping it warms up enough to melt the snow so the hubby can come home.
So I'm a day late, but I have this week's Mish Mash Challenge theme ready, Black and White:
I Used:
Sinful Colors- Black on Black (black crème)
China Glaze- White on White (white crème)
Orly- Tiara (small silver glitter in a clear base)
I started with three coats of China Glaze White on White. Once that was completely dry, just using the brush that came with the polish, I painted the black French tips. This doesn't have to be neat or tidy since you're just going to cover the line up with silver glitter. It did take two coats of Sinful Colors Black on Black to get complete coverage.
Then using a make up sponge, I dabbed on Orly Tiara to blend into the white and black, giving it a gradient effect. Then I went back and using the brush that came with Tiara, I dabbed the polish at the line between the black and white until the silver was completely opaque.
I hope y'all enjoyed today's post! Be sure to check out every one's black and white designs in the links below. I can't wait to see what they came up with. Happy Polishing!!
So I'm a day late, but I have this week's Mish Mash Challenge theme ready, Black and White:
I Used:
Sinful Colors- Black on Black (black crème)
China Glaze- White on White (white crème)
Orly- Tiara (small silver glitter in a clear base)
I started with three coats of China Glaze White on White. Once that was completely dry, just using the brush that came with the polish, I painted the black French tips. This doesn't have to be neat or tidy since you're just going to cover the line up with silver glitter. It did take two coats of Sinful Colors Black on Black to get complete coverage.
Then using a make up sponge, I dabbed on Orly Tiara to blend into the white and black, giving it a gradient effect. Then I went back and using the brush that came with Tiara, I dabbed the polish at the line between the black and white until the silver was completely opaque.
I hope y'all enjoyed today's post! Be sure to check out every one's black and white designs in the links below. I can't wait to see what they came up with. Happy Polishing!!
Wednesday, January 15, 2014
Mish Mash Challenge: Two Colors You Would Never Normally Pair Up
Hey Y'all!! It's Wednesday and that means it's time for the Mish Mash Challenge! Now, I've said before that I was born with an incredibly strong tacky gene...meaning I love what other people find tacky. According to my mother, it came from my grandmother (her mother-in-law, lol). For example, there is no such thing as too much sparkle!
Which brings me to this week's theme, Two Colors You Would Never Normally Pair Up. Ummmm, such a thing exists? I love weird color pairings, purple and red, blue and orange, I even love brown and black together! So coming up with two colors that I don't think go together was pretty much impossible for me. I decided to go with two colors that aren't my favorite together: orange and purple:
I Used:
OPI- Vant to Bite My Neck? (dark purple crème)
Orly- Flicker (deep orange shimmer)
Make Up Sponge
And you want to know something? I like this! I didn't think I would, but...guess my tacky gene is still going strong, lol!
Be sure to join me in checking out everyone else's challenge mani. I know they are all amazing! I'll see y'all tomorrow! Happy Polishing!!
Which brings me to this week's theme, Two Colors You Would Never Normally Pair Up. Ummmm, such a thing exists? I love weird color pairings, purple and red, blue and orange, I even love brown and black together! So coming up with two colors that I don't think go together was pretty much impossible for me. I decided to go with two colors that aren't my favorite together: orange and purple:
I Used:
OPI- Vant to Bite My Neck? (dark purple crème)
Orly- Flicker (deep orange shimmer)
Make Up Sponge
And you want to know something? I like this! I didn't think I would, but...guess my tacky gene is still going strong, lol!
Be sure to join me in checking out everyone else's challenge mani. I know they are all amazing! I'll see y'all tomorrow! Happy Polishing!!
Tuesday, December 31, 2013
New Year's Eve Bling Gradient
Hey Y'all!! Happy New Year's Eve!! So this New Year's Eve is not going the way I hoped...Mr. Glittery and I are sick :( They say what you do on New Year's Eve is what you will be doing the rest of the year, here's hoping "they" are wrong. Not that we had a lot planned, just the hubs, now-a-teen and I at home, but still. Being sick stinks! So let me live through you, what fabulous plans do you have for tonight??
Anyway, yesterday I showed you my Waterfall nails, a more subtle look and for today I have a much more blingy look for you:
I Used:
Finger Paints- Colorful Collage (small and medium holo glitters in clear base)
China Glaze- Liquid Leather (black crème)
I SO wish the sun would come out so you could see how this sparkles! It's blinding! I love Colorful Collage so much! If you want bling and glitter for the new year, this will work perfectly!
To get this look I started with two coats of China Glaze Liquid Leather. Once that had dried, and using the brush that came with the polish, I started about three quarters of the way down my nail from the tip and brushed the polish towards the tip. Then I went back and painted only the top 1/4 of my nail. This polish is so packed with glitter, that's all it took to get the gradient....with a little dabbing to fill in any holes at the tip.
So despite the mean hubby sharing his germs with me (he made me sick, not the other way around no matter what he says), at least I can look at my pretty sparkling nails. Now all I have to do is stay up until midnight for the now-a-teen.
Here's hoping you have a safe and joyful New Year's Eve and 2014!! Happy Polishing!!
Anyway, yesterday I showed you my Waterfall nails, a more subtle look and for today I have a much more blingy look for you:
I Used:
Finger Paints- Colorful Collage (small and medium holo glitters in clear base)
China Glaze- Liquid Leather (black crème)
I SO wish the sun would come out so you could see how this sparkles! It's blinding! I love Colorful Collage so much! If you want bling and glitter for the new year, this will work perfectly!
To get this look I started with two coats of China Glaze Liquid Leather. Once that had dried, and using the brush that came with the polish, I started about three quarters of the way down my nail from the tip and brushed the polish towards the tip. Then I went back and painted only the top 1/4 of my nail. This polish is so packed with glitter, that's all it took to get the gradient....with a little dabbing to fill in any holes at the tip.
So despite the mean hubby sharing his germs with me (he made me sick, not the other way around no matter what he says), at least I can look at my pretty sparkling nails. Now all I have to do is stay up until midnight for the now-a-teen.
Here's hoping you have a safe and joyful New Year's Eve and 2014!! Happy Polishing!!
Subscribe to:
Posts (Atom)

-1.jpg)


-1.jpg)


.jpg)


-1.jpg)
-1.jpg)

-1.jpg)


.jpg)

-1.jpg)


.jpg)
.jpg)


.jpg)

.jpg)