Showing posts with label Tutorial. Show all posts

Thursday, July 11, 2013

Neon Watercolor & Tutorial

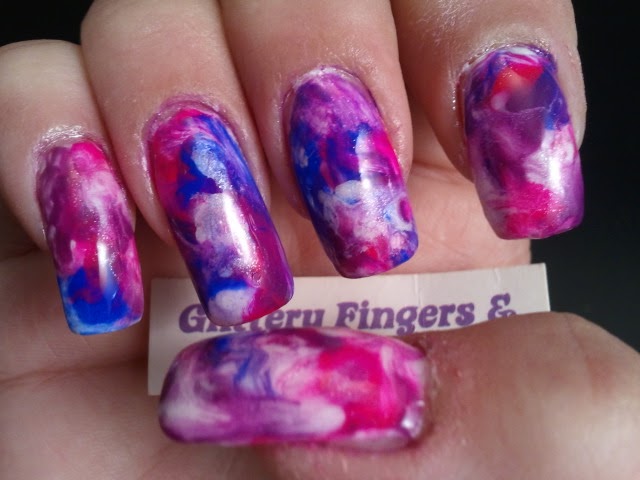
Hey Y'all!!  Today I'm headed out with the family on a stay-cation, but before I take off for a few days, I wanted to post this tutorial of my mani.  Just a warning, it's pic heavy.  I love the watercolor technique so much, but more because I tend to make it look more like tie dye, lol.  On another day I will show you the softer watercolor, but for today we're going for BRIGHT!
So that's the final look and here's what you'll need:
Of course, pick any colors you want,  I Used:

China Glaze- Dandy Lyin' Around (shimmery white)
Sinful Colors- Endless Blue (bright blue crème)
Finger Paints- Pink Perspective (bright neon pink crème)
essence- Break Through (bright purple crème)
100% Acetone
Small Brush
The little cup is a glass ramekin I pour the acetone in. ( I bought it really cheap at a dollar store and use it only for this purpose.)

Ok, so I started out with two coats of China Glaze Dandy Lyin' Around, a beautiful, shimmery white.  But any white polish will work.  Neon really needs the white to make the colors pop.
Then top with top coat.  Do not skip this step.  Otherwise, your acetone could eat all the way through to your nail and you'll have naked nail showing through.

Then line up the colors you've chosen.  I picked a neon/bright purple, blue, pink, and since I wanted the white to show, I added the white.  Open all the bottles.  Neon dries really quick, so you'll have to do the next steps a little fast.  Simply drop some of the nail polish colors on your nails, making them kind of thick/big:
Next, dip your brush (any small brush will work) into the acetone and swirl the colors around.
(It has to be 100% acetone, but you can find it pretty cheaply at grocery stores)
Make sure you cover all of your base color.  Once it has dried, top with top coat and you're done!
I hope y'all enjoy this tutorial!  I'm off to the aquarium!  Happy Polishing!!!


Wednesday, October 24, 2012

French Nail Tutorial

Hi Everyone!!  I've added a new page to my blog:  How To:  Perfect French Nails.  This gives you four different ways to achieve french nails and includes step-by-step directions and pictures.  So the finished product is my design for today.  And I finally have a Breast Cancer Awareness design on Pink Wednesday!

I Used:
Orly- Decades of Dysfunction (an extremely light pink)
Piggy Polish- Pink is the New Heart (pink and holographic glitter polish)

Be sure to check out the tutorial here on french tip nails.  And check out my new page on facebook, Glittery Fingers & Sparkling Toes.  Happy Polishing!!

Wednesday, September 19, 2012

Butterflies!

I know that butterflies are more Spring than end of Summer, but the Monarch Butterfly's colors remind me of fall and that's why I picked butterflies for today's manicure.  And to be honest with you, I'm not ready to let go of summer.  Don't get me wrong, I'm thrilled to finally have football back (Go Bucs!!!), but I'm not ready to stop wearing shorts.  They're just so comfy! 

Here's the tutorial for the butterflies.  You can make these with any color you want.

I used:
China Glaze- Liquid Leather
China Glaze- White on White
Finger Paints- Vermilion $ Painting
Finger Paints- Prints & Printsess
Wet-n-Wild- 9.0.2.1. Orange
Pro-FX Quick Dry High Gloss Top Coat
Dotting Tool
Liner Brush
Detail Brush
Make-up Sponges (cut up)


I started with two coats of Finger Paint's Prints & Printsess.  It's a light peach with a pretty peach shimmer to it.  Next I sponged Finger Paint's Vermilion $ Painting on the top portion of my nail in a diagonal gradient.  That polish is a dark orange/red with a gold shimmer.  Once that was dry I sponged Wet-n-Wild's 9.0.2.1.Orange along the middle.  I love this polish, it has a gold micro glitter.  This is to help give the wing a more multi-dimensional look.  For the sponges, I use ones from the dollar store.  Just cut them into irregular shapes.  Also, wet them and they will expand to give you a better effect.

Then in the corner of your nail, paint a semi-circle.  Using a liner brush (a brush with long, thin bristles) or liner polish, make lines from the semi-circle out to the edge of your nail.
Connect the lines with a curved line.  Color in the space between the curved line and your skin with black polish.  Using a dotting tool (or toothpick), make random white dots in the black area.  Finish with a top coat.  I hope you enjoy this design! Happy Polishing!!

Left hand:
Right hand:


Monday, September 3, 2012

Toes

Hi! I love painting my own toe nails, despite the fact that they are getting farther and farther away from me every year! This is a simple polish that everyone can do.  All you need to do is pick two colors and find some scotch tape.

I used:
Finger Paints- Purple Palette
Finger Paints- Art You Wondering
Scotch Tape

First paint two coats of your base color. I usually start with the lighter of the two colors.  Once that is dry, place a piece of  scotch tape diagonally across your nail.  When using scotch tape, remember to take it off your hand a few times to make it less sticky so it won't pull up your polish.  You may need two coats of this polish.  Remove tape immediately after your last coat while the polish is still wet. 

Apply a top coat and youre done!  Happy Polishing!


Dry Brush Technique

Hi Everyone!!!! I'm so excited to finally have my blog up and running again!! So here is my first tutorial: the dry brush method. The dry brush method simply means putting just a small dot of nail polish on a dry paint brush. You can use any brush: the brush that came with the nail polish scraped clean, a cheap children's paint brush or art brushes. They all work.

What I used:
Orly- White French Tip
NYC- Lavender Cupcakes
Wet-n-Wild- On a Trip
Finger Paints- Purple Palette
Wet-n-Wild- Buffy the Violet Slayer

Start with two coats of a white base. Put a drop of the lightest polish on a paper or plate and get just a small amount on your brush.  Starting from the base of your nail, swipe the polish upwards towards your finger tip. Make several lines until you're happy with results. Try not to go to the end of your finger nail (like I mistakingly did, lol).

Continue with this method for each color, shortening each brush stroke as you go. The darkest and/or glitter color should be the shortest and the last.

If you have any questions, please let me know!! You may either comment below or email me at glitteryfingers@gmail.com.

Happy Polishing!!!