Showing posts with label black. Show all posts

Tuesday, June 30, 2015

Neon Summer Flowers

Hey Y'all!  Ugh!  Do any of y'all have kids?  If you do, you know how much they love to share with Mommy...especially their germs!  Well, even though mine is a teenager, she still felt the need to share her cold with me.  Only, it seems to always make me sicker than it does her!  But I'm finally feeling well enough to get this post up :)

Since it is "officially" summer here (quotation marks because, really?  The temps have been in the high 90's for a month and heat index in the 100's, but no.  Now it's summer), I decided to do a summer neon version of my Spring Flowers:
I Used:
China Glaze- White on White, white crème
LA Colors- Black crème (name is missing)
Color Club- Sweet Getaway, ultra bright neon pink crème (scented)
China Glaze- DJ Blue My Mind, ultra bright blue neon crème
Studio M- Grape Escape, bright purple neon crème
Studio M- Lemon Drop, bright yellow neon with gold shimmer
For the tutorial, just check out the Spring Flowers post.  I loved how this turned out.  And as you may know, I'm more of a bright and bold colors than a pastel colors kind of gal.  This was fun to wear, and I did get a lot of compliments on it.
One mistake I made is above...don't put the purple on the black background.  You couldn't really even see it in person.  Oh well. 

I hope y'all enjoyed today's mani.  Happy Polishing!!

Monday, June 22, 2015

Holographic Skittle

Hey Y'all!!  How was your weekend?  I've had better, I've had worse, so I can't really complain. Except for one thing:  Fleas!!  Maybe y'all can help me.  We've been going back and forth to Florida over the last few weeks and had a sitter for our fur babies.  Well, with us gone, and the incredibly hot weather, we've been taken over by these *&%& fleas!!  I hate fleas!!  And not only are they making my poor babies miserable, they keep biting me too.  And only me and the fur babies.  The teen and the hubby seem to have yucky blood.  Now, while I do enjoy the fact that I have superior blood to my family, I'm tired of being a big, jiggly, itchy, scratchy mess.  My house smells like apple cider vinegar and flea dip.  The babies and I are tired.  Any advice?

Now on to today's mani!  Today I have a Holographic Skittle for you:
I Used:
Color Club- Harp On It, a silver linear holo
Orly- Mirrorball, silver linear holo with small holo glitters
Loreal- Masked Affair, a soft gray linear holo
Color Club- Beyond, a charcoal gray linear holo
Celestial- Reaper Crew, a black linear holo
First off, I know the color differences don't show up very well in the photos.  But in person, it was obvious.  Taking pictures of holos is really hard...taking pictures of holos and trying to capture the subtle differences in color, really, really hard!

Now for the mani.  Ombre nails are very easy to do.  All you have to do is pick five polishes in the same color family and paint each nail a different color.  For this ombre, I started with Color Club Harp On It on my thumb.  Harp On It is a bright silver linear holo.  On my index finger is Orly Mirrorball.  This is also a silver linear holo but it also has small holographic glitter.  My middle finger has Loreal Masked Affair.  Holy cow!!  Loved this one.  It's a gray linear holo.  Next up is Color Club Beyond, a dark, charcoal gray linear holo on my ring finger.  Finally, on my pinky, is Celestial Reaper Crew, a black linear holo.  Love that one!!

Photos show two coats with top coat.  I really enjoyed this one.  But then, I love anything that glitters and sparkles!

Hope you have a fabulous day!  Happy Polishing!!

Monday, May 4, 2015

Neon Cheetah Print

Hey Y'all!  Happy Monday!  How are y'all doin' today?  Me?  I'm exhausted!  So sorry I was missing last week, but the teen had rehearsals all week then six shows over the weekend with her ballet company.  That meant many late nights, long days, and a lot of time sitting in the car for Mom.  But she, and all the dancers were wonderful.  So, I guess I'm actually a tired, but proud Mom.

But, it's a new week, and I have a new mani for you, a Neon Cheetah:
I Used:
Color Club:  Sweet Get Away, ultra bright neon pink crème
Barielle:  Sterling Silver, a smoky, silver metallic
LA Colors:  Black crème (the name is missing)
Dotting Tool
Fine Brush
I so loved this mani, and it's really easy to do!  I started by painting three fingers (thumb, ring and pinky) with Barielle Sterling Silver, a pretty, smoky looking silver metallic.  Then I painted the remaining nails with Color Club Sweet Get Away, an ultra bright pink neon crème.  This is from the scented neon line they did.  I think it was supposed to smell like roses, but I just got a slight floral scent from it.

Then, using a dotting tool, I made splotches that would be the base of the cheetah spot.  Then using a fine detail brush, I drew the black outline.  You don't need a brush for this, just use a fine toothpick or anything that is thin.
I hope you liked today's design!  And here's hoping it's the start to a fabulous week!

Happy Polishing!!

Monday, April 20, 2015

Atlanta Nail Meet Up Holo Water Marble

Hey Y'all!!  I hope you had a great weekend.  We didn't do too much.  It was rainy.  I mean, really rainy.  We got a couple of inches of rain.  And while there was flooding issues in the area, we were good.  Thankfully.  And since it's the last weekend until Summer break that we didn't have much going on, we stayed home and vegged.


But last weekend (which if you follow me on facebook or instagram you already know), was our semi-annual Atlanta Nail Meet Up!  We started at lunch (Pho), talked, had giveaways and raffles, and then went shopping!!  But first, here's what I had on my nails, a Holographic Water Marble:
I Used:
OPI:  Do You Have This Color In Stockholm, an absolutely perfect shade of purple crème
Color Club:  Harp On It, a silver linear holographic polish
Color Club:  Beyond, a charcoal/black linear holographic polish
I had SO much fun!!  My buddy, Harri from Trailorhood Chic, was there.  It was her first time at this shopping place, so I took about 6 seconds to show her around before I went nuts myself.  In my defense, it was only my second time there.  I really wish I had video of Harri and I!  We were so excited that we literally kept running our buggies into each other.  Like 15 times!!  No surprise, but she and I spent the most.  Instead of bags, we got boxes!  But we live a long way from there and everyone else is pretty close.

Then we all met outside to take a "nail pic":
 
 
The orange and blue to my right (I have the watch on) are Harri's nails!  To see what she used, just click here!

And here is my haul:
There are some things hidden in the bag, but they are a surprise for a friend.  And there is one of my babies in the corner!  Count Damon hates to be left out of photos!

I love our meet ups!  Part of me wishes that we would get together more than just twice a year, but my wallet is thankful that we don't!

I hope y'all have a fun day!  Happy Polishing!!


Monday, April 13, 2015

Black & Silver Holographic Gradient

Hey Y'all!!  How's your Monday going?  We just had our Spring Break last week (which is why I didn't post), and I am so not ready to get back into the swing of things.  There is just SO much happening in the next 5 weeks...I need more rest!  And we didn't even do anything over the break.  Pathetic, I know, lol.;

But on to today's mani, a black and silver holographic gradient:
I Used:
Color Club:  Harp On It, a silver linear holographic
Celestial:  Reaper Crew, a black linear holographic
Make Up Sponge
I love how this one turned out!  I started with one coat of Color Club Harp On It, a silver linear holographic polish.  Once that was completely dry, I sponged on the Color Club and Celestial Reaper Crew, a true black linear holographic polish.
When sponging on the gradient, I decided to do it vertically and alternated the colors.  So it goes from side to side and silver to black to black to silver, etc.  And despite sponging on the polish, it still had the linear effect.  It wasn't as prominent as just brushing on the polish, but it was still there.

I hope you enjoyed today's mani!  Happy Polishing!!


Wednesday, July 23, 2014

Ombre, Gradient and Stripes

Hey Y 'all!!  Happy Hump-Day!  I hope y'all are having a fabulous day.  I feel better today.  Yesterday stunk, I had a headache that just would not go away!  But 11 1/2 hours of sleep cured that!  I can't believe I slept that long.  But now, at least I feel better!  And I have a new post for you!

For today I have an Ombre/Gradient and Stripe design for you:
I Used:
China Glaze- White on White (white crème)
China Glaze- Pelican Gray (pale gray with a silver shimmer)
China Glaze- Silver Lining (clear base with small silver glitter)
China Glaze- Black Diamond (shimmery black)
Striping Tape
Make Up Sponges
I love how this mani turned out, but I have to say doing the stripes was a pain in the butt.  That's why two nails are gradients.
For the stripes I placed the striping tape diagonally then painted the colors in the order listed in the "I Used" section.  The ombre was also done diagonally.

I hope y'all enjoyed today's design!   Happy Polishing!

Thursday, May 29, 2014

Neon Studded Half Moon

Hey Y'all!!  Happy Friday!!  Thank goodness!  Although I have a busy weekend planned.  I have to get the girl child some new pointe shoes, which for us is an all day event.  The nearest place is over 65 miles away and I have to drive through a super busy metropolitan city.  And then come home and clean house because I'll have a house full of teenage girls for most of next week.  Although when they are all here, I just hide in my bedroom and read and paint my nails.  For anyone who has young children, when they reach teenage years, if you throw enough food and soda at them, they pretty much leave you alone, lol!

Anyway, for today I have a simple Neon Studded Half Moon mani for you:
I Used:
Salon Perfect- Flamingo Flair (neon peach crème)
Sally Hansen- I Love Nail Art Studs (black studs)
I started with two coats of Salon Perfect Flamingo Flair,a gorgeous peach neon crème.  The formula was a little streaky, but evened out after just two coats.  I loved the color!  So fresh and bright, I think this works great for Spring and Summer!

Once your base coat has dried, start adding top coat, working with only one nail at a time.  While the top coat is still wet, place your studs (that sounds naughty, but it's not.  Really, I mean it).  You can place them in a semi-circle or choose to do a more geometric shape like I did here.
I hope y'all enjoyed today's mani and that y'all have a fabulous weekend!  Do you have any plans?

Happy Polishing!!

Tuesday, May 27, 2014

Born Pretty Store Review: Arabesque Water Decals

Press Sample

Hey Y'all!!  I'm so excited about today's review, I'm going to get right to it! Today I have Born Pretty Store Arabesque Water Decals.  This is a rather large sheet that comes with gold and black curly-q designs:
And they are absolutely gorgeous on the nail!  First up, the black:
And now the gold:
Aren't these beautiful??  I can't tell you may compliments I received on these!  And they are so easy to apply.  Here is my other hand:
To apply, simply paint your nails and let them dry completely (the polishes used are listed at the bottom of this post).  Then cut out the design you wish and dip in water for about 10 seconds.  Remove the decal from the plastic backing and place on your nail.  As long as the decal is wet, it is very easy to move around so you don't have to worry about getting it exactly right the first time.  I do suggest using tweezers to place them.  Once the decal is where you want it, gently pat dry.  It only takes a couple of seconds to dry.  Then just top with top coat.  Any excess or any on your skin is easily removed with acetone.

It took all but about an inch of each color to do a full mani, so if you like them, I suggest ordering more than one!

Not only are they gorgeous on, they lasted a long time!  I wore each design for 6 days!  And the best part?  These can be yours!  Easily!  They are $4.99 a sheet, but with the code NE5J61, you can get a 10% discount!!!  And free shipping world wide!!

Just CLICK HERE TO ORDER!!!  And don't forget the discount code:  NE5J61 

The polishes I used are:  Studio M- Volt of Light (yellow neon with a subtle blue shimmer) and Orly Saturated (dark purple neon)

I hope you enjoyed today's review!  Happy Polishing!!

Wednesday, April 23, 2014

Footprints At The Beach

Hey Y'all!

So, since my mind is on warmer weather, I came up with this mani I'm calling Footprints At The Beach:
I Used:
Orly- Coffee Break (light tan crème)
Color Club- Beyond (black linear holographic)
Mash Stamping Plate- Mash 75

First, have you ever gone through your polish stash and thought, "Where on earth did that polish come from? I've never even heard of it?"  No.  Just me?  Well, that's exactly what happened with Orly Coffee Break.  I've never heard of it and don't remember ever seeing it before.  I certainly don't remember buying it!  Did I get it as a gift?  I've never forgotten one before. Maybe I just have so many bottles of nail polish they've started reproducing on their own!

Anyway, I started with two coats of the teleported-into-my-house Orly Coffee Break.  Once that dried, I used Mash Stamping Plate 75 and stamped with Color Club Beyond, a black linear holo.
Ok, I did mess up one footprint.  That was me and not the plate, but I'm getting better.  I really love this!  Makes me long for the summer!

I hope you enjoyed today's mani!!  Happy Polishing!!


Thursday, April 17, 2014

Turquoise Plastic Wrap

Hey Y'all!!  How's your Thursday going?  Mine sucks!!  Hubby has food poisoning from something he ate at work.  At WORK!!  Not from my cooking!!!  But yucky and unfun day ahead.

So let me get right to the post!  Today I have Turquoise Plastic Wrap Nails for you:
I Used:
Summer Brights- No name (turquoise satin finish)
Orly- Love. Angel. Music. Baby. (gold satin finish)
Orly- 4 In The Morning (black satin finish)
Plastic Wrap

I started with two coats of Summer Brights, a no name satin finish turquoise.  Then, using balled up plastic wrap, I dabbed on first the black, then the gold.
And since I wanted everything to be nice and glossy, I did top it off with top coat.
Sorry for the short post, but I guess I should go take care of the sick hubby :(

Hope y'all have a great day!  Happy Polishing!!

Monday, March 31, 2014

Spring Water Marble

Hey Y'all!!!  I am SO sorry I've been missing the last week.  I woke up Tuesday with the plague!  Ok, maybe it wasn't the plague, but it felt like it.  I had bronchitis, sinus infection, fever, I was miserable.  But I'm on the road to recovery!! And I have a fabulous week of posts for you!  Including tomorrow!  There are 100 fabulous reasons to visit the blog tomorrow...no April Fool's joke.

But for today, I have a Spring Water Marble for you!!
I Used:
Orly- Cheeky (medium peach with gold shimmer)
Zoya- Raven (black crème)
Pure Ice- Jaguar (gold shimmer)
I added the black because it's still cold and that makes me mad!!  Also because I love black and peach together, lol.

Be sure to look under popular post in the right hand column for Fall Water Marble, for step-by-step directions for water marbling.

I hope y'all enjoyed today's post!  Don't forget to come back tomorrow for the big surprise!!  Happy Polishing!!


Monday, February 24, 2014

Black & Purple Gradient French Tips

Hey Y'all!!  Happy Monday!  I know, I know, that's an oxymoron, but I hope you're having a great day.  I'm excited to start a new week, anyway.  I have some fabulous posts for you this week, including a couple of beauty reviews, so be sure to be on the look out for them!

I'm also excited to show you today's nails!  I'm going to call this Black & Purple Gradient French Tips:
I Used:
Finger Paints- First Edition (dark neon purple crème)
Sinful Colors- Black on Black (black crème)
Make Up Sponge

To create this design, start with two coats of Finger Paints First Edition, a gorgeous dark purple neon crème.  Once that has dried completely, cut up a make up sponge, the wedge type (I buy mine at the dollar store).  I just cut it into 3 or 4 pieces.  Then run them under the faucet and wring them out.  This makes them bigger and gives a softer look to your gradient.
Then paint a stripe of Finger Paints First Edition and a stripe of Sinful Colors Black on Black on to the sponge:
Doing both colors helps them to blend together.  Then just dab on to your nails.  If you want the French Tip look, make sure you keep the black just on the tip of your nails.  You may need to do this two or three times to get the colors opaque.  Then just top with top coat!
I hope y'all enjoyed today's mani; I got a ton of compliments on it!  Y'all have a fabulous Monday!  Happy Polishing!!


Thursday, February 13, 2014

Mish Mash Challenge: Black & White

Hey Y'all!!  We survived the great ice storm of 2014!!  We have been so fortunate!!  We didn't lose power or, so far, any trees.  Yay!!  Now just hoping it warms up enough to melt the snow so the hubby can come home.  

So I'm a day late, but I have this week's Mish Mash Challenge theme ready, Black and White:
I Used:
Sinful Colors- Black on Black (black crème)
China Glaze- White on White (white crème)
Orly- Tiara (small silver glitter in a clear base)

I started with three coats of China Glaze White on White.  Once that was completely dry, just using the brush that came with the polish, I painted the black French tips.  This doesn't have to be neat or tidy since you're just going to cover the line up with silver glitter.  It did take two coats of Sinful Colors Black on Black to get complete coverage.
Then using a make up sponge, I dabbed on Orly Tiara to blend into the white and black, giving it a gradient effect.  Then I went back and using the brush that came with Tiara, I dabbed the polish at the line between the black and white until the silver was completely opaque.
I hope y'all enjoyed today's post!  Be sure to check out every one's black and white designs in the links below.  I can't wait to see what they came up with.  Happy Polishing!!


Monday, January 20, 2014

Gwen Stefani French Tips

Hey Y'all!!  First, wow!!  Thank you for all the love on facebook!!  I hit 1,100 likes this weekend and am thrilled!!!  Thank you, thank you!!  I'm gonna start collecting goodies for a Thank You Giveaway!! 

That was the icing on an already fabulous weekend!  See, today is my wedding anniversary.  24 years today.  I was 5 when we got married.  No, seriously, I was.  Would I lie to you?  Anyway, the hubby took me shopping.  We hit Saks Fifth Avenue and Sephora.  But before that, we went to lunch at our absolute favorite Italian restaurant, Ippolito's!  Yummy!!  That's where I ate a ton of garlic. Garlic makes me burp.  Garlic makes me burp like a 300 pound man named Bubba.  That explains why, in the middle of Saks Fifth Avenue, I let loose with a burp that would put any Bubba to shame.  Yep.  I did that.  I also quickly looked at my husband with a disgusted look and said, "Really?  Control yourself!"  Yep, I did that too!

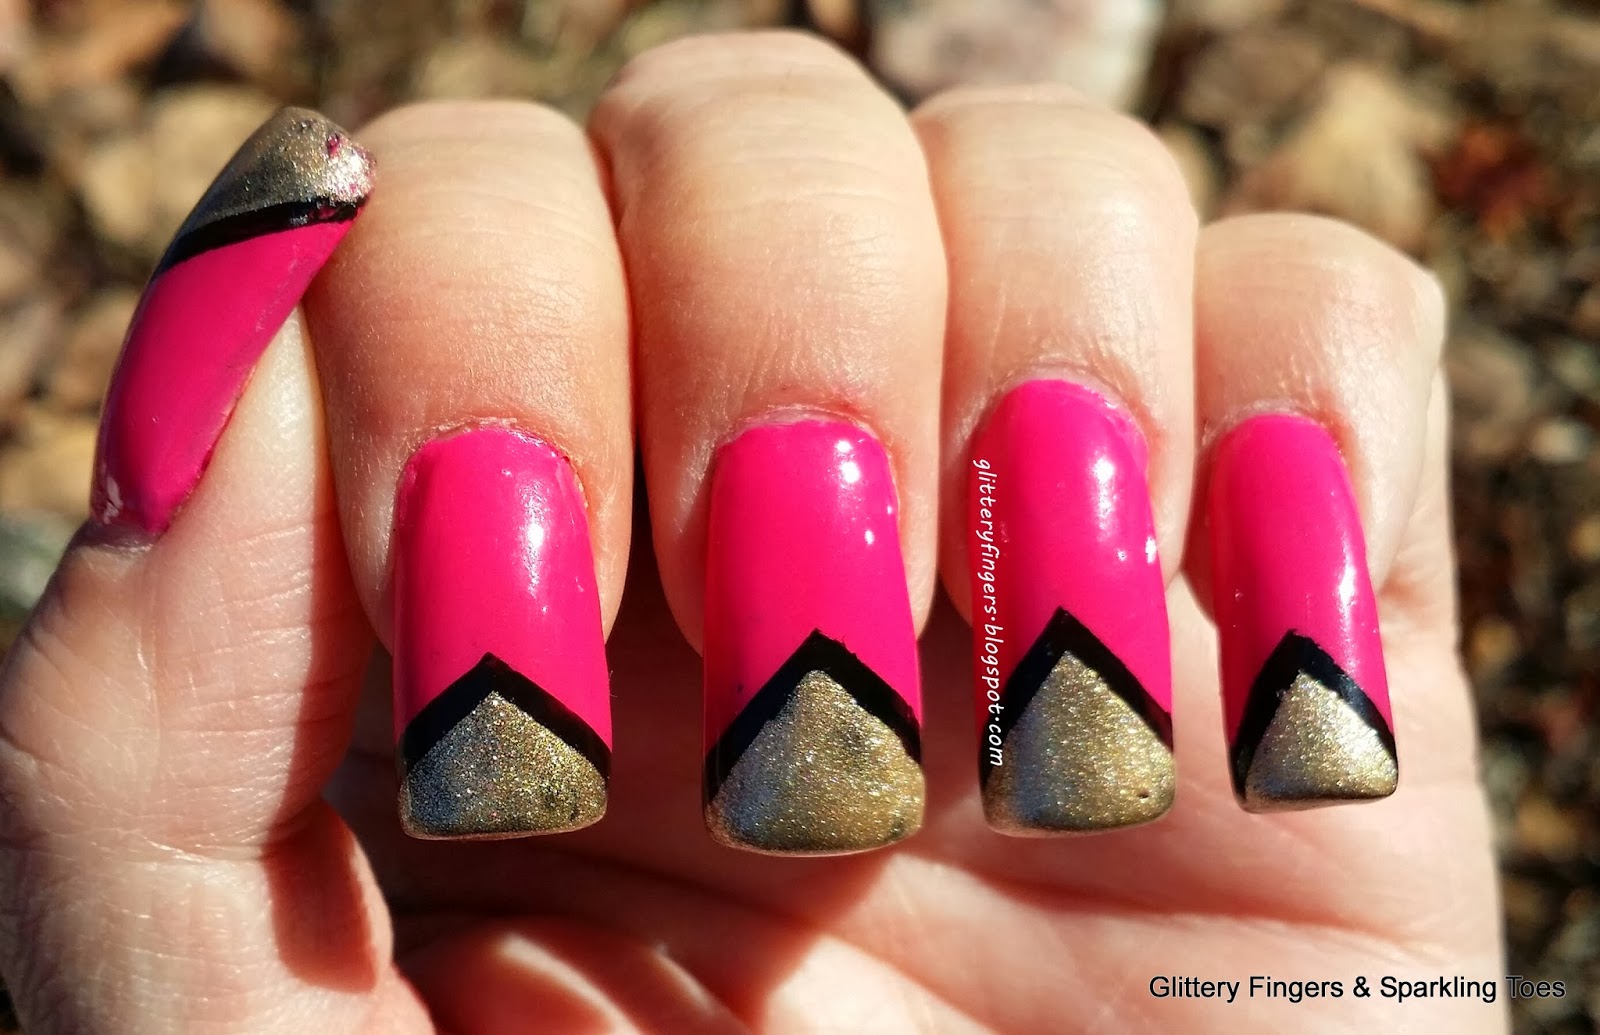
Ok, on to today's post.  Today I have French Tips using the new OPI Gwen Stefani collection:
I Used:
OPI- Hey Baby (bright pink crème)
OPI- Love. Angel. Music. Baby (gold shimmer satin finish)
China Glaze- Liquid Leather (black crème)
Striping Tape

This was a fun and easy mani to do, it just takes a little patience because you have to wait for each color to completely dry before moving on to the next step. (I'll do a review of the polishes on a later post)

To start, paint two coats of OPI Hey Baby.  Remember to let it dry completely.  Then using striping tape (or you could use scotch tape), tape off a wide V at your nail tip:
Fill in with your black polish and immediately remove the tape and let dry.  Then tape off all but a small edge of the black V:
Then fill in with OPI Love. Angel. Music. Baby.  Remove the tape immediately.  Now you can either leave it just like this to keep the satin finish of the gold, or use a top coat over the whole design.  I used a top coat because I wanted to wear this for a couple of days and wanted to make sure it would last.
I hope y'all enjoyed today's design!  And thanks so much for stopping by!!  I'll be back tomorrow with a Try It On Tuesday polish.  And remember, if you tell anyone about the burp in Saks....my hubby did it!

Happy Polishing!!