Wednesday, July 31, 2013

Mish Mash Challenge: Purple

I'm so excited I can barely stand it!!!  It's time for our new challenge...the wonderful bloggers from the ABC Challenge are now participating in, drumroll please, the Mish Mash Challenge!!!
(click to enlarge) 
And first up is my absolute favorite color in the world, PURPLE!!!
I Used:
Sinful Colors- Tempest (lavender crème)
Cover Girl- 300 (purple crème)
Loreal- Breaking Curfew (dark purple crelly)
Scotch Tape

It's purple!!!  So this was a fun and easy mani.  After you paint your base colors (ring finger is Loreal Breaking Curfew and Thumb is Cover Girl 300), and it has dried completely, add scotch tape diagonally on your nail:
Please tell me I'm not the only blogger with nail polish on their laptop!  And it's only 7 months old :(

When that has dried completely, add the tape in the other direction and paint that triangle.  I really like how this turned out and can see doing it with a ton of different color combinations.
Be sure to check out the wonderful ladies below and see their purple designs!!  Plus we have a couple of new members so get to know them!  Hope y'all have a fabulous day!!  Happy Polishing!!


Tuesday, July 30, 2013

TIOT: OPI DS Magic

Hi Y'all!! Happy Tuesday!  I hope y'all are having a good week.  I think my cold has finally let up, so yay!!  I'm so excited about today's post,  just have to get right to it!

Today is Try It On Tuesday (TIOT), organized by the gorgeous and wonderful Sassy Paints!! Just a reminder, on TIOT, you have to wear a polish you've never worn before, and you would be surprised how quickly those can pile up.  (see how you can join us at the end of this post).  For today I chose OPI DS Magic:
I know I say this a lot, but seriously, pictures do not do this polish justice!!  It is magnificent in person!!
I took so many pictures of this mani, more than I think I've ever taken...it was just so hard to capture!!  OPI DS Magic is a royal blue polish with blue and purple microglitter/shimmer.  Even in the dark this polish seems to shine.  In the light, it dances with shimmer and sparkle.  It truly deserves the name Magic!!
The one and only negative, and it's a small one, is that the polish was on the thin side and had a tendency to flood my cuticles.  And cleaning up royal blue polish is not easy.  But the polish is so gorgeous it's worth any hassle!

Be sure to check out Sassy Paints, facebook page here to see the other TIOT manis.  And if you would like to join us, please do!!  You don't have to be a blogger to join.  Just go to her facebook page to see how to be included.  Hope y'all have a fabulous day!!  Happy Polishing!!


Monday, July 29, 2013

Orly Space Cadet

Happy Monday Y'all!!  How was your weekend?  For me, it kind of stunk.  I have a cold and all I did was sleep.  All weekend.  And I'm still sick so it didn't help.  And it's our last real week off before school and dance start back up.  Oh well. Hopefully I will be over it soon.  Besides, my van is being worked on so I can't go anywhere anyway.  Bummer.  Now on to today's post!

I just recently acquired this pretty.  It has been on my wish list forever, Orly FX Space Cadet:
Orly FX Space Cadet is from Orly's 2010 Cosmic Collection, and y'all, it is gorgeous.  Pictures just don't do it justice.
Space Cadet is a dark, teal-like jelly base with this incredible duochrome shimmer in it.  The shimmers go from purple to orange, to gold, to green, to amber, to every color in between.  The most notable colors are the purple and greenish gold.
The formula was fantastic.  The pictures show three thin coats with Seche Vite top coat.  And the best part?  It dried so quickly.  I just love this polish and am so happy it's mine!  I bought it at Ulta for $10.00.  I know, a little high, but it's so pretty.  I hope y'all have a fabulous Monday and I will see you tomorrow with Try It On Tuesday!!  Happy Polishing!!


Friday, July 26, 2013

Reciprocal Zebra Stripes

Hey Y'all!!  TGIF!!  Anyone have big plans this weekend?  For many around here, this is the last weekend before school starts...can you believe it?  What happened to Summer??  The hubby is supposed to take me out to a nice dinner tonight.  He's trying to make up for stepping on but not seeing the green hoppy thing yesterday.  Yep, a nice dinner out ain't going to get it.  He needs to do more!  I'm thinking something polish/make up related!

Anyway, I have what I'm calling Reciprocal Zebra Stripes for you today:
I Used:
China Glaze- Fancy Pants (blurple with pink and purple shimmer)
OPI- Pompeii Purple (fuchsia with pink shimmer)
Scotch Tape
Medium Liner Brush

I really love my mixed up zebra stripes, and really love these two colors together!  It didn't come out exactly as I saw it in my mind, but it's close. 

So to create this mani, start with two coats of the lighter color; in this case, OPI Pompeii Purple.  Pompeii Purple is a beautiful fuchsia polish with a purple shimmer. Once that has dried completely, use scotch tape to tape a diagonal line on your nails.  Be sure to place and remove the tape a few times first to remove some of the stickiness.
Then paint your second,darker color.  I used China Glaze Fancy Pants (love this color).  It did take two coats.  If you need two coats, you can wait a few minutes in between coats, but don't let the polish dry completely.  Immediately after the second coat (or your first and only), remove the scotch tape.  If you wait it will lift the new polish up.

When that has all dried, use a long, thin brush (I used a medium liner brush) to make the zebra stripes.  Zebra stripes are basically shaky triangles.  Make sure to use the opposite color, especially if your stripe covers both colors.  Then just use top coat to seal in your design!
I hope y'all have a fabulous day!  Happy Polishing!!

Thursday, July 25, 2013

Orly & OPI Glitter Gradient

Hi Y'all!!!  I have to tell you, it is amazing that I am even here today and not dead from fright!  As you may have read on my facebook page, I have a deep seeded, gigantic, incomprehensible fear of green hoppy things (fr*gs to everyone else who isn't scared).  So as I leave my bedroom this morning, I look down and in the hallway, there is a dead green hoppy thing!!!!  Yes I should be happy that it was dead, but you know what?  That didn't make me any less terrified!!  The horror, the horror!  Thank you to the now-a-teen for getting it out of the house.  Although she only did it after finding out I wasn't going to leave my room and take her to dance as long as it was there.  The horror, the horror!!

Anyway, somehow I did survive and I have a fabulous, easy mani for you today!  It is a glitter gradient:

I Used:
Orly- Harmonious Mess
OPI- Pink Yet Lavender

Just to let you know, pictures do not do OPI Pink Yet Lavender justice.  But let me start with Orly Harmonious Mess.  Harmonious Mess is a beautiful periwinkle blue crème that is just so pretty.  I took the now-a-teen to dance while wearing only the Harmonious Mess and received compliments everywhere I went.  The pictures show two coats, which went on perfectly.  The formula was perfect!

Then for the gradient, I used OPI Pink Yet Lavender.  Oh my goodness!!!  This is such a fabulous glitter!!!  It is a clear based polish with micro holographic glitter and medium sized hexagon pink/lavender colored glitter.  And it really is Pink yet Lavender.  I couldn't pin point which color I thought it was.  I do know that it's gorgeous and I love it!!

Start the gradient with one coat of OPI Pink Yet Lavender (or what ever color glitter you choose) over the entire nail.  For the next coat, paint only 2/3 or your nail and for the final coat, paint only 1/3.  You can start from either the tip of your nail (like I did on my ring finger), or from the cuticle (like the rest of the nails).  Finally, add one coat of top coat.  I hope you enjoy today's mani.  For me, I think it's time for wine!  Or a pina colada!  Happy Polishing!!


Wednesday, July 24, 2013

Review: Born Pretty Store Water Decals

The following products were furnished to Glittery Fingers & Sparkling Toes for review.  The opinions expressed are my own and were in not influenced in any way.

Hi Y'all!!  Happy Hump Day!  I am so excited about today's review, I'm going to get right to it!  I have Water Decals from the Born Pretty Store for you today.  What are water decals?  These are the best invention since sliced bread.  They are small art designs that are pre-made and all you do is soak them in water for a few seconds, place them on your nails, top coat and voila! You're done!  Here are the ones I chose:
Aren't they wonderful?  And these will look great on short nails too!  And even toe nails!

When you order the water decals, this is what you will receive:

These couldn't be easier to use.  Simply cut out the design you want, place it in a small bowl of water (may need to be warm depending on how cool your room is) for about 5 seconds, then remove from water.  When you remove the paper from the water, the decal will slide off the paper.  I used a pair of tweezers to remove the decals.  That is not necessary, but it did make it easier for me.  Then just dip your nail in the water and place the decal where you want it to go.  You do have a little time to adjust where you place it.  Once you are happy with it, take a paper towel and carefully dab it to remove the water.

The instructions then say to use a blow dryer to dry the decals, but I didn't do this.  They will dry just like nail polish if you want to wait for a couple of minutes.  Or use the blow dryer method.  Once they have dried, simply top with top coat and you're done!
This design, Gold Glitter Irregular (but looks like Cheetah to me).   These decals are just $2.86 (plus 10% off by using my code in the left hand column) for a sheet with 21 designs.  (I did use more than one design per fingernail because of the length of my nails).  That will easily allow you to do both a mani and pedi, but I would suggest ordering more than one sheet because you are going to love these!!  They were easy to use, fast, and look wonderful on your nails!!

Don't like this design?  Not a problem!!  There are hundreds of designs, from butterflies, to flowers, to full nail sheets!  And don't forget that Born Pretty Store has everything you could possibly need for beauty, nails and make up.  Not to mention everything you need for home décor, outdoor sports, toys, hobbies, the list just goes on and on!!  Be sure to check them out!  And remember to use my discount code:  NE5J61!!  Happy Polishing!!

 
Polishes Used:
Maybelline- Urban Utopia (turquoise crème)
Sinful Colors- Sunburnt (coral crème)


Tuesday, July 23, 2013

TIOT: Orly Flicker

Hi Y'all!!  How have y'all been??  I've been busy.  And of course there was the horror of yesterday (I talked about it on facebook), so today I am exhausted.  Just trying to stay awake until it's time to pick up the now-a-teenager from dance.

But today is the Try It On Tuesday challenge from the fabulous Gini at Sassy Paints!!  The challenge is that we wear a polish that we've never tried before, so I chose a recent purchase, Orly Flicker:
I love this polish!! It was part of Orly's fall collection last year and sadly, I missed it.  So this was on my lemming list, and then last week, I walked into Ulta and they had it on clearance!  Yea!!
Orly Flicker is a gorgeous orange/rust/red shimmer polish!  The color is just so rich!  It's not a douchrome, but it does act like one.  Both of the pictures show the true color, it just depends on how the light touches it.  The formula was great, no streaking, balding, and no brush strokes showed.  It was a little slower to dry than most Orly polishes...you can see a little pull on my thumb nail in the top picture.  Just wait for each coat to dry completely first and you will avoid this.
Be sure to check out everyone else's TIOT manicures on Sassy Paints facebook page.  And remember, everyone can join this challenge, not just bloggers.  Go to her facebook page for the details on how to join in.  Happy Polishing!!!

Friday, July 19, 2013

For Talia Joy

I started blogging about a year ago, and discovered the wonderful world of make up and nail videos on You Tube, I know, how did I miss them?  And one name kept popping up, taliajoy18.  I had to check her out.  And, like the rest of the make up world, I fell in love with that sweet girl.  I felt a special affinity for her, she's from my home town and the same age as my daughter.  Not to mention that she knew her make up!  I loved watching her tips and she taught me a lot.  And she's just so bubbly and filled with joy, you can't help but laugh along with her.

And Talia was beautiful, inside and out.  Sadly she had also spent half her life battling cancer, and on Tuesday, July 16, 2013, at the age of 13, she lost that battle.  The make up world has come together to remember her today.  Her last instagram post was of her mint manicure, so today, thanks to Nicole from Nail Polish Wars for organizing this, we wear green to celebrate her life and her accomplishments.  So Talia Joy, this is for you:


The gold ribbon is for childhood cancer and the ring finger has gold balloons being released.  At the end of the post, I will list the polishes I used.

The family has asked that donations be made to the Base Camp Foundation in her memory.  Please take a moment to see what you can do to help.  You can also follow her facebook page, AngelsforTalia to follow her legacy.  Also be sure to check the links below to see what the other bloggers have done for this day.  Now I will leave you with one of my favorite videos of hers.  Thank you Talia for brightening a dark world and for your passion for make up and for life.  Keep Swimming...


I Used:
Sally Hansen- Parrot
Pure Ice- Mint Dream
Pure Ice- Don't You Wish
Pure Ice- Jaguar
China Glaze- White Cap


Thursday, July 18, 2013

Review: Born Pretty Holo Polish

The following products were furnished to Glittery Fingers & Sparkling Toes for review.  The opinions expressed are my own and were in not influenced in any way.

Hi Y'all!!  I hope you're having a fabulous Thursday!  I think I'm still trying to recover from our stay-cation.  I walked more in those five days than I have in the last two months.  But we had a lot of fun!

But on to today's review!  I am SO excited to show you this polish!!  Holographic polishes are extremely popular right now, and for good reason, they are GORGEOUS!!!  And today I have one of the colors from the Born Pretty Store, Holo Polish #12:
Do you see all that beautiful holo goodness??  The above picture was taken in direct sun.  But there is something extra special about Born Pretty Store's holographic polishes that I haven't found in other holos:
Yes!!  They show their holograph INSIDE too!!  You don't have to be in bright sunlight to see how beautiful these polishes are, they glitter under indoor lights too!
For this post, I reviewed Born Pretty Holo Polish #12, a pretty, dark, forest green with a linear holographic effect.  Pictures show two coats of Holo Polish #12, and top coat on pinky and ring finger.
To start this manicure, be sure to use a good, leveling base coat, or do like I did and use a top coat for the base.  This gives the polish a smooth, even base so that you get the maximum effect from the linear holo.  And for  everyone wearing acrylic nails, you can wear this polish!  Just use a good top coat as your base too.

As for the formula, it was perfect!  It went on smoothly without any balding or dragging and leveled out on its own.  It dried great, and only required two coats for full coverage so that bottle will go a long way.  And unlike most holo polishes, you can use a top coat without losing the holo!  In the pictures, only my pinky and ring finger have top coat because I wanted to see how well this polish stayed on the nail.  It did great! The pictures were taken on the second day of my very busy stay-cation.  There were no chips or wearing.

And another great thing about this polish is it's price!  Only $5.59 each AND with my discount code: NE5J61, you get 10% off AND free shipping!!  Click here to see all the fabulous holo polishes, and don't forget to use my discount code for 10% off.

So bottom line, this is the best holographic polish I've tried, and I've tried a lot.  This is a must have.  It went on wonderfully, wore great without any chipping and looks beautiful when you're inside too.  I really did get a lot of compliments on it.  See you tomorrow!  Happy Polishing!!

Wednesday, July 17, 2013

My Guest Post at Pammy Blogs Beauty

Hi Y'all!!!  I've really missed you this last week, or almost a week!  It felt so weird not having post to do, but I really enjoyed the time with the family.  It was a much needed break.  And I'm kind of glad we didn't go out of town, the stay-cation exhausted me!

So the wonderful Pammy, of Pammy Blogs Beauty and one of my fellow Metro Atlanta Beauty Bloggers, asked me to fill in on her blog while she moves.  I was thrilled!!  And I did a design that makes me think of her.  Click here to see the design and tutorial!!  And check out the rest of her blog!  Happy Polishing!!

Thursday, July 11, 2013

Neon Watercolor & Tutorial

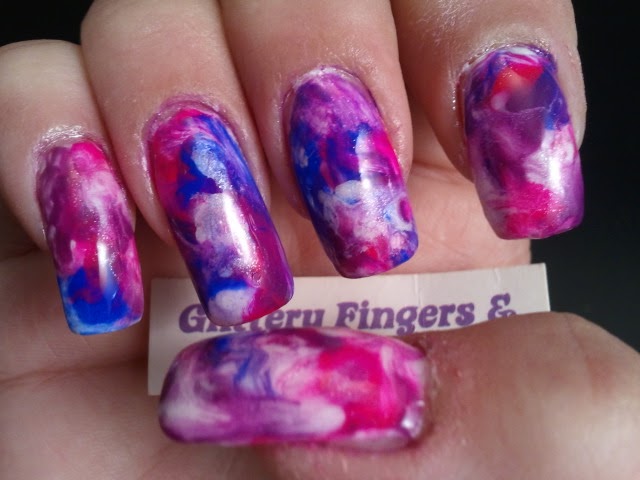
Hey Y'all!!  Today I'm headed out with the family on a stay-cation, but before I take off for a few days, I wanted to post this tutorial of my mani.  Just a warning, it's pic heavy.  I love the watercolor technique so much, but more because I tend to make it look more like tie dye, lol.  On another day I will show you the softer watercolor, but for today we're going for BRIGHT!
So that's the final look and here's what you'll need:
Of course, pick any colors you want,  I Used:

China Glaze- Dandy Lyin' Around (shimmery white)
Sinful Colors- Endless Blue (bright blue crème)
Finger Paints- Pink Perspective (bright neon pink crème)
essence- Break Through (bright purple crème)
100% Acetone
Small Brush
The little cup is a glass ramekin I pour the acetone in. ( I bought it really cheap at a dollar store and use it only for this purpose.)

Ok, so I started out with two coats of China Glaze Dandy Lyin' Around, a beautiful, shimmery white.  But any white polish will work.  Neon really needs the white to make the colors pop.
Then top with top coat.  Do not skip this step.  Otherwise, your acetone could eat all the way through to your nail and you'll have naked nail showing through.

Then line up the colors you've chosen.  I picked a neon/bright purple, blue, pink, and since I wanted the white to show, I added the white.  Open all the bottles.  Neon dries really quick, so you'll have to do the next steps a little fast.  Simply drop some of the nail polish colors on your nails, making them kind of thick/big:
Next, dip your brush (any small brush will work) into the acetone and swirl the colors around.
(It has to be 100% acetone, but you can find it pretty cheaply at grocery stores)
Make sure you cover all of your base color.  Once it has dried, top with top coat and you're done!
I hope y'all enjoy this tutorial!  I'm off to the aquarium!  Happy Polishing!!!


Wednesday, July 10, 2013

Australain Polishes Thanks to A Polished Prance

Hi Y'all!!!  Happy Hump day!! I hope every one is having a great day!!  I am super excited today because I have some fantastic polishes to show you today thanks to the incredible Chantelle from A Polished Prance!!!

I met the fabulous Chantelle through Kimber's ABC Challenge and she is just as sweet as can be.  Well during our "U" week, she posted this polish,  BYS Ultra Violet.  I told her I was drooling over it and she offered to get it for me!!!  So we've done a swap of a few polishes, and I think I'm the winner!!  She sent the most gorgeous polishes!!  (And some delicious chocolate) I can't wait to show them all to you!!  When I saw these two I knew they had to go together and had to be first!!  So here is BYS Ultra Violet and Glitterati Heart of Glass:
Sorry for the cuticles, kitchen accident
I LOVE THESE POLISHES!!!!  Ok, first up is the one that started the trade, BYS Ultra Violet,  a gorgeous blue leaning purple with a very slight silver shimmer.  This is a one coater, but I used two because, well, I just always do two coats.  The silver shimmer isn't that obvious, but it gives the violet a softer look I think.  The pictures show two coats with top coat.

Now the rest of the polishes were a surprise, and I jumped up and down when I saw Heart Of Glass by Glitterati Nail Enamel, Face of Australia!!!  Heart of Glass is a lilac milky jelly with all kinds of fabulous glitter wonderfulness in it!!!  Not kidding.  It has holo pink hearts, holo bar glitter, micro holo, medium red squares, small purple squares, fuchsia squares...just tons of glitter goodness!  The pictures show two coats with one coat of top coat.
This was such a fabulous trade!!!  I'm thrilled with all the polishes and can't wait to show them all to you.  So be on the look out for them!  The only yucky thing is my package hasn't reached her yet :(  I checked and it left the country.  So keep your fingers crossed that it makes it!  Until then, be sure to check out her site, A Polished Prance!!!  Happy Polishing!!!

Tuesday, July 9, 2013

Try It On Tuesday (& Review)

Hey Y'all!!!  Sorry I've been missing the last few days.  I took the 4th of for some family time and then my web site took Friday off, lol.  Seriously.  I couldn't even get on it.  So I took that as a sign to take a few days off.  It was great.  And I have a new skill, I can make friendship bracelets!!  LOL, so if you ever want to know how, just let me know :)

Now to today's post.  The wonderful Gini at Sassy Paints 2012 (LOVE HER!!!)  has started a new, super relaxed challenge and I'm thrilled!!  It's the Try It On Tuesday for your untried polishes.  I have a ton of untried.  It happens to the best of us.  And I love this challenge because now I have to try them.  I mean, I love them, that's why I bought them.

So for my first TIOT, I have OPI Innie Minnie Mightie Bow from the newest Minnie Mouse Collection:
Isn't it fabulous??  Innie Minnie Mightie Bow is a gorgeous red with blue undertones, and red and pink shimmer.  The shimmer is subtle, but it's there.  This polish almost glows on your nails!  The pictures show two coats with one coat of Seche Vite top coat.
The formula was good.  It started out perfect, but then seemed to thicken up as I went along.  I have no idea what that's about, but it wasn't really thick. It was still manageable.  And in the picture above you can see the glow the polish gives.  Bottom line?  LOVE!!!  It is worth any headache!

Want to see the other TIOT participants?  Just visit Sassy Paints' facebook page!  There will be a photo album with links to the blog or original picture.  Want to participate but you're not a blogger?  No problem!  She has you covered.  Just click here for all the info!
Happy Polishing!!!


Wednesday, July 3, 2013

ABC Challenge: Z is for Zebra (& Neon Gradient)

Hi Everyone!!  I hope y'all have a fun Wednesday.  It's supposed to storm here today through Saturday morning.  Ugh!!  So the now-a-teen and I are going to lunch and a movie.  Now if we can just decide which one.  She wants Despicable Me 2 and I want to see The Lone Ranger.  Don't laugh!!  Don't judge me!  I love westerns!!  Really I do.  It has nothing to do with Johnny Depp being in the movie.  Or him being shirtless throughout it.  Stop laughing!!  It doesn't!!

Fine.  If you're going to be like that I will get on to today's mani.  Today is the last ABC Challenge.  We did it!!  26 weeks later and we are at Z!!!  So for me, Z stands for Zebra and Zoya!
I Used:
Sinful Colors- Snow Me White (white crème)
Orly- Glowstick (yellow neon crème)
China Glaze- I'm With The Lifeguard (green neon shimmer)
Nina Ultra Pro- Blue Blaze (blue neon crème)
Zoya- Storm (black with holographic micro glitter)
Medium Striping Brush
Make Up Sponge

I love how this turned out.  The inspiration for the neon gradient came from one of China Glaze's new ombre kits.  Which are fabulous deals, $12.99 for four full sized polishes.  But for this particular gradient, I had three of the four colors, so I just used my own polishes.  I started with one coat of Sinful Colors Snow Me White.  Then, painting stripes of colors on a make up sponge, I sponged on the neon gradient.  This took two coats.

For the zebra print...well this is probably the easiest animal to do.  All you have to do is paint triangle shaped stripes.  They don't have to be even or straight, in fact they shouldn't be!  So shaky hands, can't draw a straight line...no problem.  You can do this.  Just use a thin, medium bristle length brush.  The only sad thing is the holographic glitter in the black didn't really show up.  But I like it anyway. 

Be sure to check out what the other fabulous ladies have come up with for Z.  And don't forget, we have a new challenge starting up the beginning of August.  This one is 30 weeks long and has some incredible challenges in it.  Now I'm off to bribe, I mean DISCUSS which movie to go see with the now-a-teen.  Who do you think will win?  (Check my facebook page later to see).  Happy Polishing!!