Friday, May 23, 2014

Studded Mint & Gold Half Moons

Press Sample

Hey Y'all!!  Happy Friday!!  Anyone have plans for the holiday weekend (here in the US it's Memorial Day)?  We only have plans to do nothing!  We've gone for 4 straight weeks, so we plan to be complete couch potatoes this weekend.  Plus the hubby has to work today and Friday.  But it will be so nice to sleep in!

For today I have an elegant twist on the Half Moon, Studded Mint & Gold Half Moons:
I Used:
Sally Hansen Insta-Dri- Mint Sprint (dark mint/turquoise crème)
Sally Hansen I Love Nail Art Stud Kit- gold studs

Preen.me sent me a bunch of fun and fabulous Sally Hansen products to try (and you will see them all in up coming posts)!  And this design leaped out to me the second I saw the products!  I think this is such a modern and elegant take on half moons and is a whole lot easier to do!
Start with two coats of Sally Hansen Insti-Dri in Mint Spring.  Loved this polish!  It was a dream!  And to be honest, you can get away with just one coat.  I can't...I just have to do two.  I just do.  Plus I think the mani last longer with two coats, but that is just my opinion.
The gold studs are part of the Sally Hansen I Love Nail Art stud kit.  It comes with gold studs, and black and white rhinestones and a rubber tipped stick to help with placing them.  This is such a fabulous kit!  And it contains a lot of studs.  After completing this many you could barely tell I used any of them! 

For the next step, you need to work with one nail at a time.  Paint a pretty thick coat of top coat then working quickly, place the studs.  I chose to place them in a more triangular shape...makes me think of art deco, which I love.  Once all the studs are placed, apply another coat of top coat to secure your look!

I hope you enjoyed today's look!  Happy Polishing!!

Thursday, May 22, 2014

Tahitian Sunset (or Peach/Orange Gradient)

Hey Y'all!!  I've missed y'all so much!!  I told you things were insane, and they have been!  The end of the year is always so busy, but this year seemed even busier than normal.  And if all that wasn't enough, I thought I would enter a nail art competition.  Ah, stress.  And even though I'm losing the competition, I at least have a bunch of nail art designs coming up for you!  And if you follow me on Instagram, you can see all the designs :)

For today I have what I'm calling Tahitian Sunset because it reminds me of Tahiti:
I Used:
Sinful Colors- Hot Chili (dark rusty orange with micro holographic glitters)
Sinful Colors- Coral Riff (bright coral with subtle blue shimmer)
Sinful Colors- Anchors Away (yellow creme with strong orange undertones)
Make Up Sponge
Y'all know how I do gradients (and if you don't, just click gradient under the labels in the left hand column), so I'll skip the directions.

These Sinful Colors all came from their Simmer Down collection.  I can not tell you how much I love this collection!!  All the colors remind me of sultry, tropical nights!  And all the formulas worked beautifully!
I hope y'all have a fabulous day!!  Happy Polishing!!

Tuesday, May 13, 2014

Spring Flowers

Hey Y'all!!  Whew! I'm exhausted and it's only Tuesday.  The next eight days are going to be insane.  And if I didn't have enough on my plate, I joined a contest on Instagram being held by Salon Perfect.  I am so ready for a day to do nothing.  Oh well, maybe in 9 days! 

But for today I have my first entry for the contest.  The theme was floral (and look!  I even used a prop!):
I Used:
Sinful Colors- Easy Going (medium cream crème)
Wet-n-Wild- Tickled Pink (light pink crème)
Sinful Colors- Pink Forever (bright pink crème)
China Glaze- 108 Degrees (dark pink glass fleck)
China Glaze- Put A Bow On It (magenta glitter in a dark magenta base)
Fine detail brush
This was a pretty basic mani.  I started with two coats of Sinful Colors Easy Going.  Then using a fine detail brush, I painted the petals using Wet-n-Wild Tickled Pink, Sinful Colors Pink Forever and China Glaze 108 Degrees.  Then I used China Glaze Put A Bow On It.
I really like how this turned out.  It really reminds me of Spring.  Fingers crossed on the contest.

If you're not already following me on Instagram, head over there.  It's the easiest way to keep up with me and to get sneak peeks on upcoming nail art!  Just click here!

Have a fabulous day and Happy Poliahing!!


Friday, May 9, 2014

Purple & Hearts & Circles & Holo & Oh My!

Hey Y'all!!  Happy Friday!!  I am so happy it's Friday!  The teen and I have an entire day to chill before another crazy 10 straight days((minus Mother's Day) that include dance, recital, end of the year school parties and oral surgery.  Dang!  It's all her stuff.  LOL, I guess I don't have a life anymore!  Do any of y'all have special plans for the weekend?  Mother's Day is Sunday.  I plan for the teen and hubby to wait on me hand and foot all day!  And crab!  I want crab for dinner!  And lunch!

Ok, so if y'all follow me on facebook, twitter or instagram, you know that a couple of weeks ago some of my blogger buddies and I had a swap.  And the person who had me was the incredible, fabulous, beautiful Natalie at Over The Top Coat!!!!  And she did an incredible job!!  She knocked off a bunch of my wants and loaded me up on jelly beans (my favorite candy)!!!  It was so hard to choose which polish to use first, but I was predictable.  I went with the purple and glitter!
Holy crap on a cracker!!!  These were AH-MAZING!!!!  Pictures truly don't do these justice!!

The lilac is China Glaze Lotus Begin, a beautiful lilac crème.  LOVE!!!  Pictures show two coats.

The glitter top coat is Above The Curve Circle of Love.  OMG!!!!  This is my first Above The Curve nail polish, but it won't be my last.  Circle of Love is mind blowing!  Ok, I will try to tell you everything in it...  Circle of  Love is a clear based topper with:  lilac hearts (hard to see because it's the exact same color as Lotus Begin), red hearts, pink hearts, white hearts, large holographic circles,  large red circles, medium white circles, medium pink circles, medium red circles, medium magenta circles, small magenta circles, small pink circles, small white circles, miro red glitter and micro holographic glitter!  Whew!!  That's a ton of glitter!  And a ton of fabulousness!!  I think I got them all!!

Pictures show one (yep, that's just one) coat of Circle of Love with two coats of top coat, just to make sure everything evened out. I didn't even have to dig for the glitters.  Not even the big ones!

I can not begin to tell you how much I LOVE these polishes!!  And I can't thank the fabulous Natalie enough!!!

Hope y'all enjoyed today's post and that you have an incredible weekend! Happy Polishing!!

Thursday, May 8, 2014

Review: Madison Street Beauty Polish

Press Sample

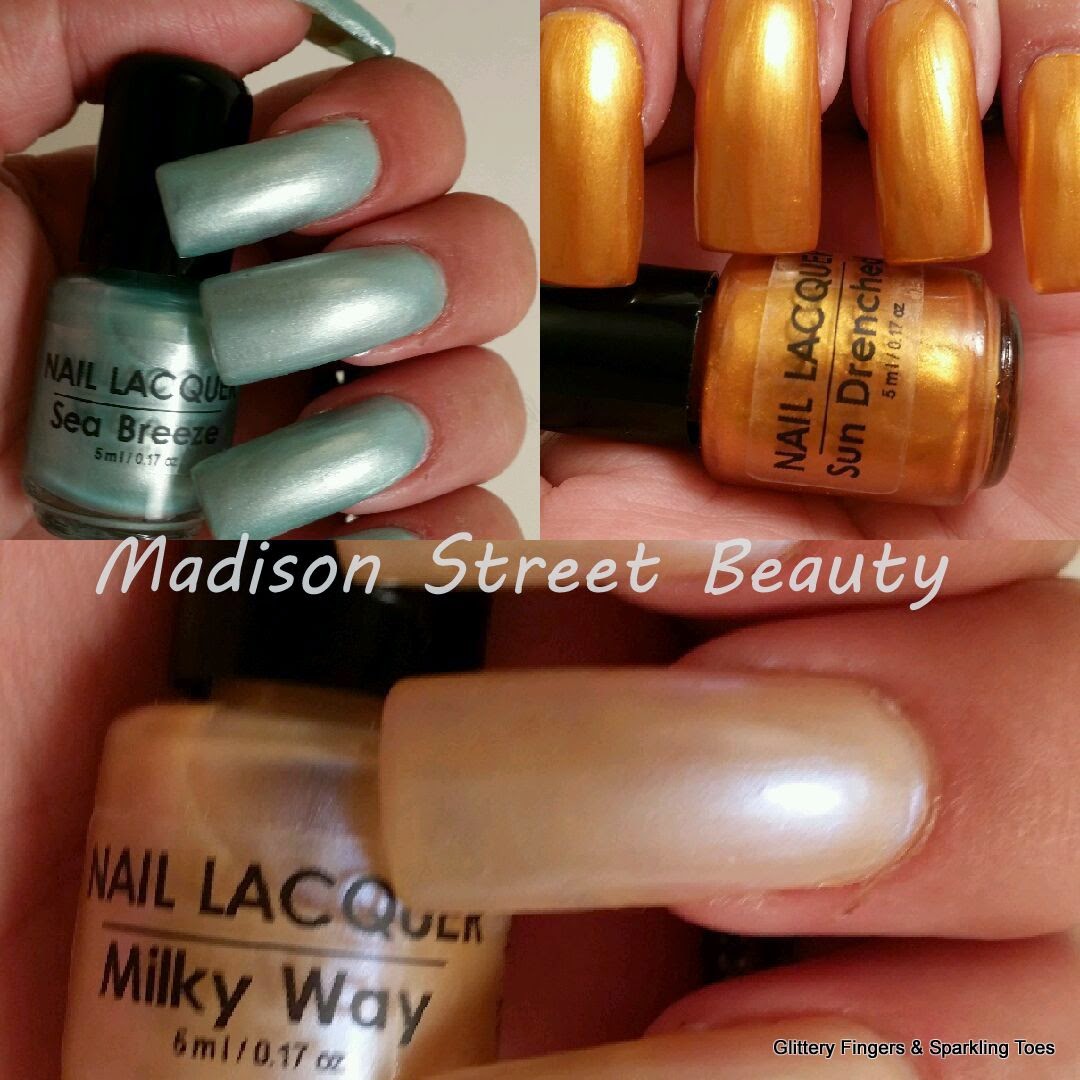
Hey Y'all!! I'm so excited about today's post!  I have three incredible polishes from Madison Street Beauty!!!  By clicking that link, it will take you to their etsy store (they are currently revamping their website).  Madison Street Beauty has all natural mineral make up and their polish is 3-Free, Formaldehyde, Toluene, and Dibutyl Phthalate (DBP)! Everything is hand made with top quality and care in Las Vegas, Nevada.  And none of their products are tested on animals.  While I love their make up (and can't wait to get my hands on it), they sent me three polishes of my choosing to review for y'all.  So let's get to it!!


Milky Way

Milky Way is a creamy white with a blue shimmer.  Pictures show three coats with top coat.  The formula was great.  It was streaky, like most frosts, but evened out perfectly with a second coat.  I did choose to add a third coat to make it completely opaque.  There wasn't any balding and no visible brush strokes. This is such a gorgeous color.  It's so light and just such a perfect shade of white.  And that blue shimmer?  Love it!!  And it's so appropriate for any occasion!  Whether for work or a night out, Milky Way would fit perfectly!
(For some reason known only to the experts at MIT, my camera ate all the pictures of Milky Way taken in the sun.  But one survived in a collage posted below.)

Sea Breeze
Sea Breeze is a light, frosty blue.  Pictures show two coats with top coat.
The formula was fantastic!  A little streaking with the first coat, but the second coat cleared that right up.  And....no brush strokes!  Love Sea Breeze!!  It's such a wonderful blue!


Sun Drenched
Sun Drenched is a gorgeous, golden topaz frost.  Pictures show two coats with top coat.

The formula was great on this one too!  There was streaking on the first coat, but the second coat evened everything out nicely.  And again, no brush strokes!  I have to say this one was my absolute favorite!  It just screams summer to me :)  Sun Drenched is just gorgeous on!!

I have to say I'm totally in love with these polishes!  They were so easy to work with, the pigments were strong and they are absolutely beautiful on!
And are you ready for the very best part??  Right now, they are on sale!!  All polishes come in the mini, 5ml bottles you see in the photos and are normally $4.99 but are on sale for just $2.00 each!!  It's the perfect time to try them and stock up on your favorites!!  Just CLICK HERE to see their etsy shop!!

I hope to bring you more from Madison Street Beauty soon!!  Happy Polishing!!

These products were furnished to Glittery Fingers & Sparkling Toes for review.  The opinions expressed are my own and were in not influenced in any way.


Wednesday, May 7, 2014

Another Spring Pedicure

Hey Y'all!!  Oh. My. Goodness!!!  I've missed y'all!!  The last five days have been a whirl wind of tons of going and no sleeping!  The teen was in "Cinderella", five shows in three days.  On Monday we got up at 4:45am and got home at 7:45pm!  I'm too old for this!  But she was beautiful, if I say so myself :)   Basically, we weren't home for five straight days. 

I do have a pot or you today!! It's the third pedicure from my Atlanta Parent Magazine article:
I Used:
Wet-n-Wild- Temptation (bright salmon crème)
Wet-n-Wild Mega Rocks- Stick It To The Man (medium blue and holographic glitters in a clear base)
Maybelline Triple Shine- Sparks Fly (various sizes of light blue and silver glitter in a clear base)

So I wanted this to be a glitter gradient, but it didn't quite work that way, but I still like the outcome.  I started with two coats of Wet-n-Wild Temptation.  Then, using the brush that came with the polish, I painted Wet-n-Wild Stick It To The Man on the top half of my toe nails.  I really love this color, but the glitter was just too sparse to make a gradient.  So I went back over it with Maybelline Sparks Fly.
I hope y'all enjoyed today's pedicure!!  Happy Polishing!!

Thursday, May 1, 2014

Spring / Summer Pedicure

Hey Y'all!!  Well, at least today started off better than yesterday!  If you follow me on Instagram or Facebook, you know we had a tree come down and with it, a power line that landed on my van.  Thankfully we are all ok, and everything is cleaned up.

For today, I have one of the pedicures used in the Atlanta Parents article:
I Used:
Orly- Flawless Flush (soft lilac with silver shimmer)
Finger Paints- First Edition (dark purple neon)
Pink and Yellow Rhinestones
Make Up Sponge

To start this pedicure, I used two coats of Orly Flawless Flush. Once that was dry, I took a make up sponge, and after cutting it down and wetting it, I painted very thin stripes of Orly Flawless Flush and Finger Paints First Edition, cause, you know, toe nails are little.  Then just dab on.  It took two coats  Top coat is next.  When applying the top coat to the big toe, sink the rhinestones down into the top coat.  I used five pink rhinestones and one yellow to make the flower.
I hope y'all enjoy today's design.  I now have to rush and get the teen ready for dress rehearsal!  Have a fabulous day and Happy Polishing!!