Showing posts with label striping. Show all posts

Monday, January 27, 2014

Review Born Pretty Store Striping Tape

Press Sample

Hey Y'all!!  I hope y'all are staying warm!!  It's ridiculously cold here!!  Today's high is 32 degrees.  That's the high!  WTH??  I can't wait for Spring.  I feel like going to bed and not getting out until the temperatures reach the 70's! At least I'm home now and have the central heat on, every space heater and am bundled up after spending all morning and half the afternoon out.  Although I did get to go to Red Lobster for a pre-birthday lunch, yay!!

And I have some great striping tape for you today from Born Pretty Store!!
The pictures show a base of Orly Grave Mistake, a deep red crème from the Dark Shadows collection.  Then Born Pretty Store sent the above striping tape for review.  It's a gorgeous holographic gun metal design.  It truly needs to be seen in person, it is so pretty!!
I love, love, LOVE using striping tape for nail art!!  It can be used so many different ways!  My favorite way is the using the tape on the nails like in the pictures above.  I do have a couple of tips for you when using striping tape.  First, don't let your nails dry completely.  Apply the tape while they are still slightly tacky.  Once you have the tape where you want it, carefully press it down.  This will make the tape wear longer.  Also, cut the tape just short of your nails so nothing is hanging over the edge.  One last tip, using tweezers to place the tape can help.  Cut lengths slightly longer than your nail, place the tape, then I use nail clippers or cuticle scissors to trim the tape to the proper length.  And don't forget the top coat!!
Another great way to use striping tape is in making clean, straight lines for nail art like in my Gwen Stefani French Tips:
And the absolutely best part?????  Right now you can get
3 rolls of striping tape for just $0.99!!
That is a great deal!!  This is only for a limited time so hurry!!  But even if you miss this deal, the regular price for a set of 3 rolls is only $1.90!!  And if you use the code NE5J61 you can get an additional 10% off plus free shipping world wide!!  There are over 30 different colors to chose from.
 
I hope y'all have a fabulous day and Happy Polishing!!


The following products were furnished to Glittery Fingers & Sparkling Toes for review.  The opinions expressed are my own and were in not influenced in any way.


Monday, January 20, 2014

Gwen Stefani French Tips

Hey Y'all!!  First, wow!!  Thank you for all the love on facebook!!  I hit 1,100 likes this weekend and am thrilled!!!  Thank you, thank you!!  I'm gonna start collecting goodies for a Thank You Giveaway!! 

That was the icing on an already fabulous weekend!  See, today is my wedding anniversary.  24 years today.  I was 5 when we got married.  No, seriously, I was.  Would I lie to you?  Anyway, the hubby took me shopping.  We hit Saks Fifth Avenue and Sephora.  But before that, we went to lunch at our absolute favorite Italian restaurant, Ippolito's!  Yummy!!  That's where I ate a ton of garlic. Garlic makes me burp.  Garlic makes me burp like a 300 pound man named Bubba.  That explains why, in the middle of Saks Fifth Avenue, I let loose with a burp that would put any Bubba to shame.  Yep.  I did that.  I also quickly looked at my husband with a disgusted look and said, "Really?  Control yourself!"  Yep, I did that too!

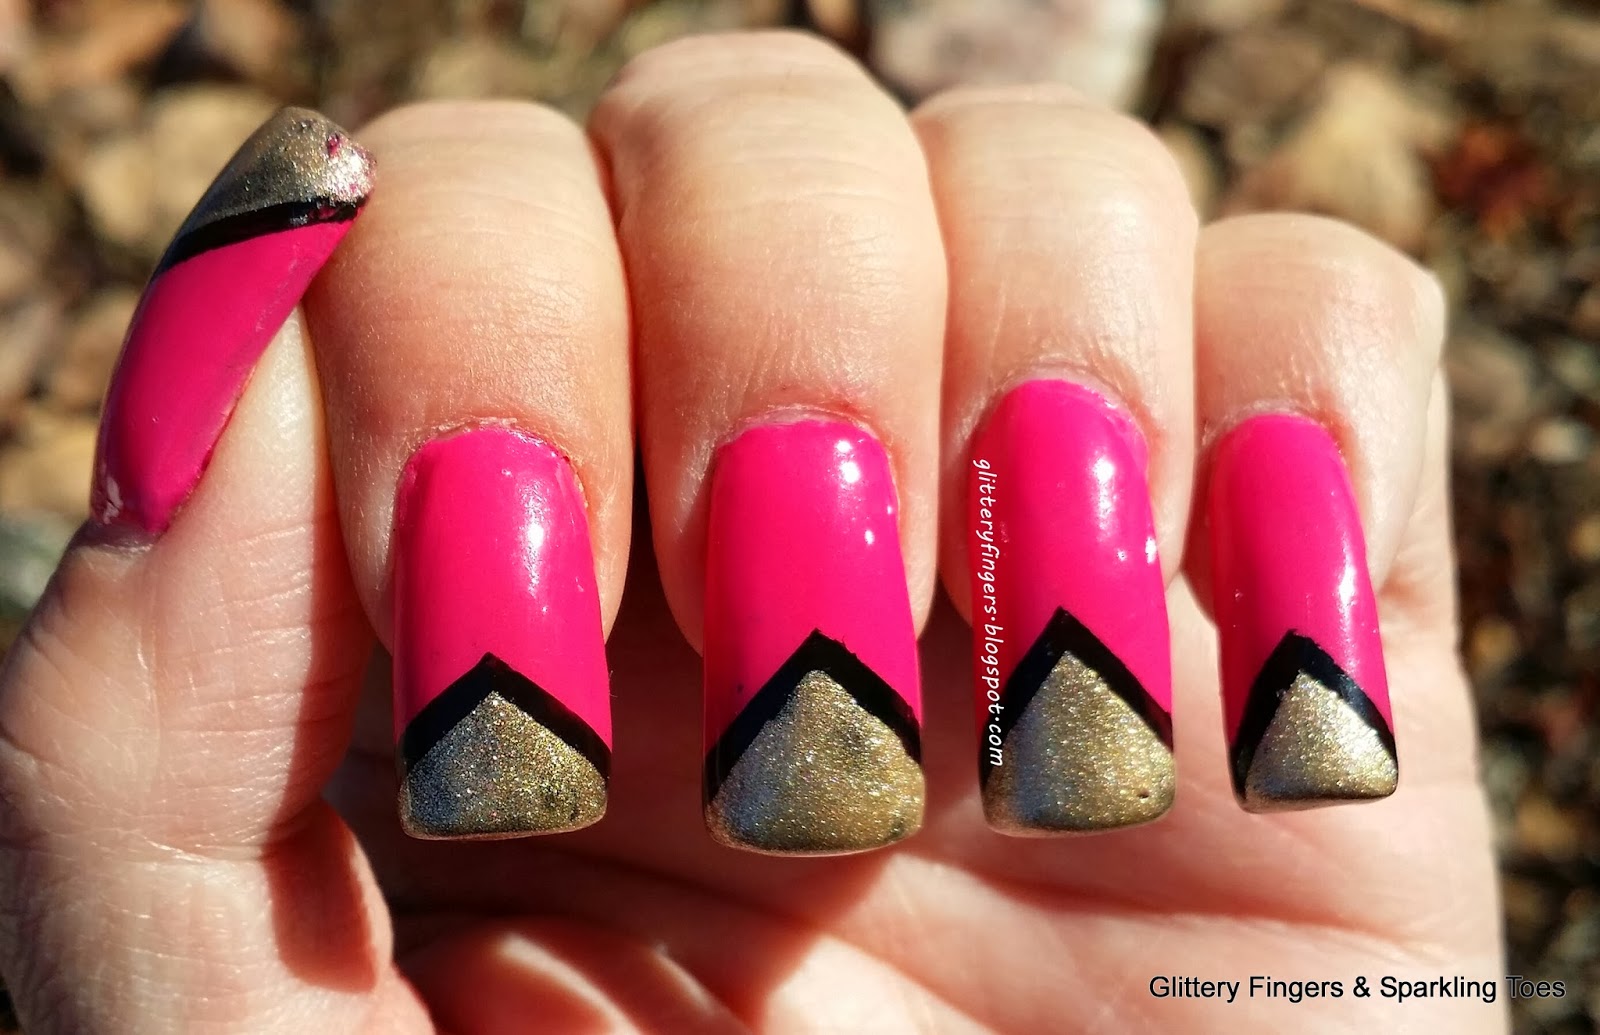
Ok, on to today's post.  Today I have French Tips using the new OPI Gwen Stefani collection:
I Used:
OPI- Hey Baby (bright pink crème)
OPI- Love. Angel. Music. Baby (gold shimmer satin finish)
China Glaze- Liquid Leather (black crème)
Striping Tape

This was a fun and easy mani to do, it just takes a little patience because you have to wait for each color to completely dry before moving on to the next step. (I'll do a review of the polishes on a later post)

To start, paint two coats of OPI Hey Baby.  Remember to let it dry completely.  Then using striping tape (or you could use scotch tape), tape off a wide V at your nail tip:
Fill in with your black polish and immediately remove the tape and let dry.  Then tape off all but a small edge of the black V:
Then fill in with OPI Love. Angel. Music. Baby.  Remove the tape immediately.  Now you can either leave it just like this to keep the satin finish of the gold, or use a top coat over the whole design.  I used a top coat because I wanted to wear this for a couple of days and wanted to make sure it would last.
I hope y'all enjoyed today's design!  And thanks so much for stopping by!!  I'll be back tomorrow with a Try It On Tuesday polish.  And remember, if you tell anyone about the burp in Saks....my hubby did it!

Happy Polishing!!


Wednesday, June 19, 2013

ABC Challenge: X is for, well, X

Hi Y'all!!  How is everyone today?  Can you believe we are already to X??  And, dang it, I'm not sick.  I had only a couple of ideas (two...I had only two) and I went with the second idea.  So, drum roll please, here is my design for X:
I Used:
Finger Paints- Leonardo's Lime (lime/neon crème)
Finger Paints- Peacock Portrait (dark holo glitter bomb
Sinful Colors- Snow Me White (white crème)
Stripping Tape

Well, these didn't turn out like I meant for them to.  One problem I had was with Leonardo's Lime by Finger Paints.  Leonardo's Lime is a beautiful light neon green. I really loved the color, although it wasn't anything spectacular.  I have three other very similar polishes.  But the problem with this one is that it BLEEDS!!  Big time!!  It dyed my nails and bled through the white polish I topped it with.  Yep,  that's Sinful Colors Snow Me White on top.  It turned an ugly yellow color.

I also used another new color by Finger Paints, Peacock Portrait.  LOVE THIS!!!  It's a gorgeous, dark holo glitter bomb.  What's not to love???  Here's what the colors look like on their own (except Peacock Portrait is over white):
Picture's do not do Peacock Portrait justice.  Sadly there's not any sun today, but I will be wearing this again soon!!

AND::::  GFC is going away in just a week and a half.  If you follow me through GFC, please take a second to follow me through Bloglovin!!  I have a huge giveaway starting next month to celebrate my One Year Blogiversary and I don't want you to miss it!!  Be sure to check out what the other wonderful ladies came up with for X in the links below!!  Happy Polishing!!


Friday, May 3, 2013

Purple & Silver Pedicure

Hi y'all!!!  Happy Friday!!  I hope you're having a fabulous day!!  I actually have this post scheduled cause it's my insane time, but I will be sure to tell you how the weekend went on Monday.  And I will try to post pictures on my facebook page over the weekend.

And now here is my promised THIRD pedicure of the week!!  I did it!!  Three pedicures in one week!
I Used:
Sinful Colors- Dream (neon purple)
Pure Ice- Dazzle Me (silver and holographic glitter in a clear base)
Silver Striping Tape

I received the gorgeous Sinful Colors from the fabulous Natalie at Over The Topcoat in a giveaway.  It was love at first sight.  The pictures show two top coats.  When that was still a little tacky, I placed the silver striping tape.  Love striping tape!!e!!!  And it's really pretty cheap and easy to use.   (it can be ordered by clicking this link for Born Pretty Store.  It's $1.90 for 12 rolls and if you use my code in the right column you can get 10% off!!)  I placed one piece of tape diagonally across all my toes but the big toe.  On that one I placed two pieces diagonally and parallel to each other.
Then fill in the space in between the two lines on your big toe with a pretty glitter.  I used Pure Ice Dazzle Me (thank you to the incredible Gini at Sassy Paints).  Dazzle Me is a clear base with micro silver glitter and small hexagon and medium diamond holographic glitters.  Love this!!  And as always don't forget the base and top coats!

Pictures don't do this design justice!  It's incredible!  Everything sparkles or shines.  It seems like my toes are twinkling!!  Hope y'all enjoy this!  Have a great Friday and Happy Polishing!!!


Friday, March 8, 2013

Reciprocal Gradient

Hi my friends!!!!  I'm so happy to see you today!  And...it's Friday!!  Anyone have big plans?  I am so excited about this post today that I'm going to get straight to it!  This design is called a Reciprocal Gradient and was named and made up by Emma at Globe and Nail.  I LOVE THIS DESIGN!!  As soon as I saw it, I knew I had to try it.  The link above shows her original design and here is mine:
I Used:
Sinful Colors- Black on Black
Nina Ultra Pro- French White
Orly- Shockwave (gray crème)
Stripping Tape

Isn't is fun?  I would give you the steps to do this, but Colette at My Simple Little Pleasures, made a fabulous video with great directions for this design. So today I just have pictures for you. 

Thank you all so much for checking this out!  I appreciate each and every one or you!!  Whether you've been with me from the beginning (love you) or just joined (welcome), THANK YOU!!  Have a fabulous weekend and I'll see you soon!  Happy Polishing!!

Monday, November 19, 2012

Red & Silver French Tip

Hi Everybody!! I hope y'all are having a fabulous week.  And I hope y'all will forgive me for rushing the season, but I was so excited to try these polishes, I couldn't help myself!  Plus the next three wees are going to be ridiculously busy.  This week is Thanksgiving.  Then two weeks later my almost teenager is in "The Nutcracker".  So on top of her normal five days a week of classes, we have to add Nutcracker rehearsals.  I'm getting tired just thinking of it.  Although this is her sixth year...nope, still not used to it.

So anyway, enough whining.  Here's my first manicure of the Holiday season, a sparkly french tip.  I think this would be great for a Christmas party.


Right Hand
I Used:
Orly- Torrid
China Glaze- Glistening Snow
Silver Striping Tape

I started with two coats of Orly Torrid.  While that was still tacky, I placed the silver striping tape at my finger tip line.  Applying the tape before the nails completely dry helps the tape to stick to your nails.  I used the tape as my guide for making the french tip, but there are other ways to make the french tip here.

Next I painted all of my nail tips, except the ring finger and thumb with two coats of China Glaze Glistening Snow.  For my thumb and ring finger I used two coats of Glistening Snow on the bottom half of my nail. 

Glistening Snow is very similar to China Glaze Angel Wings.  Both are from their 2012 Holiday Collection.  Glistening Snow is a clear based polish packed with silver holographic micro-glitter.  It is so packed with polish that two coats will give you complete coverage.  It has a very subtle glittery look, perfect for the winter.  Once on the nail, it dries very quickly to an almost matte finish.  It's also pretty gritty and soaked up the top coat.

I used two coats of top coat to seal my design and give it a smooth finish.  I hope y'all enjoy this manicure.  Happy Polishing!!
Left Hand

Monday, October 22, 2012

Blue & Fuschia Glitter Art Deco

Morning Everyone!!  Did y'all have a fabulous weekend?  I did.  Not only did it include a wonderful ballet, all weekend with my family and great food, but there was a trip to Ulta!! That may not be a big deal to most people, but I live in a small town and we live way out in the country (the closest grocery store is over 14 miles away).  Ulta is over an hour and two counties away!  So for me, going there is a big treat!  And I left with a lot of great polish!

Having all this new polish, I couldn't decide what to do, so my daughter picked out two colors and said, "Use these."  I don't know why but they made me think of this art deco vase/box thing from the 20's I have...despite not being the same colors. 

Anyway, here's my design:

I Used:
China Glaze- Frostbite (blue)
Orly- Bubbly Bombshell (fuchsia glitter)
Scotch Tape
Stripping Tape


I started with Frostbite, a beautiful, bright blue shimmer polish.  Although two coats were fine, it took three coats to get it to the same shade as it looked in the bottle.  The formula is great, just a little thin,

Once that has dried completely, use scotch tape to tape off a narrow V with the point at the cuticle.
The top of the V doesn't go all the way to the corner of my nail. My daughter was afraid I would cover up too much of the blue, so narrow V.  Next I used Orly's Bubbly Bombshell, a fuchsia colored glitter in a clear base.  It took two coats to get the saturation of glitter I wanted.  To do this, paint one coat and leave the tape on.  Once you've painted the second coat, immediately remove the scotch tape.

When the glitter dries, use black stripping tape to tape off the design.  Place the tape on both arms of the V, then one in the center.  If you don't have black stripping tape, you can use black polish to make the stripes.

Don't forget your top coat!  Hope you enjoy my art deco design.  Happy Polishing!!


Wednesday, September 12, 2012

Stripes

I saw, what I thought was this design, on Pinterest and loved it.  I went to copy the look and it turned out I didn't, but I still love how it turned it out.

I used:
Orly- Royal Navy
Light Blue Stripping Tape
Pro-FX Quick Dry High Gloss Top Coat

I have to tell you that I love this Orly polish! It's the perfect royal blue and has a silver shimmer to it. Anyway, I started with two coats of Orly's Royal Navy.  Once that was almost dry, but still tacky, I put the stripping tape on.  If you put the tape on before the polish is completely dry it will last so much longer than waiting until it dries completely.  My manicure is 7 days old in the above picture.  Once the taping is done, remember to apply your top coat.  I used two coats of it on this design to even it out.

Let me know what you think! And as always, Happy Polishing!!

Monday, September 10, 2012

For the Love of Teal (Turquoise and Gold)

This is definitely one of my favorite nail art designs. I've been using this design for over 20 years in every color/glitter/tape combination imaginable.  I hope you like it! For this version,

I Used:
China Glaze- Turned Up Turquoise
Orly- Mermaid Tale
Gold Striping Tape
Pro-FX Quick Dry High Gloss Top Coat


Start with two coats of the non-glitter polish.  Here I used the China Glaze Turned Up Turquoise.  When that is completely dry, put a line of gold stripping tape diagonally across your nail. Then just fill in the other half of your nail with the glitter polish (Orly's Mermaid Tale).  Finish with a top coat (or two) and you're done!

There are endless combinations to this simple design.  That's what makes it fun for me.  Happy Polishing!!
Outside: