Showing posts with label drips. Show all posts

Thursday, October 31, 2013

Happy Halloween!! Red & Black Design

Happy Halloween Y'all!!  So tell me, what plans do you have for this most frightening of days???  Since my now-a-teen is too old for trick-or-treating and too young for parties, she and I are having a "Halloween" movie marathon!!  An entire day of Michael Myers ripping people apart!!  Did I mention this is her first time seeing a horror movie?  Last year I introduced the idea of horror movie with Attack of the Killer Tomatoes, so why not step it up this year?

But I do have a Halloween mani:
I Used:
Sinful Colors- Black on Black (black crème)
Fright Night Claw Polish- Voodoo (red crelly with red glitter)
Dotting tool

I realize that most bloody drips are colored the opposite way, but y'all know I have to be different. 
I love how glittery Voodoo is!
I hope y'all enjoy today's mani!  I would love to see yours!  Just share them on my facebook page.  Now back to my Halloween movie marathon!  Happy Halloween!!

Monday, October 21, 2013

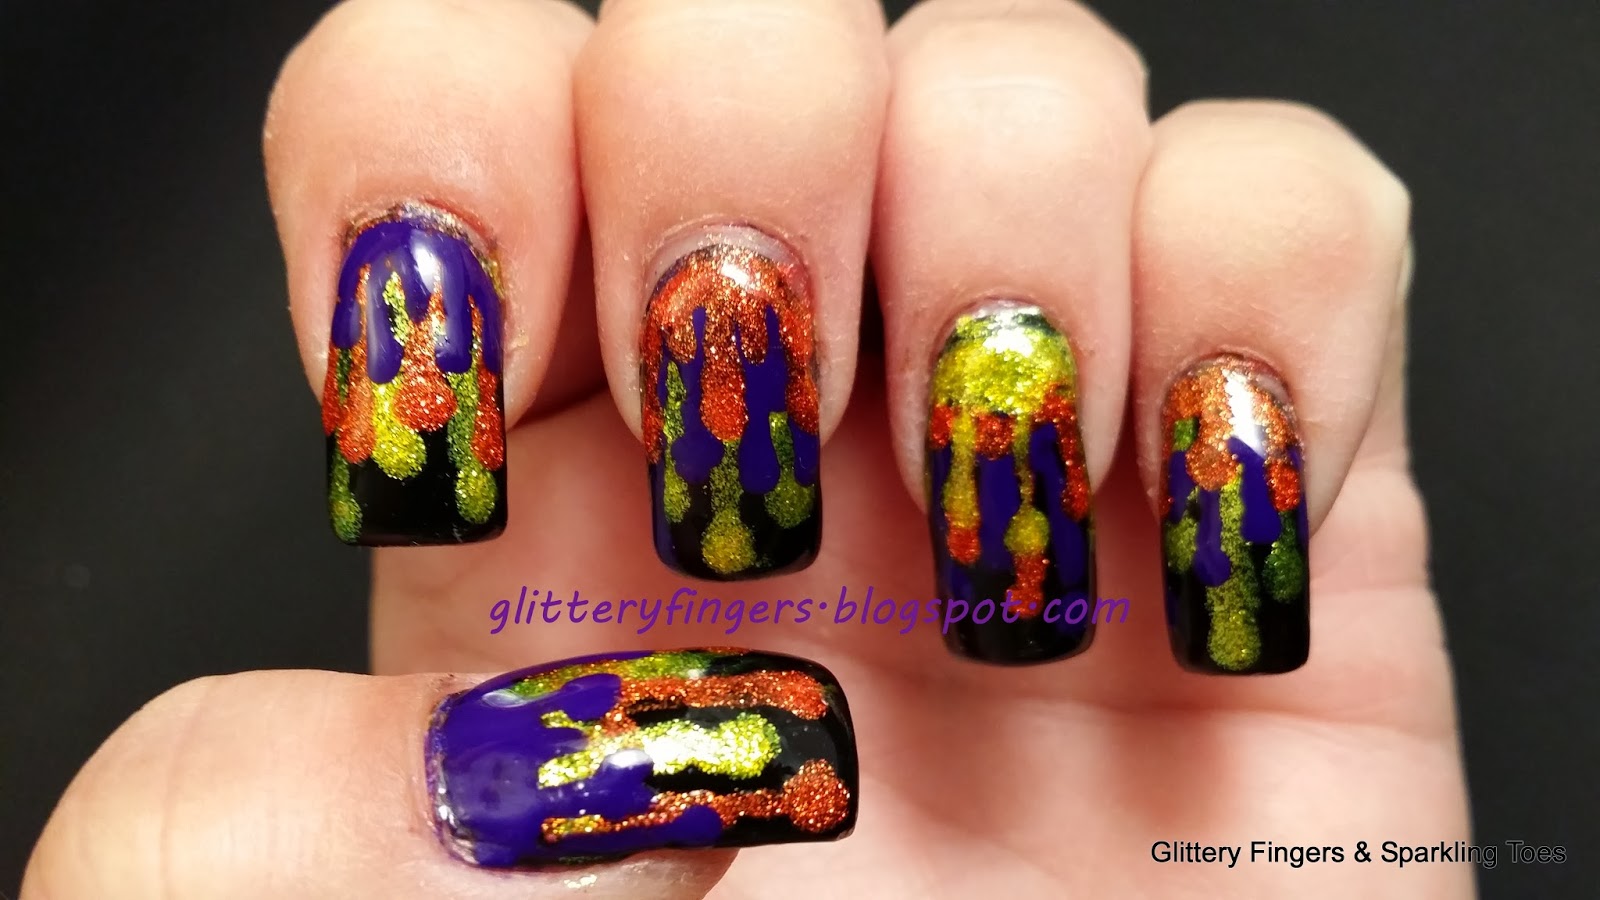
Halloween Multi Drips

Hi Y'all!!  Happy Monday!  Are y'all ready for the Fall weather yet??  I'm not!!  It was 63 degrees in the house this morning!  Yuck!!  And today and tomorrow are the last days in the 70's.  After that it's all 60's and 40's.  I'm just not a cold weather kind of gal...and this is just the Fall!!  I have a feeling it's going to be a miserably cold Winter :(

But I do love Fall activities, football, new tv season (loving Sleepy Hallow and can't wait for Dracula Friday), harvest festivals and Halloween.  And today I have Halloween Multi Drips for you:
I Used:
Orly- Liquid Vinyl (black crème)
Color Club- Daisy Does It (yellow glass fleck)
Color Club- Disco Dress (purple crème)
Zoya- Dhara (orange glitter texture polish)
Dotting Tools

Since I did the tutorial for drips here, I'll just give you a couple of tips.  The first thing I figured out was I shouldn't have used a textured polish!  I love Zoya Dhara and I think it's the perfect Halloween orange, but because of it's texture, it didn't work great here.  I would suggest using all crèmes actually.  Also, start with the lightest color first, then the darkest color on top.  My favorite finger is my index finger...I think I should have stayed with that order.
I like the idea of this design, and I really like several of the fingers.  I think I'm going to have to try this again with Winter colors.  What do y'all think?  Have a fabulous Monday!!  Happy Polishing!!

Thursday, October 10, 2013

Halloween Drips & Gradients

Hi Y'all!!  Happy Thursday!!  Almost the weekend!!  Not that I have any plans, but at least I don't have to do all the cooking.  So I met some wonderful ladies Tuesday while eating lunch and they really liked my nails, so, I'm skipping order to show you these now.  So here are my first Halloween nails, Drips and Gradients:
I Used:
Zoya- Dhara (glittery orange texture polish)
Orly- Liquid Vinyl (black crème)
Dotting Tool (ball point pen will work great too)
Make Up Sponge

For the gradient nails, I started with two coats of Orly Liquid Vinyl.  Once that dried, I cut up a wedge make up sponge (the ones from a dollar store work perfectly) into more manageable sizes.  But you don't have to, it just works better for me.  I also wet the sponges and wring them out.  This seems to make them more porous and work better  Then just paint the edge of the sponge with Zoya Dhara and dab your nails starting at the tip and working your way 3/4 of the way down your nail.  Just dab.  You don't want a solid color, you want the base to show through.  When that has dried, repeat the steps going 1/2 way down your nails and then repeat again only going 1/4 of the way down your nails.  Then just seal it all with top coat.
The drips are even easier!  Start with two coats o Zoya Dhara.  Once that has dried, drop a couple of drops of the black polish onto a paper plate or scratch paper.  Then dip your large dotting tool into the polish.  If you don't have a dotting tool, a ball point pen would work great.  Then, in a quick straight up and down motion, place a dot where you want the drop to end.  Then draw a shaky line to the tip of your nail.  Once you've drawn all your drips, connect them at the tip of your nail.  Be sure to vary the connections.  You don't want a straight line.
I hope y'all like my first Halloween nails of 2013!!  If you do, and wouldn't mind, please head over to Nails by Ms. Lizard's Halloween Contest and give them, or your favorite, a like!  Thanks!!!

Have a great night Y'all!!  Happy Polishing!!