Hey Y'all!! Happy Monday! I hope you had a good weekend. We didn't do much which was a nice change. We caught up on our "America's Got Talent" shows...love that show! And just spent time loving on our fur babies and each other. Plus I spent time trying to teach my 90+ pound fur baby that she can't do the same things as the 9 pound fur baby. In other words, no Tillie, you can't run across the room and jump in Mommy's lap...you are going to squish Mommy! But I do make that fun sound when she lands on me and all the air rushes out of my body...she likes that sound.
I do have a new design for you today...I think I've finally figured out how to do a Fan Brush design:
I Used:
Studio M- Hot Zone (neon pink with blue shimmer)
Orly- Hot Tropics (neon magenta with a gold shimmer)
Sinful Colors- Gold Medal (antique gold/bronze gold metallic)
Fan Brush
I started this manicure with two coats of Studio M Hot Zone, a gorgeous neon pink with a blue shimmer. Next comes the fan brush. This takes practice, at least for me, lol. Put a little polish on a piece of paper (or foil, or paper plate) and dip your fan brush into the polish. Then dab the excess polish off. You want to remove the majority. Then, just run the fan brush vertically across the nail. Start on one side, then start on the other side of the nail.
You may have to go over the nail several times to get the look you want. I also went over the nails with the base color, using the fan brush, to make it stand out more. Once you get the look you want, top off with top coat.
I hope you enjoyed today's mani! Happy Polishing!!
Showing posts with label fuchsia. Show all posts
Monday, July 28, 2014
Tuesday, April 22, 2014
TIOT: Sinful Colors Get It on
Hey Y'all!! It's Try It On Tuesday!! And I have a fun one today, Sinful Colors Get It On:
I've had this one so long, I don't even remember when I got it.
Get It On is a gorgeous fuchsia matte polish. It is highly pigmented, bold formula that worked wonderfully. Photos show two coats without top coat. There was no streaking or balding.
And believe it or not (believe it!), no staining! The formula worked wonderfully and wore really well!
I just love this color!! And for $1.99, it's a steal!
Have a fabulous Tuesday! Happy Polishing!!
I've had this one so long, I don't even remember when I got it.
Get It On is a gorgeous fuchsia matte polish. It is highly pigmented, bold formula that worked wonderfully. Photos show two coats without top coat. There was no streaking or balding.
And believe it or not (believe it!), no staining! The formula worked wonderfully and wore really well!
I just love this color!! And for $1.99, it's a steal!
Have a fabulous Tuesday! Happy Polishing!!
Monday, April 21, 2014
Fuchsia Plastic Wrap
Hey Y'all!! Happy Monday! And yes, I've decided it's going to be a happy Monday. After last week, ugh, this week started off much better. We went to my cousins' house for Easter and had great food and great company! What did y'all do this weekend
Today's mani is a fun, different finishes, plastic wrap manicure (I know, I'm a little plastic wrap happy lately): a Fuchsia Plastic Wrap:
I Used:
Sinful Colors- Get It On (dark fuchsia matte)
Cover Girl- Bombshell (fuchsia with silver shimmer)
China Glaze- Travel In Color (pale white with purple shimmer)
Plastic Wrap
To start there is not a top coat. I wanted a variety of finishes, so even though it doesn't show well in photos, there is matte and shimmers. I started with two coats of Sinful Colors Get It On, a fuchsia matte polish.
Next I balled up some plastic wrap and dipped into Cover Girl Bombshell, a fuchsia polish with a silver shimmer, and dabbed it on my nails. Be sure to turn the plastic so you get a varied look on your nails.
Next, using a new ball of plastic, I did the same thing with the China Glaze Travel In Color, a pale white with a purple shimmer. And again, no topcoat. I'm so sad I couldn't get the different finishes to show better in the photos. It looked amazing in real life!
Have a fabulous day and Happy Polishing!!
Today's mani is a fun, different finishes, plastic wrap manicure (I know, I'm a little plastic wrap happy lately): a Fuchsia Plastic Wrap:
I Used:
Sinful Colors- Get It On (dark fuchsia matte)
Cover Girl- Bombshell (fuchsia with silver shimmer)
China Glaze- Travel In Color (pale white with purple shimmer)
Plastic Wrap
To start there is not a top coat. I wanted a variety of finishes, so even though it doesn't show well in photos, there is matte and shimmers. I started with two coats of Sinful Colors Get It On, a fuchsia matte polish.
Next I balled up some plastic wrap and dipped into Cover Girl Bombshell, a fuchsia polish with a silver shimmer, and dabbed it on my nails. Be sure to turn the plastic so you get a varied look on your nails.
Next, using a new ball of plastic, I did the same thing with the China Glaze Travel In Color, a pale white with a purple shimmer. And again, no topcoat. I'm so sad I couldn't get the different finishes to show better in the photos. It looked amazing in real life!
Have a fabulous day and Happy Polishing!!
Friday, April 11, 2014
Pink Dot Gradient
Hey Y'all!! TGIF!!! I hope y'all have had a great week! Have you entered the Coupons.com Givaway yet??
So I have another Spring mani for you, a Pink Dot Gradient:
I Used:
OPI- Taupe-Less Beach (light taupe crème)
China Glaze- Wish On A Starfish (light pink with gold shimmer textured polish)
OPI- Hey Baby (bright pink crème)
OPI- Flashbulb Fuchsia (bright fuchsia with silver shimmer)
Dotting Tools
I started with two coats of OPI Taupe-less Beach. Then using a couple of different sized dotting tools, start making the dots.
Starting at the cuticle, your going to make a "C" shape with the dots. The polishes I used, from lightest to darkest, are China Glaze Wish On A Starfish, OPI Hey Baby, and OPI Flashbulb Fuchsia.
Have a fabulous Friday!! Happy Polishing!!
So I have another Spring mani for you, a Pink Dot Gradient:
OPI- Taupe-Less Beach (light taupe crème)
China Glaze- Wish On A Starfish (light pink with gold shimmer textured polish)
OPI- Hey Baby (bright pink crème)
OPI- Flashbulb Fuchsia (bright fuchsia with silver shimmer)
Dotting Tools
I started with two coats of OPI Taupe-less Beach. Then using a couple of different sized dotting tools, start making the dots.
Monday, March 3, 2014
My "I Don't Care If It's Still Winter I Want Spring" Nail Art
Hey Y'all!! Happy Monday! Did you have a great weekend? I had a pretty good one. The weather yesterday was gorgeous! 72 degrees. Ahhhh...a hint of Spring. Sadly, just a hint. Today's weather STINKS!! Cold, windy, rain, temperature of 50. This makes me so sad. So I'm rebelling!! I've had it with Winter! I don't care what the calendar says, I'm starting Spring! Today!
So here's my "I Don't Care If It's Winter, I Want Spring" nail design:
I Used:
Zoya- Darcy (bright yellow crème)
Lakme- Aqua Blast (bright blue crème)
OPI- Flashbulb Fuschia (bright fuchsia shimmer)
LA Colors- Palm Tree (green crème)
China Glaze- Liquid Leather (black crème)
Orly- Monster Mash (green holographic medium glitters and small green holographic bar glitters in light green jelly base)
Large Dotting Tool
Very Fine Detail Brush
Now for the tutorial :) To start, paint your nails yellow and blue.
I used Zoya Darcy in my index and pinky fingers, and Lakme Aqua Blast on the rest. Then, using OPI Flashbulb Fuchsia and a large dotting tool (the biggest. a pen would work great), make large blobs and teardrop shapes:
These do not need to be perfect. In fact, perfect would look odd. For the rose buds, use a green polish, and make leaves covering the lower part of the bud. Then a straight line for the stem. On the bud, use black polish to outline the bud and add one curved line from the tip to the bottom to outline one of the petals.
For the roses, using black nail polish, start in the center of the blob and make a little c. Then make varying sizes of shaky c's going all the way to the outside edge. On the very edge, make sure you don't completely fill in the line....leave some of the blob showing.
Then on your yellow nails, use your glitter polish to make a gradient. Start 3/4 of the way down your nail and paint towards your tip. Then 1/2 way and then 3/4 of the way. Don't forget the top coat to save your hard work!
Join me in fighting Winter!! If we all decide that we've had enough, I just know it will go away. It has to! Join the fight!!!!
And Happy Polishing!!
So here's my "I Don't Care If It's Winter, I Want Spring" nail design:
![]() |
| Left Hand |
![]() |
| Right Hand |
Zoya- Darcy (bright yellow crème)
Lakme- Aqua Blast (bright blue crème)
OPI- Flashbulb Fuschia (bright fuchsia shimmer)
LA Colors- Palm Tree (green crème)
China Glaze- Liquid Leather (black crème)
Orly- Monster Mash (green holographic medium glitters and small green holographic bar glitters in light green jelly base)
Large Dotting Tool
Very Fine Detail Brush
Now for the tutorial :) To start, paint your nails yellow and blue.
I used Zoya Darcy in my index and pinky fingers, and Lakme Aqua Blast on the rest. Then, using OPI Flashbulb Fuchsia and a large dotting tool (the biggest. a pen would work great), make large blobs and teardrop shapes:
These do not need to be perfect. In fact, perfect would look odd. For the rose buds, use a green polish, and make leaves covering the lower part of the bud. Then a straight line for the stem. On the bud, use black polish to outline the bud and add one curved line from the tip to the bottom to outline one of the petals.
For the roses, using black nail polish, start in the center of the blob and make a little c. Then make varying sizes of shaky c's going all the way to the outside edge. On the very edge, make sure you don't completely fill in the line....leave some of the blob showing.
Then on your yellow nails, use your glitter polish to make a gradient. Start 3/4 of the way down your nail and paint towards your tip. Then 1/2 way and then 3/4 of the way. Don't forget the top coat to save your hard work!
Join me in fighting Winter!! If we all decide that we've had enough, I just know it will go away. It has to! Join the fight!!!!
And Happy Polishing!!
Thursday, August 15, 2013
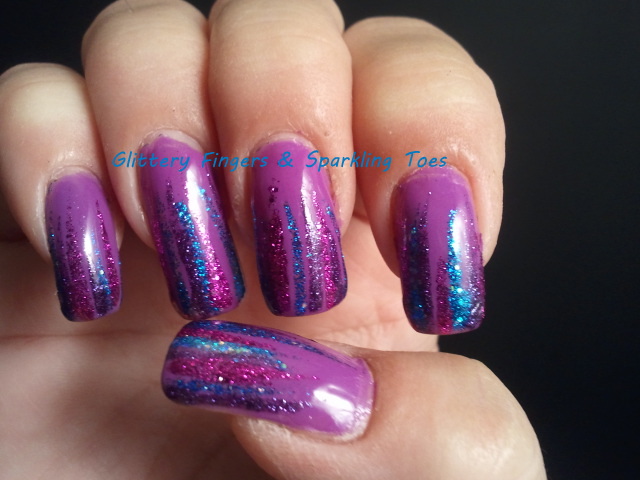
Glitter Waterfall
Hey Y'all. I have a quick post for you today. Mainly because I have to find my pants before rushing the now-a-teen to dance. Why have I lost my pants? Because it's been in the 90's forever, until today. Today is 68 degrees!!! WTH?? All I can find are shorts.
Anyway, I decided to try a new technique, waterfall. Typically, waterfalls are all in the same color family, like 4 shades of blue, and are all one length. I did mine a little differently, cause let's face it, glitter makes everything better!
I Used:
Wet-n-Wild- Who is Ultra Violet (bright purple cream)
Orly- Bubbly Bombshell (micro fuchsia glitter in purple base)
Orly- Angel Eyes (micro blue and small silver holographic glitters in light blue base)
Finger Paints- Purple Palette (micro purple glitter in dark purple base)
Medium Liner Brush
I wish there was sun so I could show you all the sparkle!
Anyway, I decided to try a new technique, waterfall. Typically, waterfalls are all in the same color family, like 4 shades of blue, and are all one length. I did mine a little differently, cause let's face it, glitter makes everything better!
I Used:
Wet-n-Wild- Who is Ultra Violet (bright purple cream)
Orly- Bubbly Bombshell (micro fuchsia glitter in purple base)
Orly- Angel Eyes (micro blue and small silver holographic glitters in light blue base)
Finger Paints- Purple Palette (micro purple glitter in dark purple base)
Medium Liner Brush
I wish there was sun so I could show you all the sparkle!
I started with two coats of Wet-n-Wild Who Is Ultra Violet from their new Pop Collection. Then I used a liner brush to make the lines. All a liner brush is, is a thin long bristled brush. In this case, it was about an inch long. I really suggest buying one (like at Michael's) because then you don't have to buy all those separate nail art polishes, you can make any polish you own into nail art. Anyway, I used the liner brush to make the lines. I started at the tip and swept down my nail lifting as I went. tried to make every line a different length.
I hope y'all enjoyed today's post! Have a fabulous day and Happy Polishing!!
Friday, July 26, 2013
Reciprocal Zebra Stripes
Hey Y'all!! TGIF!! Anyone have big plans this weekend? For many around here, this is the last weekend before school starts...can you believe it? What happened to Summer?? The hubby is supposed to take me out to a nice dinner tonight. He's trying to make up for stepping on but not seeing the green hoppy thing yesterday. Yep, a nice dinner out ain't going to get it. He needs to do more! I'm thinking something polish/make up related!
Anyway, I have what I'm calling Reciprocal Zebra Stripes for you today:
I Used:
China Glaze- Fancy Pants (blurple with pink and purple shimmer)
OPI- Pompeii Purple (fuchsia with pink shimmer)
Scotch Tape
Medium Liner Brush
I really love my mixed up zebra stripes, and really love these two colors together! It didn't come out exactly as I saw it in my mind, but it's close.
So to create this mani, start with two coats of the lighter color; in this case, OPI Pompeii Purple. Pompeii Purple is a beautiful fuchsia polish with a purple shimmer. Once that has dried completely, use scotch tape to tape a diagonal line on your nails. Be sure to place and remove the tape a few times first to remove some of the stickiness.
Then paint your second,darker color. I used China Glaze Fancy Pants (love this color). It did take two coats. If you need two coats, you can wait a few minutes in between coats, but don't let the polish dry completely. Immediately after the second coat (or your first and only), remove the scotch tape. If you wait it will lift the new polish up.
When that has all dried, use a long, thin brush (I used a medium liner brush) to make the zebra stripes. Zebra stripes are basically shaky triangles. Make sure to use the opposite color, especially if your stripe covers both colors. Then just use top coat to seal in your design!
I hope y'all have a fabulous day! Happy Polishing!!
Anyway, I have what I'm calling Reciprocal Zebra Stripes for you today:
I Used:
China Glaze- Fancy Pants (blurple with pink and purple shimmer)
OPI- Pompeii Purple (fuchsia with pink shimmer)
Scotch Tape
Medium Liner Brush
I really love my mixed up zebra stripes, and really love these two colors together! It didn't come out exactly as I saw it in my mind, but it's close.
So to create this mani, start with two coats of the lighter color; in this case, OPI Pompeii Purple. Pompeii Purple is a beautiful fuchsia polish with a purple shimmer. Once that has dried completely, use scotch tape to tape a diagonal line on your nails. Be sure to place and remove the tape a few times first to remove some of the stickiness.
Then paint your second,darker color. I used China Glaze Fancy Pants (love this color). It did take two coats. If you need two coats, you can wait a few minutes in between coats, but don't let the polish dry completely. Immediately after the second coat (or your first and only), remove the scotch tape. If you wait it will lift the new polish up.
When that has all dried, use a long, thin brush (I used a medium liner brush) to make the zebra stripes. Zebra stripes are basically shaky triangles. Make sure to use the opposite color, especially if your stripe covers both colors. Then just use top coat to seal in your design!
I hope y'all have a fabulous day! Happy Polishing!!
Monday, June 17, 2013
Summer Plastic Wrap Mani
Hi my Lovelies!!! I'm so happy to see you today and hope you are having a fabulous Monday!! I had a great weekend (can you tell, lol) and I will tell you all about it in a minute. First I have to show you the mani I was wearing this weekend:
I Used:
OPI- Flashbulb Fuchsia
ELF- Un-named
Plastic Wrap
I love how this came out and I really loved these two colors together. The OPI Flashbulb Fuchsia is a gorgeous fuchsia shimmer. And sadly the ELF polish didn't have a name on it. It was a dark purple with purple and blue micro glitter. Just gorgeous! And I got a lot of compliments on this mani.
This technique, the plastic wrap mani, is one of my all time favorites. It's a lot of bang for the buck so to speak. In other words, it's super easy but looks really complicated. Just paint your base coat, then ball up a small amount of plastic wrap. Dip it into your second color and dab on your nails. Be sure to rotate your plastic wrap to help give your mani a more diverse look.
Ok, now I can't resist telling you about my weekend, I got to see my baby girl dance with a male partner in a pax de deu!! That's a dance with both a ballerina and a male dancer. And this was the first time ever!!!
Isn't she great?? I'm such a proud mama!! This is a big deal for ballerinas. Especially seeing she just got her first pointe shoes in January. Have a fabulous Monday!! Happy Polishing!!
I Used:
OPI- Flashbulb Fuchsia
ELF- Un-named
Plastic Wrap
I love how this came out and I really loved these two colors together. The OPI Flashbulb Fuchsia is a gorgeous fuchsia shimmer. And sadly the ELF polish didn't have a name on it. It was a dark purple with purple and blue micro glitter. Just gorgeous! And I got a lot of compliments on this mani.
This technique, the plastic wrap mani, is one of my all time favorites. It's a lot of bang for the buck so to speak. In other words, it's super easy but looks really complicated. Just paint your base coat, then ball up a small amount of plastic wrap. Dip it into your second color and dab on your nails. Be sure to rotate your plastic wrap to help give your mani a more diverse look.
Ok, now I can't resist telling you about my weekend, I got to see my baby girl dance with a male partner in a pax de deu!! That's a dance with both a ballerina and a male dancer. And this was the first time ever!!!
Isn't she great?? I'm such a proud mama!! This is a big deal for ballerinas. Especially seeing she just got her first pointe shoes in January. Have a fabulous Monday!! Happy Polishing!!
Tuesday, April 30, 2013
Glitter Flames
Happy Tuesday my Darlings!! I hope you are a having a beautiful day! Today I have some more new yumminess for y'all. I have Glitter Flames, or an impressionistic idea of Glitter Flames:
I Used:
Orly- Hawaiian Punch (fuschia shimmer)
Sinful Colors- Star Dust (dark purple jelly with fuschia and purple glitter)
So as you see, not true to life looking flames, just the impression. I love this. But of course there's purple and glitter and I think I would love anything covered in purple glitter!!
I started with two coats of Orly Hawaiian Punch. I loved this color, It's a fuchsia matte/neon polish with a fuchsia shimmer. The formula was perfect. It went on without any bald spots or dragging, It did dry matte like a neon, and sort of is a neon. It is a very bright polish. Love!!!
Then the flames are Sinful Colors Star Dust. I won this incredible polish in a giveaway from Over The Topcoat. Love her!! Star Dust is a dark purple jelly with small pink glitter (although the purple base makes them look more fuchsia) and micro purple glitter. Yes please!! Sadly it was cloudy the entire time I wore this and the pictures just do not do this polish justice. It is just fabulousness (I know not a real word) in real life!! Thank you Natalie!! And don't worry, I will definitely be wearing this again soon!
I hope y'all enjoy this mani. I can not tell you how much I love these two polishes! And together they are just a dream!! See y'all soon! Happy Polishing!!
I Used:
Orly- Hawaiian Punch (fuschia shimmer)
Sinful Colors- Star Dust (dark purple jelly with fuschia and purple glitter)
So as you see, not true to life looking flames, just the impression. I love this. But of course there's purple and glitter and I think I would love anything covered in purple glitter!!
I started with two coats of Orly Hawaiian Punch. I loved this color, It's a fuchsia matte/neon polish with a fuchsia shimmer. The formula was perfect. It went on without any bald spots or dragging, It did dry matte like a neon, and sort of is a neon. It is a very bright polish. Love!!!
Then the flames are Sinful Colors Star Dust. I won this incredible polish in a giveaway from Over The Topcoat. Love her!! Star Dust is a dark purple jelly with small pink glitter (although the purple base makes them look more fuchsia) and micro purple glitter. Yes please!! Sadly it was cloudy the entire time I wore this and the pictures just do not do this polish justice. It is just fabulousness (I know not a real word) in real life!! Thank you Natalie!! And don't worry, I will definitely be wearing this again soon!
I hope y'all enjoy this mani. I can not tell you how much I love these two polishes! And together they are just a dream!! See y'all soon! Happy Polishing!!
Tuesday, January 8, 2013
Day 6: Purple, Relaxed 31 Day Challenge
Howdy y'all!!! I am so excited!!! Today is my 101st post and I've hit 101 followers!! Y'all are the absolute best!!! You are all helping make my dream come true! And I thank you!!! I also have the prizes for my next giveaway!! So be on the lookout over the next few days for the info on how to sign up. And if that isn't enough, today is the day!!! It's PURPLE!!! My absolute favorite color in the entire world!! The hard part of this challenge was narrowing down what to use. I finally went with two untrieds. (Honestly, I'm not doing this entire challenge with untrieds!!) Here's my final look:
I Used
China Glaze- Gothic Lolita
Maybelline- Lavender Sparks
This is my sort of gradient French tip kind of design. LOL! I started with two coats of China Glaze Gothic Lolita. Gothic Lolita is a medium purple/fuchsia with a purple shimmer. This was an odd polish. Don't get me wrong, I love the color. In the bottle it's just like I escribe. On the nail, it's a much darker purple and the shimmer is non-existent. But it's a gorgeous color.
Maybelline Lavender Sparks is a clear based polish with micro lavender glitter and small and medium round holographic glitter. It is beyond gorgeous. I did the gradient by starting in the center of my nail and brushing towards the tip. Once that was dry, I started about 3/4 of the way up my nail and brushed to the tip. The third time I just painted the very tip. Since it's a typical glitter polish it has to build up, but you don't end up with thick tips.
Hope y'all enjoyed it. Be sure to check the other fabulous ladies designs and check back tomorrow for black and white! Happy Polishing!!
I Used
China Glaze- Gothic Lolita
Maybelline- Lavender Sparks
This is my sort of gradient French tip kind of design. LOL! I started with two coats of China Glaze Gothic Lolita. Gothic Lolita is a medium purple/fuchsia with a purple shimmer. This was an odd polish. Don't get me wrong, I love the color. In the bottle it's just like I escribe. On the nail, it's a much darker purple and the shimmer is non-existent. But it's a gorgeous color.
Maybelline Lavender Sparks is a clear based polish with micro lavender glitter and small and medium round holographic glitter. It is beyond gorgeous. I did the gradient by starting in the center of my nail and brushing towards the tip. Once that was dry, I started about 3/4 of the way up my nail and brushed to the tip. The third time I just painted the very tip. Since it's a typical glitter polish it has to build up, but you don't end up with thick tips.
![]() |
| Out of focus to show holo |
Sunday, December 30, 2012
Fireworks I
Hi Everyone! So, do y'all have your plans made for New Year's Eve? I think I do. We have a ton of our favorite food (seafood for me!!) and we are going to pig out and play board games with our almost teenager. Now if the hubby and I can just stay awake until midnight!!
Today I have fireworks for you, because what's New Year's without fireworks:
(Please excuse the very dry hands, I'm working on them!)
I Used:
Sally Hansen- Petrol (dark blue crème)
Wet-n-Wild- The Gold & the Beautiful (shimmery gold)
Orly- Miss Conduct (fuchsia jelly with fuchsia micro glitter)
Sinful Colors- Heavy Metal (shimmery silver)
Orly- Shine On Crazy Diamonds (clear base with micro holographic glitter)
Small Liner Brush (toothpick will work too)
To start this manicure, I painted two coats of Sally Hansen Petrol. Then using a small liner brush (or toothpick), I just drew the fireworks. The only trick to this manicure is to make the fireworks look random. Then I added Orly Shine on Crazy Diamond to give the night stars.
I hope y'all enjoy this manicure! Happy Polishing!!
Today I have fireworks for you, because what's New Year's without fireworks:
(Please excuse the very dry hands, I'm working on them!)
I Used:
Sally Hansen- Petrol (dark blue crème)
Wet-n-Wild- The Gold & the Beautiful (shimmery gold)
Orly- Miss Conduct (fuchsia jelly with fuchsia micro glitter)
Sinful Colors- Heavy Metal (shimmery silver)
Orly- Shine On Crazy Diamonds (clear base with micro holographic glitter)
Small Liner Brush (toothpick will work too)
To start this manicure, I painted two coats of Sally Hansen Petrol. Then using a small liner brush (or toothpick), I just drew the fireworks. The only trick to this manicure is to make the fireworks look random. Then I added Orly Shine on Crazy Diamond to give the night stars.
I hope y'all enjoy this manicure! Happy Polishing!!
Subscribe to:
Posts (Atom)

-1.jpg)


-1.jpg)


-1.jpg)


-1.jpg)


.jpg)