Showing posts with label peach. Show all posts

Wednesday, April 22, 2015

China Glaze Ultra Bright Gradient

Hey Y'all!  How's your week going?  Mine is going good.  We finally got sun yesterday, after nine straight days of rain.  But then it got down to 45 degrees last night.  I can't wait until we get sun and warmth! 

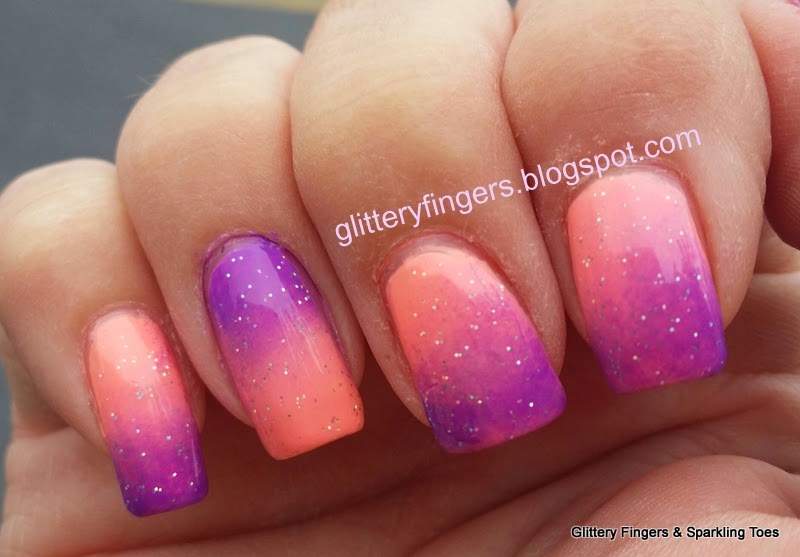
So during all the rain I decided I needed to brighten my nails up with this China Glaze Ultra Bright Gradient:
I Used:
China Glaze:  More To Explore, an ultra bright peach neon crème
China Glaze:  Plur-ple, ultra bright blue based purple neon crème
Orly:  Shine On Crazy Diamond, micro holographic glitter in a clear base
Make Up Sponge
First, I love these new "Ultra Brights" from China Glaze.  They are neon without being neon and without the matte/waxy finish.  They are actually glossy.  I guess that's why they are calling them ultra bright instead of neon, lol.
I also love the peach and purple combination!  I love how they look together.  My bestie liked it too...I think.  She gave me the back handed compliment of, "I never would have thought to put these two colors together, but surprisingly, I like it." LOL!  Nothing like a true friend to tell you the truth.
It kind of reminds me of a galaxy, but in unicorn land.  Or maybe a sunset on a tropical island. 

I hope you enjoyed today's mani!  And I hope you have a wonderful day!  Happy Polishing!!


Tuesday, June 10, 2014

TIOT: Studio M Sunrise Canyon

Hey Y'all!!  Happy Tuesday!  I hope y'all are having a fabulous day!  I'm having a relaxing day.  The teen is at dance camp and without her, my fur babies are all quiet.  So I'm having a great, quiet day. 

And I have an incredible polish for you today! Thanks to the wonderful Liz at A Mani Maniac, whom I ADORE!!!!  who gave me this polish:

Isn't this AH-MAZING???  Studio M Sunrise Canyon is a brown leaning peach, sandy linear holographic polish.  The photos show two coats with top coat!  Yes!  A linear holo that you can top with top coat!  Because of that, I was able to wear this polish for three days, which is about the longest I wear a polish.

This holo is just too gorgeous for words!  It even shows the linear holo inside, under regular lights!
Love, love, LOVE this polish!!!  And the name is perfect!  It really does make me think of a Desert Sunrise.  Sadly, it can only be found in a certain store in Michigan :'(  Luckily, I have an incredible friend that lives in Michigan!  Thank you again Liz!!  Love you!!

And love to everyone reading this!  Your support means the world to me!  Have a fabulous day and Happy Polishing!!

Thursday, May 29, 2014

Neon Studded Half Moon

Hey Y'all!!  Happy Friday!!  Thank goodness!  Although I have a busy weekend planned.  I have to get the girl child some new pointe shoes, which for us is an all day event.  The nearest place is over 65 miles away and I have to drive through a super busy metropolitan city.  And then come home and clean house because I'll have a house full of teenage girls for most of next week.  Although when they are all here, I just hide in my bedroom and read and paint my nails.  For anyone who has young children, when they reach teenage years, if you throw enough food and soda at them, they pretty much leave you alone, lol!

Anyway, for today I have a simple Neon Studded Half Moon mani for you:
I Used:
Salon Perfect- Flamingo Flair (neon peach crème)
Sally Hansen- I Love Nail Art Studs (black studs)
I started with two coats of Salon Perfect Flamingo Flair,a gorgeous peach neon crème.  The formula was a little streaky, but evened out after just two coats.  I loved the color!  So fresh and bright, I think this works great for Spring and Summer!

Once your base coat has dried, start adding top coat, working with only one nail at a time.  While the top coat is still wet, place your studs (that sounds naughty, but it's not.  Really, I mean it).  You can place them in a semi-circle or choose to do a more geometric shape like I did here.
I hope y'all enjoyed today's mani and that y'all have a fabulous weekend!  Do you have any plans?

Happy Polishing!!

Neon Dots

Hey Y'all!!  Ok, so yesterday stunk.  Seriously.  So I'm going to pretend it didn't happen and just start over today.  Today is going to be a good day!  Hear me Universe??  No crap today, ok?  LOL

So I know that it's still "technically"  Spring, but here in the southern corner of the US, it's summer.  That's why I have a fun Neon Dotticure for you today:
I Used:
Orly:  Tropical Pop (neon peach crème)
Orly- Saturated (dark purple neon crème)
Orly- Hot Tropics (dark magenta neon with a gold micro shimmer)
Dotting Tool
I started with painting three fingers with Orly Tropical Pop, a fun neon orangy-peach color.  Then I painted my ring finger with Orly Saturated, a deep purple neon...you know I loved this color!  And finally, I painted my middle finger with Orly Hot Tropics. This color is hot!  It's a dark magenta neon with gold micro glitter giving it such a gorgeous shimmer.

Then using the same colors, I started dotting away skipping the base color for that nail.  I used a large and small dotting tool, but you could use a toothpick and a ball point pen instead.  I dotted just one half of my nail.  I think the key to dotting is to overlap some of the dots.  It gives it a more random look.
I hope you enjoyed today's post.  And I really hope you have a fabulous day!  No more bad days for us!

Happy Polishing!!


Wednesday, May 28, 2014

Pastel Gradient

Hey Y'all!!  Have you ever had one of those days that no matter how hard you try you just can't get anything accomplished?  If yes, then welcome to my Wednesday! The teen spent the night at  a friend's house so I thought, yay, I'll get a ton done!  Nope.  Didn't get one thing done.  Started a bunch of stuff, but didn't finish the first thing.  Except this post.  Which is going up late.  Dang.

Oh well.  I do have a fun twist on gradient nails for you today, a four colored square gradient:
I Used:
Sinful Colors- Snow Me White (white crème)
Sinful Colors- Unicorn (pastel yellow crème)
Sinful Colors- Cream Soda (pastel peach crème)
China Glaze- At Vase Value (pastel mint crème)
China Glaze- Lotus Begin (pastel lilac crème)
Make Up Sponge

I started with two coats of Sinful Colors Snow Me White to help the pastels show up more.  Then, after wetting and wringing out a cheap make up sponge (from the dollar store), I painted the pastels in a square pattern on the sponge:
Then I just sponged them on to the nails in an up and down motion.  It took three coats to get the colors to where I wanted them.
Don't forget to top with top coat.

Hope y'all enjoyed today's post!  I'm going to give up on doing anything useful for the day and veg in front of the tv!  Happy Polishing!!


Monday, April 7, 2014

Review: Wet-n-Wild Street Art Collection, Part 1

Hey Y'all!!  How are you?  I've missed you.  I'm so sorry I've been missing the last couple of days.  I have two excuses though!  One, I had to work on an exciting project!!  Which, I can't tell you about for another three weeks, but it's a very fun thing!  Second, I was so sick for the last few days.  But it's a cold, rainy, yucky day here, so I'm going to work on getting caught up on all my posts!

And this is a fabulous one!!  I have the new Street Art Collection from Wet-n-Wild.  I have to tell you, I'm beyond happy about the bold, colorful collections for this Spring and Street Art is fabulous!!  All polishes were bought by me for $0.99 each.  Let's get started!

Get Lucky

Get Lucky is a bright, highly pigmented yellow crème.  Pictures show three coats with top coat.
The formula was fine.  It was very streaky, but that's pretty typical of any yellow polish.  It did smooth out perfectly in three coats.  And the intense yellow is worth it!  So bright and pretty!

Cursed

Cursed is a bright orange jelly.  Photos show three coats with top coat.
The formula for Cursed was great!  It took three coats to make it opaque, but it kept it's wonderful squishiness.  There wasn't any balding or streaking.

Temptation
Temptation is a highly pigmented salmon crème.  Pictures show three coats with top coat.

The formula for Temptation was good.  There was some streaking which is why it took three coats.  And, both acrylic and natural ladies, be sure to wear a base coat because there was a little staining.  Although the stains disappeared after the next mani.  Even though this was the hardest of the six to apply, it is well worth the effort.

These colors were all gorgeous!  I love each and every one of them!  And for only 99 cents each, you can't lose!  There are three more colors in this collection, and I'll have those up for you next!

And don't forget to enter the fabulous GIVEAWAY sponsored by Coupons.com!!

Stay warm, and if you have sun, enjoy it for me!  Happy Polishing!!


Monday, March 31, 2014

Spring Water Marble

Hey Y'all!!!  I am SO sorry I've been missing the last week.  I woke up Tuesday with the plague!  Ok, maybe it wasn't the plague, but it felt like it.  I had bronchitis, sinus infection, fever, I was miserable.  But I'm on the road to recovery!! And I have a fabulous week of posts for you!  Including tomorrow!  There are 100 fabulous reasons to visit the blog tomorrow...no April Fool's joke.

But for today, I have a Spring Water Marble for you!!
I Used:
Orly- Cheeky (medium peach with gold shimmer)
Zoya- Raven (black crème)
Pure Ice- Jaguar (gold shimmer)
I added the black because it's still cold and that makes me mad!!  Also because I love black and peach together, lol.

Be sure to look under popular post in the right hand column for Fall Water Marble, for step-by-step directions for water marbling.

I hope y'all enjoyed today's post!  Don't forget to come back tomorrow for the big surprise!!  Happy Polishing!!


Wednesday, March 19, 2014

Spring Reciprocal Gradient Tutorial

Hey Y'all!!  Happy last day of Winter!!  Finally!!  So, I've decided to continue my rebellion against
Winter with another Hurry Up Spring nail art design!  This may seem complicated as there are a few more steps than normal, but it doesn't take long and is so worth it!  So here is my Spring Reciprocal Gradient:
I Used:
China Glaze- White on White (white crème)
Sinful Colors- Unicorn (pale yellow crème)
Sinful Colors-Cream Soda (pastel peach crème)
Sinful Colors- Cotton Candy (pastel pink crème)
Sinful Colors- Mad About Hue (lilac crème)
Make Up Sponges
Scotch Tape

Start this Spring mani with two coats of white, I used China Glaze White on White.  I started with a white base coat to make sure the colors pop.
Next, paint thin lines of nail polish on a damp make up sponge.  Make sure that the lines are about the same length as your nails.  The order of colors is:  yellow, peach, pink and purple:
I made the yellow and peach a little thicker since the colors are so light.  Then dab the colors on your nails.  Remember to move the sponge around a little to make sure the colors blend.  This will require two coats, but they dry fast.
Once that has dried, place scotch tape on both sides of your nails making a vertical stripe.  I painted the stripe white, again to make sure the colors show.  Then repeat the sponging going the opposite way:
This takes two coats too.  Immediately remove the tape after the second coat.  Top your design with top coat and you're done!
I hope y'all enjoyed today's nail art!  Have a fabulous day and Happy Polishing!!


Wednesday, March 12, 2014

Peach Dry Brush Nail Art & Tutorial

Hey Y'all!!  Well here we go, Spring in Georgia!  77 degrees yesterday, 65 and windy today, 28 tomorrow night.  It's amazing we don't all have pneumonia!  But, I'm ignoring the weather again and have another Spring mani for you using the dry brush technique:
I Used:
Barielle- Pillow Talk (nude, pink leaning crème)
Sinful Colors- Cream Soda (pastel peach crème)
Sinful Colors- Sunburnt (bright peach/salmon crème)
Zoya- Dhara (orange glass fleck textured polish)

To start this mani, paint your nails with two coats of the lightest color, in this case, Barielle Pillow Talk:
Then you're going to use each color, going from lightest to darkest, the same way.  I used Sinful Colors Cream Soda first.  Using the brush that came with the polish, scrape off as much as the polish as you can.  You want the brush as dry as possible (he he, hence the name).  Be careful of all the polish between the brush and the cap dripping down.  Then, starting at the tip of your nail, brush towards the cuticle:
Be sure to go only 3/4 of the way.  Just lift the brush as you go.  Then use the next color.  In this case, Sinful Colors Sunburnt.  This time going only 1/2 the way up the nail.
Then use the last color, Zoya Dhara, only going 1/4 of the way up your nail.  Use this color to wrap your nails.  And yes!  Everyone, natural and acrylic ladies, need to wrap their nails!!
Be sure to protect your work with a good top coat!!

I really love this look.  It gives your nails so much detail and interest and it's so easy to do! 

Hope y'all enjoyed today's nail art and tutorial!  Have a fabulous Wednesday and Happy Polishing!!

Tuesday, April 16, 2013

Peach Love & Glitter

Hi Lovelies!!  I hope you are having a fabulous Tuesday!!  This is my daughter's and my super duper busy day, so this is a quick post.  It has been a rainy, gloomy mess around my corner of Georgia lately, so I wanted a bright and sparkling mani to lift my mood and this is what I came up with.  And the best part?  I used two untried!!  Here's my cloudy pick me up mani:
I Used:
Wet-n-Wild- Club Havana (peach crème)
Zoya- Gabrielle (extremely sheer orange with strong gold shimmer)

I had started to wear just the Zoya Gabrielle, but it turned out to be an extremely sheer jelly.  But it was so gorgeous and I was determined to wear it where it would really show up.  So finding my untried, I discovered Wet-n-Wild Club Havana, a very pretty peach color, not a pastel, but a true peach.  I decided to use it as an undie and it worked perfectly.  Zoya Gabrielle is a sheer orange jelly with a strong gold shimmer.  Beautiful!  The pictures show two coats of each and no top coat.

I loved this combination and it worked in lifting my mood!  I thank you all so much for stopping by and want you to know how much I appreciate each and every one of you!!!  Have a fabulous Thursday and, as always, Happy Polishing!!

Monday, April 1, 2013

Easter Water Marble

Hi Everyone!!  I hope y'all had a fabulous weekend and Easter.  We had a wonderful time with just us and way too much food.  And sweets.  But how can you have Easter without pigging out on chocolate bunnies and jelly beans?  And I had time to do an Easter water marble:
I Used:
Sinful Colors:  Unicorn (pastel yellow crème)
Sinful Colors: Cotton Candy (pastel pink crème)
Sinful Colors:  Sugar Rush (pastel blue crème)
Sinful Colors: Sweet Tooth (violet crème)
Sinful Colors: Orange Cream (peach crème)

NOTE: Step-by-step tutorial for water marble HERE!!!

I really like how this turned out.  It just makes me think of Spring, warm weather, flowers and, hopefully, the end of all the cold weather!  And I'm so happy...it's my first water marble without bubbles!
 
I hope you have a fabulous Monday!!  As for the little one and I, we are on Spring Break and we are feeling pretty good, so it's the best Monday we've had in awhile :D  Happy Polishing!!


Thursday, March 28, 2013

Review: Hard Candy Piece of Papaya

Hi y'all!!  I hope everyone is doing fabulous!  I'm doing good, feeling better everyday.  I hope by next week, the now teenager and I are back to normal *fingers crossed*

I do have one quick note before the review, if you follow me on GFC, Google is discontinuing it in June.  But you can follow my blog, and all the blogs you love, with Bloglovin!  I just joined and love it!  When you sign up, you'll get a home page and all of your blogs, with their latest posts, will be listed for you.  I really love it!  All you have to do is click on the button to the left!

Ok, now that that is out of the way, time to talk about Hard Candy's Piece of Papaya.  This was another polish I received from Gini at Sassy Paints during our St. Patty's Day swap.  (Love her!!!)
Isn't it yummy???  Piece of Papaya is an orange shimmer with a gold and dark orange /red shimmer that shifts to every shade in between..  The formula was perfect, not too thin, not too thick.  There wasn't any pooling, dragging or balding.  This is definitely one of my favorites from the new Hard Candy collection.  This polish is just so gorgeous that I'm going to let the photos speak for themselves!  Hard Candy polishes are available at Walmart for $3.98 each.  Talk to y'all later, Happy Polishing!!