Showing posts with label silver. Show all posts

Monday, June 22, 2015

Holographic Skittle

Hey Y'all!!  How was your weekend?  I've had better, I've had worse, so I can't really complain. Except for one thing:  Fleas!!  Maybe y'all can help me.  We've been going back and forth to Florida over the last few weeks and had a sitter for our fur babies.  Well, with us gone, and the incredibly hot weather, we've been taken over by these *&%& fleas!!  I hate fleas!!  And not only are they making my poor babies miserable, they keep biting me too.  And only me and the fur babies.  The teen and the hubby seem to have yucky blood.  Now, while I do enjoy the fact that I have superior blood to my family, I'm tired of being a big, jiggly, itchy, scratchy mess.  My house smells like apple cider vinegar and flea dip.  The babies and I are tired.  Any advice?

Now on to today's mani!  Today I have a Holographic Skittle for you:
I Used:
Color Club- Harp On It, a silver linear holo
Orly- Mirrorball, silver linear holo with small holo glitters
Loreal- Masked Affair, a soft gray linear holo
Color Club- Beyond, a charcoal gray linear holo
Celestial- Reaper Crew, a black linear holo
First off, I know the color differences don't show up very well in the photos.  But in person, it was obvious.  Taking pictures of holos is really hard...taking pictures of holos and trying to capture the subtle differences in color, really, really hard!

Now for the mani.  Ombre nails are very easy to do.  All you have to do is pick five polishes in the same color family and paint each nail a different color.  For this ombre, I started with Color Club Harp On It on my thumb.  Harp On It is a bright silver linear holo.  On my index finger is Orly Mirrorball.  This is also a silver linear holo but it also has small holographic glitter.  My middle finger has Loreal Masked Affair.  Holy cow!!  Loved this one.  It's a gray linear holo.  Next up is Color Club Beyond, a dark, charcoal gray linear holo on my ring finger.  Finally, on my pinky, is Celestial Reaper Crew, a black linear holo.  Love that one!!

Photos show two coats with top coat.  I really enjoyed this one.  But then, I love anything that glitters and sparkles!

Hope you have a fabulous day!  Happy Polishing!!

Monday, May 4, 2015

Neon Cheetah Print

Hey Y'all!  Happy Monday!  How are y'all doin' today?  Me?  I'm exhausted!  So sorry I was missing last week, but the teen had rehearsals all week then six shows over the weekend with her ballet company.  That meant many late nights, long days, and a lot of time sitting in the car for Mom.  But she, and all the dancers were wonderful.  So, I guess I'm actually a tired, but proud Mom.

But, it's a new week, and I have a new mani for you, a Neon Cheetah:
I Used:
Color Club:  Sweet Get Away, ultra bright neon pink crème
Barielle:  Sterling Silver, a smoky, silver metallic
LA Colors:  Black crème (the name is missing)
Dotting Tool
Fine Brush
I so loved this mani, and it's really easy to do!  I started by painting three fingers (thumb, ring and pinky) with Barielle Sterling Silver, a pretty, smoky looking silver metallic.  Then I painted the remaining nails with Color Club Sweet Get Away, an ultra bright pink neon crème.  This is from the scented neon line they did.  I think it was supposed to smell like roses, but I just got a slight floral scent from it.

Then, using a dotting tool, I made splotches that would be the base of the cheetah spot.  Then using a fine detail brush, I drew the black outline.  You don't need a brush for this, just use a fine toothpick or anything that is thin.
I hope you liked today's design!  And here's hoping it's the start to a fabulous week!

Happy Polishing!!

Monday, April 20, 2015

Atlanta Nail Meet Up Holo Water Marble

Hey Y'all!!  I hope you had a great weekend.  We didn't do too much.  It was rainy.  I mean, really rainy.  We got a couple of inches of rain.  And while there was flooding issues in the area, we were good.  Thankfully.  And since it's the last weekend until Summer break that we didn't have much going on, we stayed home and vegged.


But last weekend (which if you follow me on facebook or instagram you already know), was our semi-annual Atlanta Nail Meet Up!  We started at lunch (Pho), talked, had giveaways and raffles, and then went shopping!!  But first, here's what I had on my nails, a Holographic Water Marble:
I Used:
OPI:  Do You Have This Color In Stockholm, an absolutely perfect shade of purple crème
Color Club:  Harp On It, a silver linear holographic polish
Color Club:  Beyond, a charcoal/black linear holographic polish
I had SO much fun!!  My buddy, Harri from Trailorhood Chic, was there.  It was her first time at this shopping place, so I took about 6 seconds to show her around before I went nuts myself.  In my defense, it was only my second time there.  I really wish I had video of Harri and I!  We were so excited that we literally kept running our buggies into each other.  Like 15 times!!  No surprise, but she and I spent the most.  Instead of bags, we got boxes!  But we live a long way from there and everyone else is pretty close.

Then we all met outside to take a "nail pic":
 
 
The orange and blue to my right (I have the watch on) are Harri's nails!  To see what she used, just click here!

And here is my haul:
There are some things hidden in the bag, but they are a surprise for a friend.  And there is one of my babies in the corner!  Count Damon hates to be left out of photos!

I love our meet ups!  Part of me wishes that we would get together more than just twice a year, but my wallet is thankful that we don't!

I hope y'all have a fun day!  Happy Polishing!!


Monday, April 13, 2015

Black & Silver Holographic Gradient

Hey Y'all!!  How's your Monday going?  We just had our Spring Break last week (which is why I didn't post), and I am so not ready to get back into the swing of things.  There is just SO much happening in the next 5 weeks...I need more rest!  And we didn't even do anything over the break.  Pathetic, I know, lol.;

But on to today's mani, a black and silver holographic gradient:
I Used:
Color Club:  Harp On It, a silver linear holographic
Celestial:  Reaper Crew, a black linear holographic
Make Up Sponge
I love how this one turned out!  I started with one coat of Color Club Harp On It, a silver linear holographic polish.  Once that was completely dry, I sponged on the Color Club and Celestial Reaper Crew, a true black linear holographic polish.
When sponging on the gradient, I decided to do it vertically and alternated the colors.  So it goes from side to side and silver to black to black to silver, etc.  And despite sponging on the polish, it still had the linear effect.  It wasn't as prominent as just brushing on the polish, but it was still there.

I hope you enjoyed today's mani!  Happy Polishing!!


Monday, March 23, 2015

An Ombre Gradient Skittle

Hey Y'all!!  Oh. My. Goodness!!  I tried to get this post up on Friday, but my computer kept updating.  Does anyone else keep putting off updating their computer until it has hours worth to do?  No?  Just me?  Oh well.  Happy Monday!  I hope y'all had a fabulous weekend.  We had a quiet one.  The teen went to a friend's house and the hubby and I went out to a nice dinner.  And slept!  This time of year wears me out.  Not only does the teen have a million things to do and a million places to be, the weather kills me.  In one week we can have 30's, 80's, sun, tropical storms, wind...all leading up to everything about to be covered in an inch of pollen.

But on to today's mani!  I have something I'm calling an Ombre Gradient Skittle:
I Used:
China Glaze: One Track Mind (a deep cobalt blue crème)
Orly- Tiara (small silver glitter in a clear base)
Finger Paints- Ho Ho Happy Holidays (micro silver and light blue glitter in a clear base)
Icing- Sapphire (a medium blue micro glitter in a clear base)
China Glaze- Feeling Twinkly (a dark blue glitter in a clear base)
Make Up Sponge
To start this mani, I painted two coats of China Glaze One Track Mind, a deep cobalt blue crème.  Then using a make up sponge, I sponged on the glitter polishes.  They are:
Pinky:  Orly Tiara, a silver glitter
Ring Finger:  Finger Paints Ho Ho Happy Holidays, a silver and light blue glitter
Middle Finger:  Icing Sapphire, a medium blue glitter
Index Finger:  China Glaze, Feeling Twinkly, a dark blue glitter
Thumb:  all the above
When sponging on the glitter, start about three quarters of the way down your nail.  Then go back and sponge on just the tip of your nail to give you a more concentrated glitter.  For the thumb, paint stripes of the polish on the make up sponge and dab on your nail.  It is really important to use a sponge at least for your thumb...the sponge will soak up the excess clear polish leaving you a more concentrated glitter.  I did two coats on my thumb.  Then just add the top coat.
I hope you have a fabulous day!  Happy Polishing!!


Wednesday, March 18, 2015

NOTD: Finger Paints Gilded Chrome

Hey Y'all!!  How are y'all doing today?  I'm exhausted.  Long, long day yesterday and up early today.  The teen has a field trip then dance class and rehearsal so let's get right to today's post.

So for today, I went gilded, Finger Paints Gilded Chrome:
I won this from Finger Paints (it was one of three polishes).  I wasn't feeling too well today and decided I wanted a lot of bang for very little effort.  Then I remembered the polishes I won from Finger Paints!  Pictures show two coats of Gilded Chrome with two coats of top coat.
Gilded Chrome is a textured, heavily glittered pack polish in a clear base.  It is PACKED with glitter!!  The glitter is multi sized, goldish silverfish colored.  It gives the look of slightly tarnished silver.  I LOVED how this looked!  Some of the glitter has a more matte effect while the bigger glitter is super reflective. 
While I loved the look, I wasn't that impressed with the polish.  First I had to use a top coat because the texture was SO rough I was scratching myself.  And it hurt.  It took two coats to get it smooth enough for me to be able to live with it.  Second, the wear was horrible.  In less than a day, I was chipping.  A lot.  Although I did get complete coverage in two coats.  I'm really on the fence about it.  I loved the way it looked on the nail, but hated the way it felt and how little wear I got from it.  I will probably wear it out for a special night, but only for that night.

I hope you enjoyed today's post!  Happy Polishing!!

Wednesday, July 23, 2014

Ombre, Gradient and Stripes

Hey Y 'all!!  Happy Hump-Day!  I hope y'all are having a fabulous day.  I feel better today.  Yesterday stunk, I had a headache that just would not go away!  But 11 1/2 hours of sleep cured that!  I can't believe I slept that long.  But now, at least I feel better!  And I have a new post for you!

For today I have an Ombre/Gradient and Stripe design for you:
I Used:
China Glaze- White on White (white crème)
China Glaze- Pelican Gray (pale gray with a silver shimmer)
China Glaze- Silver Lining (clear base with small silver glitter)
China Glaze- Black Diamond (shimmery black)
Striping Tape
Make Up Sponges
I love how this mani turned out, but I have to say doing the stripes was a pain in the butt.  That's why two nails are gradients.
For the stripes I placed the striping tape diagonally then painted the colors in the order listed in the "I Used" section.  The ombre was also done diagonally.

I hope y'all enjoyed today's design!   Happy Polishing!

Friday, May 9, 2014

Purple & Hearts & Circles & Holo & Oh My!

Hey Y'all!!  Happy Friday!!  I am so happy it's Friday!  The teen and I have an entire day to chill before another crazy 10 straight days((minus Mother's Day) that include dance, recital, end of the year school parties and oral surgery.  Dang!  It's all her stuff.  LOL, I guess I don't have a life anymore!  Do any of y'all have special plans for the weekend?  Mother's Day is Sunday.  I plan for the teen and hubby to wait on me hand and foot all day!  And crab!  I want crab for dinner!  And lunch!

Ok, so if y'all follow me on facebook, twitter or instagram, you know that a couple of weeks ago some of my blogger buddies and I had a swap.  And the person who had me was the incredible, fabulous, beautiful Natalie at Over The Top Coat!!!!  And she did an incredible job!!  She knocked off a bunch of my wants and loaded me up on jelly beans (my favorite candy)!!!  It was so hard to choose which polish to use first, but I was predictable.  I went with the purple and glitter!
Holy crap on a cracker!!!  These were AH-MAZING!!!!  Pictures truly don't do these justice!!

The lilac is China Glaze Lotus Begin, a beautiful lilac crème.  LOVE!!!  Pictures show two coats.

The glitter top coat is Above The Curve Circle of Love.  OMG!!!!  This is my first Above The Curve nail polish, but it won't be my last.  Circle of Love is mind blowing!  Ok, I will try to tell you everything in it...  Circle of  Love is a clear based topper with:  lilac hearts (hard to see because it's the exact same color as Lotus Begin), red hearts, pink hearts, white hearts, large holographic circles,  large red circles, medium white circles, medium pink circles, medium red circles, medium magenta circles, small magenta circles, small pink circles, small white circles, miro red glitter and micro holographic glitter!  Whew!!  That's a ton of glitter!  And a ton of fabulousness!!  I think I got them all!!

Pictures show one (yep, that's just one) coat of Circle of Love with two coats of top coat, just to make sure everything evened out. I didn't even have to dig for the glitters.  Not even the big ones!

I can not begin to tell you how much I LOVE these polishes!!  And I can't thank the fabulous Natalie enough!!!

Hope y'all enjoyed today's post and that you have an incredible weekend! Happy Polishing!!

Wednesday, May 7, 2014

Another Spring Pedicure

Hey Y'all!!  Oh. My. Goodness!!!  I've missed y'all!!  The last five days have been a whirl wind of tons of going and no sleeping!  The teen was in "Cinderella", five shows in three days.  On Monday we got up at 4:45am and got home at 7:45pm!  I'm too old for this!  But she was beautiful, if I say so myself :)   Basically, we weren't home for five straight days. 

I do have a pot or you today!! It's the third pedicure from my Atlanta Parent Magazine article:
I Used:
Wet-n-Wild- Temptation (bright salmon crème)
Wet-n-Wild Mega Rocks- Stick It To The Man (medium blue and holographic glitters in a clear base)
Maybelline Triple Shine- Sparks Fly (various sizes of light blue and silver glitter in a clear base)

So I wanted this to be a glitter gradient, but it didn't quite work that way, but I still like the outcome.  I started with two coats of Wet-n-Wild Temptation.  Then, using the brush that came with the polish, I painted Wet-n-Wild Stick It To The Man on the top half of my toe nails.  I really love this color, but the glitter was just too sparse to make a gradient.  So I went back over it with Maybelline Sparks Fly.
I hope y'all enjoyed today's pedicure!!  Happy Polishing!!

Tuesday, April 29, 2014

TIOT: Formula X Vaporize

Hey Y'all!!  I hope this gets posted today, we're in for some really rough weather today and tomorrow.  What fun, especially as this is the day we are out all day/  Plus the teen has company rehearsals tonight until late.  I was looking at the weather channel and yep, the worse weather is expected to be while we are out.  Fun....NOT!  Anyway, it's time for TIOT!

So for this Try It On Tuesday, I have Formula X Vaporize:
So, I fell in love with this the second I saw it.  I had to have it!  But I will say it started a debate (that's a nice word for argument) in my house, with me on one side and the Teen and Hubby on the other.  I think this is a gorgeous, glass fleck, shimmery white, while the other two said it was a light silver. 
What do y'all think?  White or silver?
Well, even if I can't tell what color it is, it's beautiful!  The formula was a dream.  It went on perfectly without streaking which is rare with this type and color of polish.  Pictures show two coats with top coat.
Formula X for Sephora can be found at Sephora stores or on their web site.  Vaporize was $12.50.

This is a new favorite of mine!  And I predict you're going to see a lot this summer!  Happy Polishing!!


Wednesday, April 9, 2014

Spring Leopard & Gradient

Hey Y'all!!  So the teen is on Spring Break this week, and so far it's been warm & beautiful and cold  wet...typical Georgia Spring I guess.  And sadly, we don't have any plans, saving money for her summer dance camps.  Do any of y'all have big plans for Spring Break?

But it is giving me time to do a bunch of nail art for y'all!  And today I have Spring Leopard print and Gradient:

I Used:
Sally Hansen Triple Shine- Bait Me (pale gray/silver with silver shimmer)
Sally Hansen Triple Shine- Blow Bubbles (light pink shimmer)
Sally Hansen Triple Shine- Flame On (magenta shimmer)
Make Up Sponges
Dotting Tools

Since I've told y'all a lot, how to do gradients and leopard spots, I'll just tell you what colors I used where.

I painted my ring finger and thumb with the middle color, Blow Bubbles, and the rest of my nails with Bait Me, the pale shimmery grayish, white-ish silver.  Ok, I'm not sure what color it is, but it's a beauty.  The Blow Bubbles took three coats and the Bait Me took two.

The leopard spots were made using Flame On and the lines around them were made with Bait Me.  The order of the gradient, from the cuticle to the tip, is Bait Me, Blow Bubbles and Flame On.

Also, I have a favor to ask!  My friends (Over The Topcoat, Sunshine Nails and Sassy Paints) and I have entered a contest being held by Preen.me and we would SO appreciate it if you would vote for us!!  Just click here!!  We're the Polish Mavens! Thank y'all!!!!

Have a fabulous Spring Break and I'll see y'all tomorrow!  Happy Polishing!!


Thursday, February 13, 2014

Mish Mash Challenge: Black & White

Hey Y'all!!  We survived the great ice storm of 2014!!  We have been so fortunate!!  We didn't lose power or, so far, any trees.  Yay!!  Now just hoping it warms up enough to melt the snow so the hubby can come home.  

So I'm a day late, but I have this week's Mish Mash Challenge theme ready, Black and White:
I Used:
Sinful Colors- Black on Black (black crème)
China Glaze- White on White (white crème)
Orly- Tiara (small silver glitter in a clear base)

I started with three coats of China Glaze White on White.  Once that was completely dry, just using the brush that came with the polish, I painted the black French tips.  This doesn't have to be neat or tidy since you're just going to cover the line up with silver glitter.  It did take two coats of Sinful Colors Black on Black to get complete coverage.
Then using a make up sponge, I dabbed on Orly Tiara to blend into the white and black, giving it a gradient effect.  Then I went back and using the brush that came with Tiara, I dabbed the polish at the line between the black and white until the silver was completely opaque.
I hope y'all enjoyed today's post!  Be sure to check out every one's black and white designs in the links below.  I can't wait to see what they came up with.  Happy Polishing!!


Friday, January 3, 2014

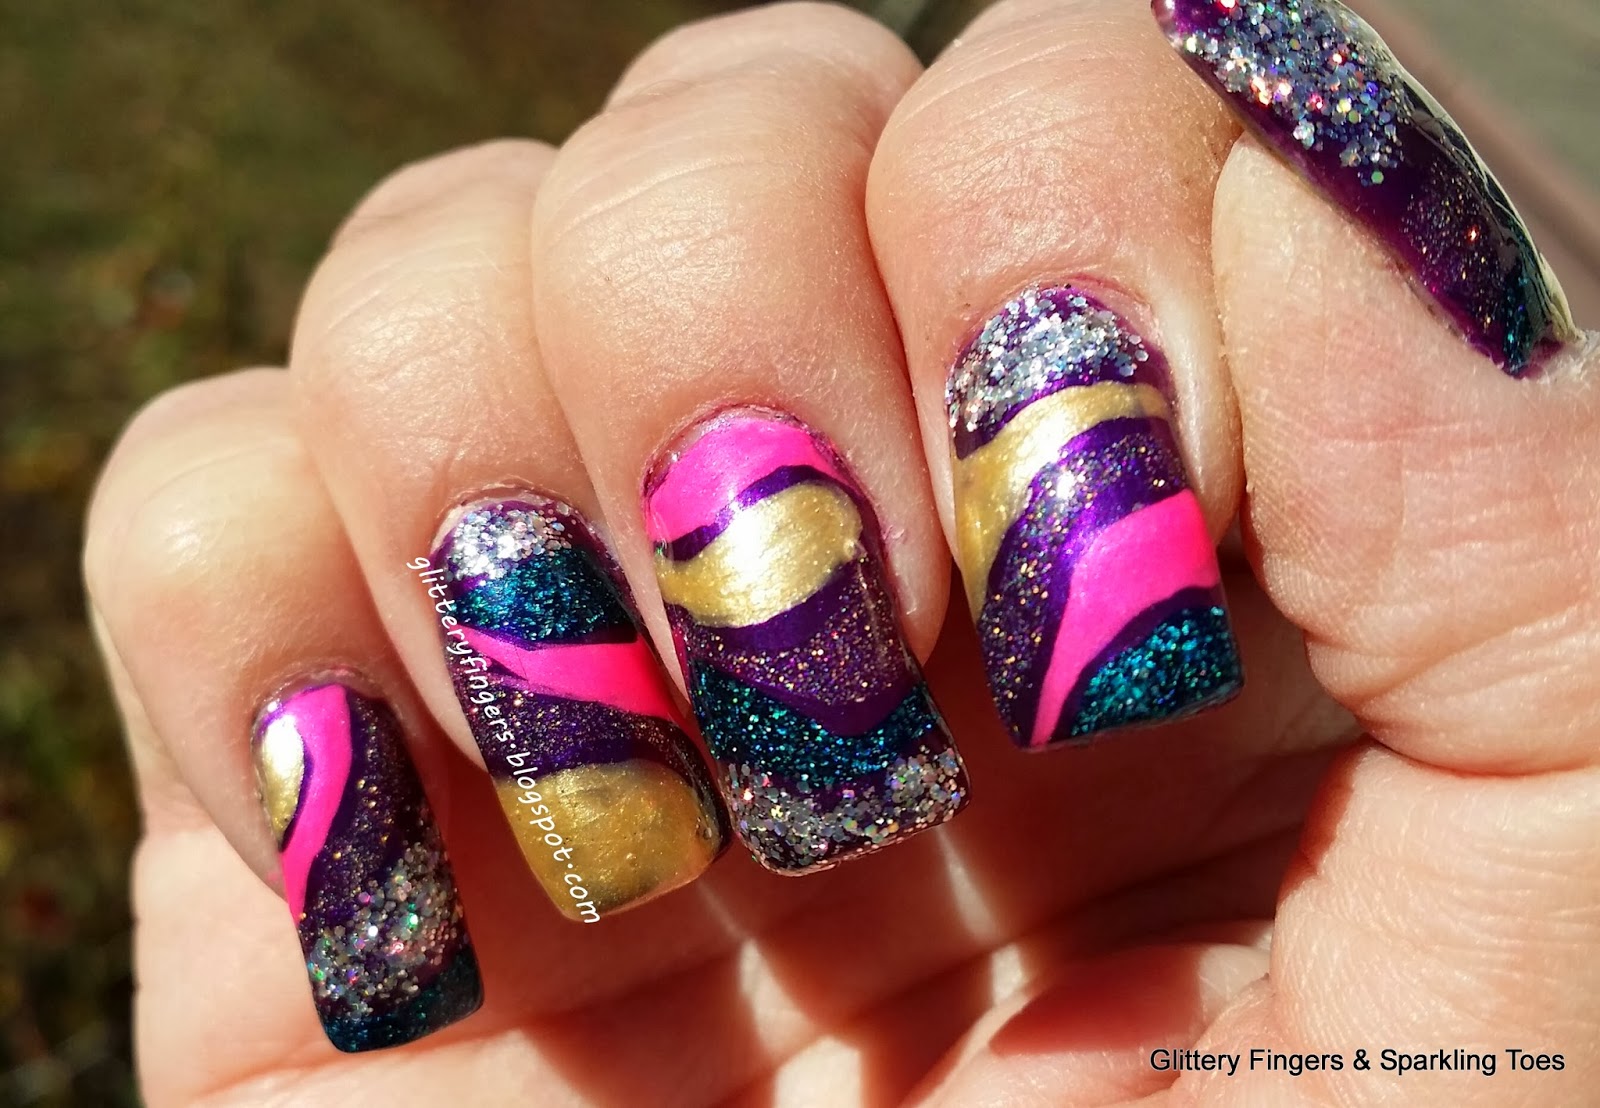
Colorful Waves-Inspired by Robin Moses

Hey Y'all!!  Now before I start this, I realize that SO many of you are in way colder places this morning, but I'm a Florida girl and this, this right here, just ain't right!  I'M SO COLD!!!!!  It's in the low 20's and the wind chill is in the low teens.  I'm not made for this weather!  I'm from Florida!  I still live in the deep south!  And if that wasn't enough, Tuesday's high is supposed to be 27 degrees!!!!!  WTH????? And that's the day we're out for 13 straight hours!!!  I'm not going to make it!

So, for my possible last post because I may freeze and have to wait to thaw out, I have some Colorful Waves inspired by the incredible Robin Moses!
If you don't know who Robin Moses is, you have to go right now to her you tube channel and see for yourself.  She is incredible!!  She is such an artist!!  And she makes it look so easy (it isn't), she's just chatting and joking away while meanwhile she is painting these incredible portraits.  I'm such a huge fan!!  And it isn't that often she does something that I think I can do, but this time she did!!  To see her fabulous design, and to get the tutorial, simply click here to see the video.

She used glitter polish, foil and loose glitter for her design, and I used all nail polishes for mine.

I Used:
Butter London- HRH (frosty dark purple)
China Glaze- Pink Voltage (neon pink)
China Glaze- Nova (small and medium holographic glitter in clear base)
Finger Paints- Sparkle Top Coat (milky base with micro gold glitter)
LA Girls- Teal Dimension (teal jelly base with micro holo glitter)
Pure Ice- Jaguar (light old frost)
 
 
I hope y'all enjoyed today's design.  And in all seriousness, y'all be careful out there.  For everyone living in the US, this cold front is serious.  Make sure you stay warm!

Stay inside and check out Robin Moses' You Tube channel!  I'll see y'all later!!  Happy Polishing!!

Thursday, January 2, 2014

Formula X For Sephora: Legend and Law of Attraction

Hey Y'all!!  Happy New Year!!  I'm still sick, yay.  Of course the hubby is now fine.  So not only did he give me his yucky germs, he has the nerve to already be better.  I'm now plotting revenge!

But he and the now-a-teen did give me a couple of bottles of polish for Christmas.  And I have them for you today!   They are both from the new Formula X for Sephora line, Legend and Law of Attraction.

First up is Legend:
I saw Legend in Sephora and fell in love with it!  If you look at the polish in the bottle in the picture above, you'll see what I saw in the store.  I saw a blurple (equally blue and purple) polish that had a heavy blue and purple shimmer.  I was so excited, couldn't wait to put it on!  What I got is exactly what you see on my nails: a burgundy polish with an extremely subtle blue and purple shimmer.
Do you see the shimmer?  Me either.  And for the most part, I didn't see it.   At least not inside in regular light.  It only showed up while taking the pictures.  And I certainly didn't expect it to be burgundy.  Not that I don't like burgundy.  I do.  Especially when it leans more towards purple like this one does.  It's just that this polish looks EXTREMELY different on the nail than it does on the nail.
As for the formula, it was great.  It went on smoothly, and evened out in two coats. Pictures show two coats with one coat of top coat.   Of course for $12.50 a bottle I expect a great formula.  My only complaint is that it looks nothing like the polish in the bottle!!!

Ok, so I was disappointed in Legend, on to Law of Attraction:
From the bottle, this appeared to be a clear base with micro silver glitter and medium hex blue holographic glitter.  Pictures show one coat of  Law of Attraction over two coats of Legend with top coat.
Ok, I'm beginning  to lose my powers of observation, cause I swear that looks like gold glitter with blue holographic glitters.  No matter where I went, no matter the lighting, this looked like gold with blue holo glitters.  What is going on???
As for formula, it was great.  And it is packed with glitter, I bet you could get full coverage with two coats.  Again, this bottle was $12.50 (the crème polishes are $10 each).

These are the only two bottles of Formula X I own, so I don't know if the "looks one way in the bottle and looks completely different on my nail" thing is limited to just these two or not.  I do have a request in for another color, Heroic, for my birthday, which is this month, so hopefully I'll find out if they all do this Houdini thing or not.  I have seen swatches of the crèmes from this line and they seem to look the same on the nail as they do in the bottle.

Maybe it's just me....what do y'all think?

Oh well.  I'll see y'all tomorrow with a design inspired by the incredible Robin Moses (isn't she amazing???).  Until then, Happy Polishing!!