Hey Y'all!! Happy New Year's Eve!! So this New Year's Eve is not going the way I hoped...Mr. Glittery and I are sick :( They say what you do on New Year's Eve is what you will be doing the rest of the year, here's hoping "they" are wrong. Not that we had a lot planned, just the hubs, now-a-teen and I at home, but still. Being sick stinks! So let me live through you, what fabulous plans do you have for tonight??
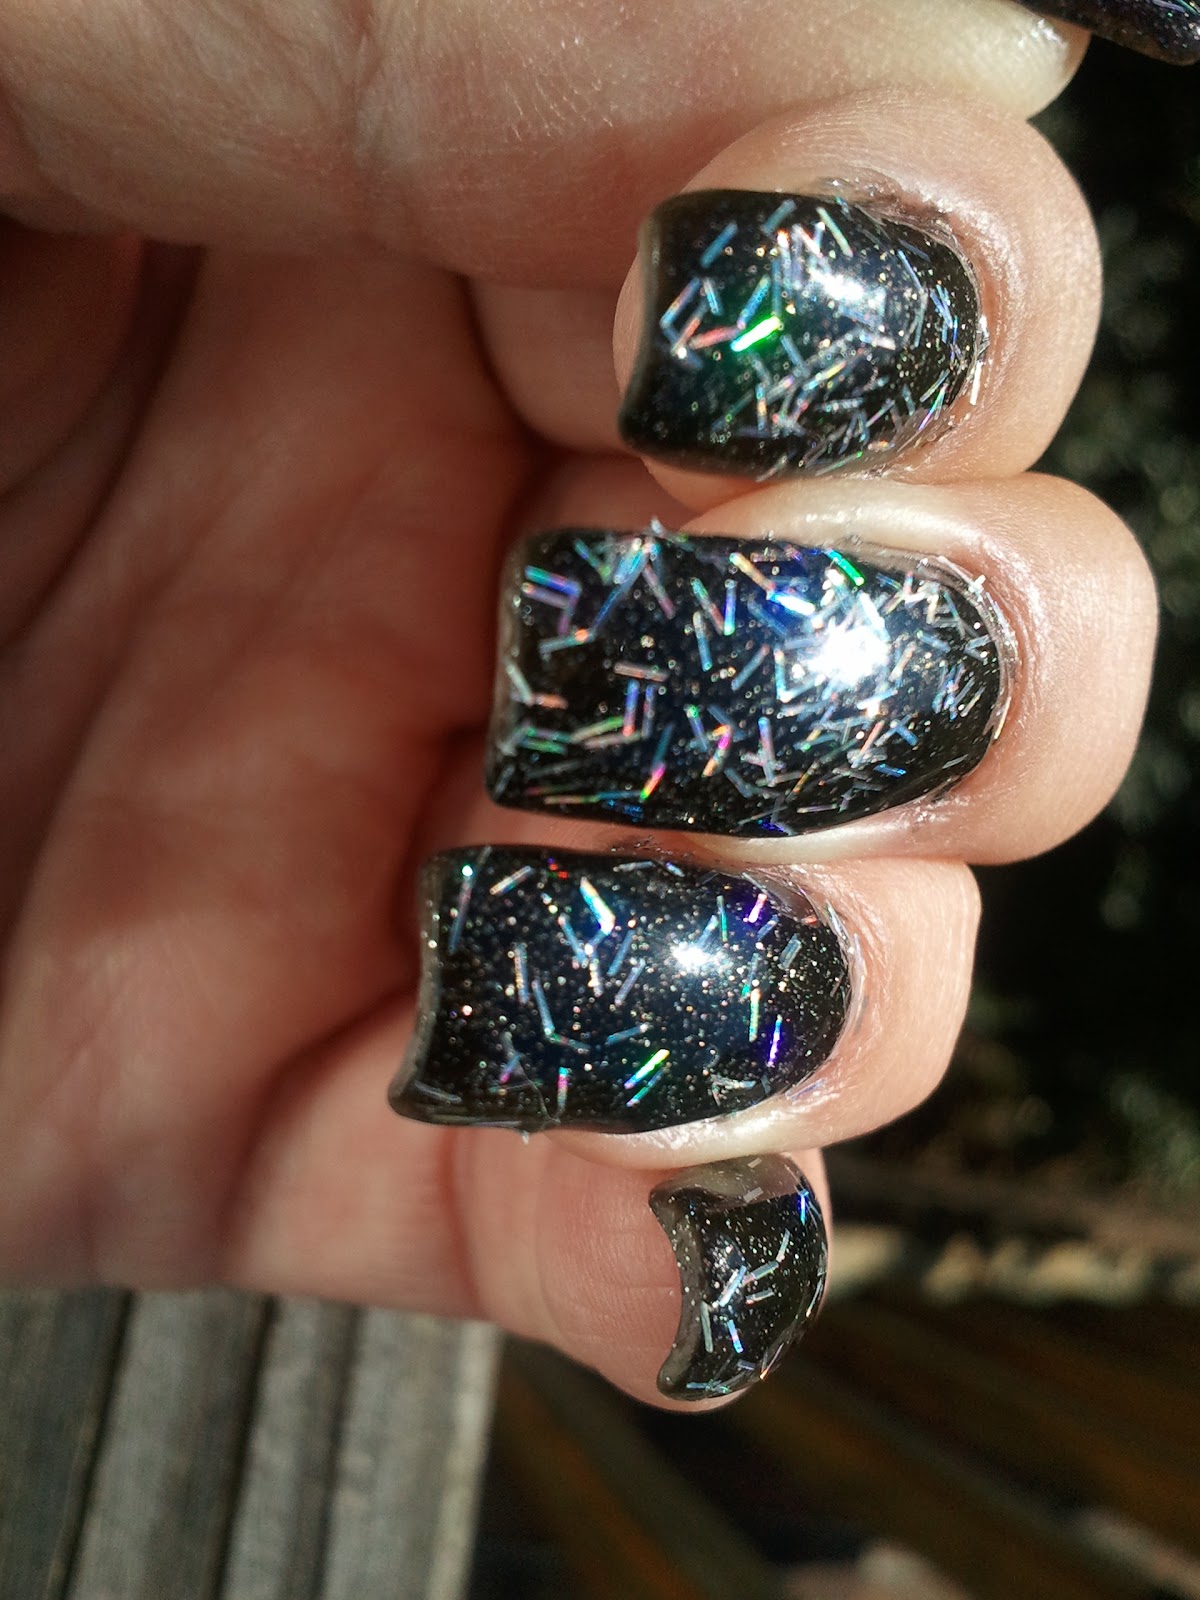
Anyway, yesterday I showed you my Waterfall nails, a more subtle look and for today I have a much more blingy look for you:
I Used:
Finger Paints- Colorful Collage (small and medium holo glitters in clear base)
China Glaze- Liquid Leather (black crème)
I SO wish the sun would come out so you could see how this sparkles! It's blinding! I love Colorful Collage so much! If you want bling and glitter for the new year, this will work perfectly!
To get this look I started with two coats of China Glaze Liquid Leather. Once that had dried, and using the brush that came with the polish, I started about three quarters of the way down my nail from the tip and brushed the polish towards the tip. Then I went back and painted only the top 1/4 of my nail. This polish is so packed with glitter, that's all it took to get the gradient....with a little dabbing to fill in any holes at the tip.
So despite the mean hubby sharing his germs with me (he made me sick, not the other way around no matter what he says), at least I can look at my pretty sparkling nails. Now all I have to do is stay up until midnight for the now-a-teen.
Here's hoping you have a safe and joyful New Year's Eve and 2014!! Happy Polishing!!
Showing posts with label New Year's Eve. Show all posts
Tuesday, December 31, 2013
Monday, December 30, 2013
New Year's Eve Waterfall
Hey Y'all!! I'm back!! Sorry for being gone since last Wednesday, but Mr. Glittery had the rest of the week off so we spent some family time together. Christmas was pretty great. It was just us this year, so it was quiet and calm, lol. I even got some things from my wish list! Some will be making an appearance soon. So how was your Christmas?? Did you get what you were hoping for? Are you ready for 2013 to be over? Are you going to any parties? Have I asked you enough questions??
Probably, lol. So let's get right to the nail design. Today I have a New Year's Eve Waterfall for you:
I Used:
China Glaze- Liquid Leather (black crème)
Pure Ice- Silver Mercedes (silver foil)
Pure Ice- Jaguar (gold foil)
Liner Brush
Let me start by saying, I do my waterfall designs a little different than everyone else. Everyone else makes very close lines that are all, basically, the same length and width and tend to not end in a point but are more blunt. I love that look. I like to do mine with vary lengths, widths and tapered points. That's just me. I have to be different o_O! You can do yours however you like. There your nails! Have fun with it.
I started with three coats of China Glaze Liquid Leather. Yep, three coats. My one constant concern with China Glaze polish is that it tends to be thin, and this batch of Liquid Leather was really thin! Then just take a thin brush and, alternating silver and gold, paint thin lines from your tip towards your cuticle, lifting the brush as you go.
That's it! I love this look for New Year's Eve. It's subtle glitz. Of course you can glam this up or down as much as you like. To make it even more subtle, try using darker colors like blue and purple. Or glam it up with silver and gold shimmers or glitters. Make it your own!
I have a few more New Year's Eve designs coming up or you, so be on the lookout! Until then, Happy Polishing!!
Probably, lol. So let's get right to the nail design. Today I have a New Year's Eve Waterfall for you:
I Used:
China Glaze- Liquid Leather (black crème)
Pure Ice- Silver Mercedes (silver foil)
Pure Ice- Jaguar (gold foil)
Liner Brush
Let me start by saying, I do my waterfall designs a little different than everyone else. Everyone else makes very close lines that are all, basically, the same length and width and tend to not end in a point but are more blunt. I love that look. I like to do mine with vary lengths, widths and tapered points. That's just me. I have to be different o_O! You can do yours however you like. There your nails! Have fun with it.
I started with three coats of China Glaze Liquid Leather. Yep, three coats. My one constant concern with China Glaze polish is that it tends to be thin, and this batch of Liquid Leather was really thin! Then just take a thin brush and, alternating silver and gold, paint thin lines from your tip towards your cuticle, lifting the brush as you go.
That's it! I love this look for New Year's Eve. It's subtle glitz. Of course you can glam this up or down as much as you like. To make it even more subtle, try using darker colors like blue and purple. Or glam it up with silver and gold shimmers or glitters. Make it your own!
I have a few more New Year's Eve designs coming up or you, so be on the lookout! Until then, Happy Polishing!!
Tuesday, December 17, 2013
Nutcracker Water Marble
Hey Y'all!! So another Nutcracker is over. I feel sad and relieved. Sad, cause, well, it's over for this season. Relieved because it takes a lot out of me, lol. I ended up with a cold and threw out my back. Fun huh?
I did want to show you my nail design for the shows, but first, a proud mama moment...here's my little one as Spanish in Act II:
Isn't she fabulous??? Ok, I know, I'm biased. This was the first time she was able to perform en pointe in a Company production. So proud!!
As for my nails, I did a silver holo and black water marble:
I Used:
Jade- Psicodelica (silver linear holographic)
China Glaze- Liquid Leather (black crème)
I thought it would be brighter than it came out, but I still like it. I painted two coats of China Glaze Liquid Leather first so that may be why it was more sedated than usual. If you look at the column on the right for Fall Water Marble, you will find my tutorial. I think after the first of the year, I'm going to do another one....with more pictures and stuff.
I hope y'all enjoy today's design! I'll be back on my normal track starting tomorrow...hopefully, lol. I already have my Mish Mash Challenge nails ready to go. I need to get over this cold...it's making me miserable. I also have a rant for you (first world beauty complaint).
I also have to find a cure for my latest You Tube obsession, Grav3yard Girl!!! I LOVE her!! Y'all should totally check her out. She does beauty, hauls, clothes, as seen on tv, just a lot of everything! She's hilarious too. (And no, she has no idea I exist, and I don't get anything for you watching her videos...I'm just a huge fan!) I swear she's a younger version of me!!
Anyway, see y'all tomorrow!! Happy Polishing!!!
I did want to show you my nail design for the shows, but first, a proud mama moment...here's my little one as Spanish in Act II:
Isn't she fabulous??? Ok, I know, I'm biased. This was the first time she was able to perform en pointe in a Company production. So proud!!
As for my nails, I did a silver holo and black water marble:
I Used:
Jade- Psicodelica (silver linear holographic)
China Glaze- Liquid Leather (black crème)
I thought it would be brighter than it came out, but I still like it. I painted two coats of China Glaze Liquid Leather first so that may be why it was more sedated than usual. If you look at the column on the right for Fall Water Marble, you will find my tutorial. I think after the first of the year, I'm going to do another one....with more pictures and stuff.
I hope y'all enjoy today's design! I'll be back on my normal track starting tomorrow...hopefully, lol. I already have my Mish Mash Challenge nails ready to go. I need to get over this cold...it's making me miserable. I also have a rant for you (first world beauty complaint).
I also have to find a cure for my latest You Tube obsession, Grav3yard Girl!!! I LOVE her!! Y'all should totally check her out. She does beauty, hauls, clothes, as seen on tv, just a lot of everything! She's hilarious too. (And no, she has no idea I exist, and I don't get anything for you watching her videos...I'm just a huge fan!) I swear she's a younger version of me!!
Anyway, see y'all tomorrow!! Happy Polishing!!!
Monday, December 9, 2013
Festive French Tips (Black & Gold)
Hey Y'all! Happy Monday! Did y'all have a great weekend? Do you have all of your Christmas shopping done? I've barely started :( And I haven't gotten anything for the hubby yet. He's so hard to buy for. He's all, "I don't need anything. I just want y'all to have what you want." Is your mister like this?? Sounds all kind and stuff, but the now-a-teen and I wanna give him presents! We like that! Grrrr.... We should get him something hideous, then maybe he will tell us what he really wants.
Oh well, on to the nails! Today I went with nails a little different for the holidays. I think they still look festive, but if you're tired of red and green this gives you another idea. I also think these would be great for New Year's Eve. So I have black and gold French tips:
I Used:
China Glaze- Liquid Leather (black crème)
China Glaze- Mingle With Kringle (gold glass fleck)
Scotch Tape
Liner Brush
Super easy & super holiday-ish! Start with two coats of China Glaze Liquid Leather. Once that has completely dried, lay scotch tape down where you want the tip to be. You can do it right on your nail line, or you can do it like I did and put it a little closer to your nail edge. Paint the Mingle With Kringle and immediately remove the tape.
Dab a little polish onto a piece of paper or paper plate first. Then using a thin liner brush, just draw little wisps...sweep the gold into black and the black into the gold.
Hope y'all enjoyed today's mani! Happy Polishing!!!
Oh well, on to the nails! Today I went with nails a little different for the holidays. I think they still look festive, but if you're tired of red and green this gives you another idea. I also think these would be great for New Year's Eve. So I have black and gold French tips:
I Used:
China Glaze- Liquid Leather (black crème)
China Glaze- Mingle With Kringle (gold glass fleck)
Scotch Tape
Liner Brush
Super easy & super holiday-ish! Start with two coats of China Glaze Liquid Leather. Once that has completely dried, lay scotch tape down where you want the tip to be. You can do it right on your nail line, or you can do it like I did and put it a little closer to your nail edge. Paint the Mingle With Kringle and immediately remove the tape.
Dab a little polish onto a piece of paper or paper plate first. Then using a thin liner brush, just draw little wisps...sweep the gold into black and the black into the gold.
Hope y'all enjoyed today's mani! Happy Polishing!!!
Monday, December 31, 2012
Red French Tip
Hi again! As promised, here's my second post of the day. If you are looking for a more classic look, or something more elegant, I may have what you are looking for:
This is a matte/glossy French tip. And I promise the hardest thing about this design was figuring out what to call it!
I Used:
Orly- Smolder (dark red shimmer)
NYC- Matte Me Crazy (matte top coat)
Pro FX- Quick Dry High Gloss Top Coat
Crystal Rhinestones
I started with two coats of Orly Smolder . After that had dried completely, I taped off the ends of my nails (see my tips for creating the perfect French tips here) and then painted the nail beds with the NYC matte top coat. Then I painted the tips with the Pro-FX high gloss top coat free hand. You do need to paint the tips to give your nails a smooth finish and feel.
One special thing I did was use real crystal rhinestones as opposed to the acrylic ones sold in beauty supply stores. You can find them at your local hobby/craft store. I found mine at Michael's for under $5.00. I do have two different sizes on too. Start by placing a dot of the matte top coat in the middle of your nail. Then place the largest rhinestone. Then repeat, placing the smaller rhinestones around the larger one.'
I hope y'all enjoy it! Have a fabulous New Year's Eve!! And be sure to post pictures of your nails and outfits on my facebook page. Happy Polishing!!
This is a matte/glossy French tip. And I promise the hardest thing about this design was figuring out what to call it!
I Used:
Orly- Smolder (dark red shimmer)
NYC- Matte Me Crazy (matte top coat)
Pro FX- Quick Dry High Gloss Top Coat
Crystal Rhinestones
I started with two coats of Orly Smolder . After that had dried completely, I taped off the ends of my nails (see my tips for creating the perfect French tips here) and then painted the nail beds with the NYC matte top coat. Then I painted the tips with the Pro-FX high gloss top coat free hand. You do need to paint the tips to give your nails a smooth finish and feel.
One special thing I did was use real crystal rhinestones as opposed to the acrylic ones sold in beauty supply stores. You can find them at your local hobby/craft store. I found mine at Michael's for under $5.00. I do have two different sizes on too. Start by placing a dot of the matte top coat in the middle of your nail. Then place the largest rhinestone. Then repeat, placing the smaller rhinestones around the larger one.'
I hope y'all enjoy it! Have a fabulous New Year's Eve!! And be sure to post pictures of your nails and outfits on my facebook page. Happy Polishing!!
Fireworks II
Happy New Year's Eve!!!! I hope y'all are having a great day. So what plans do you have for tonight? What are you wearing? Go to my facebook page and post pictures of your dress and nails! My mani is killer, my clothes...sweatshirt and lounge pants, lol. We are spending the night at home with our 12 year old, eating seafood (crab & shrimp), pizza rolls and playing board games. Still a fabulous way to spend the New Year!
So as a result of spending all night on a web site called Epic Fail (it's hilarious), I have two last minute manicures for you today. Here's the first, another firework design:
I Used:
Sinful Colors- Black on Black (black crème)
Milani- 3D (gold holographic)
Milani- HD (silver holographic)
Small Liner Brush
I started with two coats of Sinful Colors Black on Black. Once that was dry, I used a small liner brush (you could use a toothpick to drag the polish too), and painted the gold fireworks first:
I like how they look with just the gold too (please forgive the lighting, I broke the light to my light box).
Then using Milani HD, I painted the silver fireworks. I love how these turned out, I think they are festive fireworks while still looking classy. I hope you enjoy them too. As always, if you have any questions, please let me know. Happy Polishing!!

So as a result of spending all night on a web site called Epic Fail (it's hilarious), I have two last minute manicures for you today. Here's the first, another firework design:
I Used:
Sinful Colors- Black on Black (black crème)
Milani- 3D (gold holographic)
Milani- HD (silver holographic)
Small Liner Brush
I started with two coats of Sinful Colors Black on Black. Once that was dry, I used a small liner brush (you could use a toothpick to drag the polish too), and painted the gold fireworks first:
I like how they look with just the gold too (please forgive the lighting, I broke the light to my light box).
Then using Milani HD, I painted the silver fireworks. I love how these turned out, I think they are festive fireworks while still looking classy. I hope you enjoy them too. As always, if you have any questions, please let me know. Happy Polishing!!

Sunday, December 30, 2012
Fireworks I
Hi Everyone! So, do y'all have your plans made for New Year's Eve? I think I do. We have a ton of our favorite food (seafood for me!!) and we are going to pig out and play board games with our almost teenager. Now if the hubby and I can just stay awake until midnight!!
Today I have fireworks for you, because what's New Year's without fireworks:
(Please excuse the very dry hands, I'm working on them!)
I Used:
Sally Hansen- Petrol (dark blue crème)
Wet-n-Wild- The Gold & the Beautiful (shimmery gold)
Orly- Miss Conduct (fuchsia jelly with fuchsia micro glitter)
Sinful Colors- Heavy Metal (shimmery silver)
Orly- Shine On Crazy Diamonds (clear base with micro holographic glitter)
Small Liner Brush (toothpick will work too)
To start this manicure, I painted two coats of Sally Hansen Petrol. Then using a small liner brush (or toothpick), I just drew the fireworks. The only trick to this manicure is to make the fireworks look random. Then I added Orly Shine on Crazy Diamond to give the night stars.
I hope y'all enjoy this manicure! Happy Polishing!!
Today I have fireworks for you, because what's New Year's without fireworks:
(Please excuse the very dry hands, I'm working on them!)
I Used:
Sally Hansen- Petrol (dark blue crème)
Wet-n-Wild- The Gold & the Beautiful (shimmery gold)
Orly- Miss Conduct (fuchsia jelly with fuchsia micro glitter)
Sinful Colors- Heavy Metal (shimmery silver)
Orly- Shine On Crazy Diamonds (clear base with micro holographic glitter)
Small Liner Brush (toothpick will work too)
To start this manicure, I painted two coats of Sally Hansen Petrol. Then using a small liner brush (or toothpick), I just drew the fireworks. The only trick to this manicure is to make the fireworks look random. Then I added Orly Shine on Crazy Diamond to give the night stars.
I hope y'all enjoy this manicure! Happy Polishing!!
Wednesday, December 26, 2012
Silver & Gold Water Marble
Hi Every one!! I hope y'all have had a great Christmas!! I have this post scheduled for Dec. 26th, so I can take a little time off to spend with my family. I will be back with more posts for New Year's Eve by the 27th though!!
So with my daughter in "The Nutcracker", and six shows scheduled over three days, I knew I wouldn't have a chance to do my nails. I wanted something special but what to do? I thought about doing nutcrackers, or my daughter's roles (party boy and Chinese), or maybe even sugar plums. And then I went in a totally different direction! I love my "Nutcracker" manicure and I think it would be perfect for New Year's Eve: a silver, gold and black water marble!
I Used:
China Glaze- Liquid Leather (black creme)
Wet-n-Wild- The Gold & the Beautiful (very shimmery gold)
Sinful Colors- Heavy Metal (very shimmery silver)
Pure Ice- Jaguar (very pale shimmery gold)
Click here for the step-by-step tutorial with pictures on how to water marble.
I started with two coats of Pure Ice Jaguar since the silver polish was so bright (see my review of Heavy Metal). The water marble was done the exact same way as the link above. The only differences were: 1. the order I dropped the polish. Since silver and gold can sometimes be hard to see when they are side by side, I dropped the black polish in between them so they would stand out. And 2. the design. I drew a zig zag design in the bull's eye.
I love, love, love how this came out. It may not bring Nutcrackers or sugar plum fairies to mind, but it does bring glamour and New Year's Eve to mind. I definitely am going to enjoy it. What do y'all think? Happy Polishing!!
So with my daughter in "The Nutcracker", and six shows scheduled over three days, I knew I wouldn't have a chance to do my nails. I wanted something special but what to do? I thought about doing nutcrackers, or my daughter's roles (party boy and Chinese), or maybe even sugar plums. And then I went in a totally different direction! I love my "Nutcracker" manicure and I think it would be perfect for New Year's Eve: a silver, gold and black water marble!
I Used:
China Glaze- Liquid Leather (black creme)
Wet-n-Wild- The Gold & the Beautiful (very shimmery gold)
Sinful Colors- Heavy Metal (very shimmery silver)
Pure Ice- Jaguar (very pale shimmery gold)
Click here for the step-by-step tutorial with pictures on how to water marble.
I started with two coats of Pure Ice Jaguar since the silver polish was so bright (see my review of Heavy Metal). The water marble was done the exact same way as the link above. The only differences were: 1. the order I dropped the polish. Since silver and gold can sometimes be hard to see when they are side by side, I dropped the black polish in between them so they would stand out. And 2. the design. I drew a zig zag design in the bull's eye.
I love, love, love how this came out. It may not bring Nutcrackers or sugar plum fairies to mind, but it does bring glamour and New Year's Eve to mind. I definitely am going to enjoy it. What do y'all think? Happy Polishing!!
Monday, December 24, 2012
Tinsel- 12 Days of Christmas Challenge
Merry Christmas Eve Everyone!! I hope y'all have finished all your shopping, baking and wrapping and can relax and enjoy your family and paint your nails.
Today is the 11th day of the Christmas challenge and out of all of them, this was absolutely the hardest for me!! I mean, tinsel? I didn't have a clue. I did like four designs, but kept coming back to my first one. This one is my favorite. And I think it would be fabulous for New Year's Eve too!
I Used:
Icing- Twilight
Loose silver holographic bar glitter
I started with two coats of Icing Twilight. This is a gorgeous polish! It's a black jelly with silver micro glitter. The silver glitter really shows up in the picture above. I used three coats to make it completely opaque, but two would have been fine.
When that had dried, I applied a thin layer of top coat and sprinkled the loose bar glitter over it. The glitter was a fabulous find at Dollar Tree. If you have one near you, go and check it out. They have started carrying a lot of nail art supplies and everything in the store is $1.00. On to the manicure, tap down the glitter so you don't have any sharp edges and finish with a top coat.
I don't know if it looks like tinsel, but it's glittering and sparkling all over the place so I'm happy! And it's perfect for New Year's Eve! I can not wait to see what everyone else came up with! Be sure to visit their sites!! Merry Christmas and Happy Polishing!!
Today is the 11th day of the Christmas challenge and out of all of them, this was absolutely the hardest for me!! I mean, tinsel? I didn't have a clue. I did like four designs, but kept coming back to my first one. This one is my favorite. And I think it would be fabulous for New Year's Eve too!
I Used:
Icing- Twilight
Loose silver holographic bar glitter
I started with two coats of Icing Twilight. This is a gorgeous polish! It's a black jelly with silver micro glitter. The silver glitter really shows up in the picture above. I used three coats to make it completely opaque, but two would have been fine.
When that had dried, I applied a thin layer of top coat and sprinkled the loose bar glitter over it. The glitter was a fabulous find at Dollar Tree. If you have one near you, go and check it out. They have started carrying a lot of nail art supplies and everything in the store is $1.00. On to the manicure, tap down the glitter so you don't have any sharp edges and finish with a top coat.
I don't know if it looks like tinsel, but it's glittering and sparkling all over the place so I'm happy! And it's perfect for New Year's Eve! I can not wait to see what everyone else came up with! Be sure to visit their sites!! Merry Christmas and Happy Polishing!!
Subscribe to:
Posts (Atom)
.jpg)


.jpg)


.jpg)


