Showing posts with label essence. Show all posts

Thursday, July 11, 2013

Neon Watercolor & Tutorial

Hey Y'all!!  Today I'm headed out with the family on a stay-cation, but before I take off for a few days, I wanted to post this tutorial of my mani.  Just a warning, it's pic heavy.  I love the watercolor technique so much, but more because I tend to make it look more like tie dye, lol.  On another day I will show you the softer watercolor, but for today we're going for BRIGHT!
So that's the final look and here's what you'll need:
Of course, pick any colors you want,  I Used:

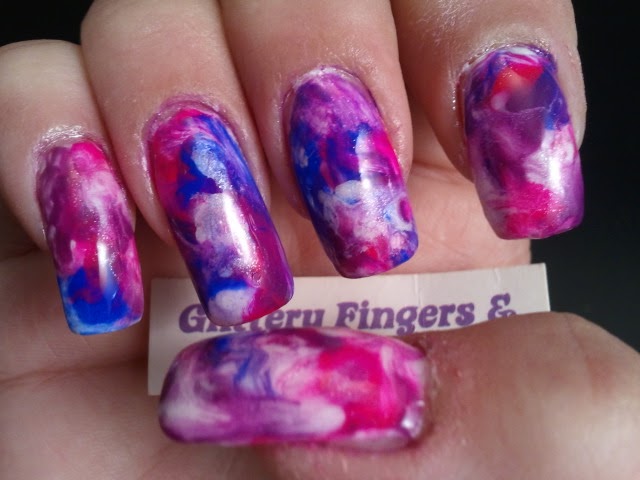
China Glaze- Dandy Lyin' Around (shimmery white)
Sinful Colors- Endless Blue (bright blue crème)
Finger Paints- Pink Perspective (bright neon pink crème)
essence- Break Through (bright purple crème)
100% Acetone
Small Brush
The little cup is a glass ramekin I pour the acetone in. ( I bought it really cheap at a dollar store and use it only for this purpose.)

Ok, so I started out with two coats of China Glaze Dandy Lyin' Around, a beautiful, shimmery white.  But any white polish will work.  Neon really needs the white to make the colors pop.
Then top with top coat.  Do not skip this step.  Otherwise, your acetone could eat all the way through to your nail and you'll have naked nail showing through.

Then line up the colors you've chosen.  I picked a neon/bright purple, blue, pink, and since I wanted the white to show, I added the white.  Open all the bottles.  Neon dries really quick, so you'll have to do the next steps a little fast.  Simply drop some of the nail polish colors on your nails, making them kind of thick/big:
Next, dip your brush (any small brush will work) into the acetone and swirl the colors around.
(It has to be 100% acetone, but you can find it pretty cheaply at grocery stores)
Make sure you cover all of your base color.  Once it has dried, top with top coat and you're done!
I hope y'all enjoy this tutorial!  I'm off to the aquarium!  Happy Polishing!!!


Monday, June 24, 2013

Review: Models Own Mermaid Tears & Golden Shore

Hi Everybody!!!  Finally getting my post up.  I'm sorry this is so late, but I was exhausted after this weekend.  It was so long.  But I had a fabulous day and a bizarre day.  But since I'm late, on with the review!

During a recent restock at Llarowe, I was finally able to pick up some of my biggest lemmings.  Two of them are Mermaid Tears and Golden Shore by Models Own (in the picture below with the base colors I used):
Aren't they fabulous???

Ok, let's start with my Number One Lemming, Mermaid Tears.  This is two coats of Mermaid Tears over two coats of essence break through and top coat (direct sun):
Mermaid Tears is a gorgeous polish of a light purple jelly base with flakies that shift between blue and aqua and teal.  The base is SUPER light.  So light that it barely gives a naked nail a purple hue so  I would strongly recommend wearing this over a base color.  The base I used, essence break through didn't seem to change its color at all.

As for Mermaid Tears, I LOVE it!!  It is flashing like little blue lights are on my nails.  Application was pretty easy.  The base isn't too thick.  Just apply it slowly and check each nail before moving on.  I didn't and I had a few flakies that were sticking straight up.  My only complaint is that the pictures show two coats and not a lot of flakies.  Next time I will fish around for them.  Other than that, this was everything I had hoped for.  Seriously, my hands keep flashing like I have lights on them.  Even in low light:

Next up is Golden Shore by Models Own:
This is two coats over Sinful Colors Sunburnt and a top coat.  Golden Shore has an orange jelly base with flakies that shift from gold to green to yellow.  This.  Is. Gorgeous!!  The base shows up on nails just a tiny bit more than Mermaid Tears, but it didn't alter the color of Sunburnt.  The base is really thick but was super easy to apply and there were plenty of flakies,  No fishing required.  Just like with Mermaid Tears though, apply the polish one nail at a time and check to make sure all of the flakies are lying flat.  This is just so pretty, and there is a ton of sparkle in it.  I'm loving it!

Bottom line?  Get these!!  If you love sparkle and flakies, these are a must have!  They are $8.00 each.  I hope y'all enjoyed today's review.  I'll talk to you tomorrow!!  Happy Polishing!!

Monday, February 11, 2013

Inspired by a Tutorial, R31DC

Hi y'all!  How's your Monday going?  I'm not a huge fan of Mondays (but then who is), and a Monday that is rainy and cold leaves me comatose.  Which unfortunately is the type of Monday we have here in Georgia today.  All I want to do is crawl back into bed and wait for Tuesday.  But I can't.  Sigh.

Anyway, today is the second to last day of the Relaxed 31 Day Challenge (another reason to be sad on this dreary day), and today's prompt is Inspired by a tutorial.  For this challenge I picked the chevron nail tutorial from Dressed Up Nails .  And here is my interpretation:

I Used (from lightest to darkest):
essence- grey-t to be here (grey with a purple shimmer)
Sally Hansen- Lacey Lilac (lilac cream)
Wet-n-Wild- On a Trip (purple crème)
Ulta- Celebutante (dark purple crème)
Orly- Wild Wisteria (very dark purple crème)
Small Liner Brush

I do love this look, but it was really time consuming and not great for a perfectionist.  I drew the chevrons free hand and the other nails are two coats of Ulta Celebutante.  One thing I would change is to paint a thin line of the lightest color down the middle of the nail to keep my center straight.  I will definitely be trying this again!

Be sure to check out the other wonderful ladies!  I hope y'all have a fabulous (and dry) Monday and Happy Polishing!!


Tuesday, February 5, 2013

Inspired by a Pattern

Hi y'all!  How is your Tuesday going?  I hope everyone is staying warm and healthy.  I'm finally starting to feel better, but I think it's because I passed the plague on to my poor daughter :(

Deciding on a pattern was tough.  But since I felt horrible and knew I had a long day coming up, I decided to copy the pattern of one of my favorite shirts.  My bestie, who is not a poishaholic like me, is always saying that your nails and clothes should match. So I thought it would be fun to have my nails literally match my clothes:
I Used:
Nina Ultra Pro- French White (white crème)
essence- oh my glitter! (purple with purple shimmer)
NYC- Skin Tight Denim Crème (dark blue shimmer, don't know why it's called a crème)
Striping Tape

I started with two coats of white polish and once that had dried completely, I painted the essence oh my glitter by the cuticle.  Since the blue stripe was going to cover the purple, the edge didn't have to be perfect.  Finally using striping tape, I painted the dark blue stripes and finished it off with a top coat.  (If y'all would like to see the picture of how I taped up my nails, let me know and I will add it)

I hope y'all like this mani and please check out the other ladies and their patterns.  Happy Polishing!!