Hey Y'all!! How was your weekend? I've had better, I've had worse, so I can't really complain. Except for one thing: Fleas!! Maybe y'all can help me. We've been going back and forth to Florida over the last few weeks and had a sitter for our fur babies. Well, with us gone, and the incredibly hot weather, we've been taken over by these *&%& fleas!! I hate fleas!! And not only are they making my poor babies miserable, they keep biting me too. And only me and the fur babies. The teen and the hubby seem to have yucky blood. Now, while I do enjoy the fact that I have superior blood to my family, I'm tired of being a big, jiggly, itchy, scratchy mess. My house smells like apple cider vinegar and flea dip. The babies and I are tired. Any advice?
Now on to today's mani! Today I have a Holographic Skittle for you:
I Used:
Color Club- Harp On It, a silver linear holo
Orly- Mirrorball, silver linear holo with small holo glitters
Loreal- Masked Affair, a soft gray linear holo
Color Club- Beyond, a charcoal gray linear holo
Celestial- Reaper Crew, a black linear holo
First off, I know the color differences don't show up very well in the photos. But in person, it was obvious. Taking pictures of holos is really hard...taking pictures of holos and trying to capture the subtle differences in color, really, really hard!
Now for the mani. Ombre nails are very easy to do. All you have to do is pick five polishes in the same color family and paint each nail a different color. For this ombre, I started with Color Club Harp On It on my thumb. Harp On It is a bright silver linear holo. On my index finger is Orly Mirrorball. This is also a silver linear holo but it also has small holographic glitter. My middle finger has Loreal Masked Affair. Holy cow!! Loved this one. It's a gray linear holo. Next up is Color Club Beyond, a dark, charcoal gray linear holo on my ring finger. Finally, on my pinky, is Celestial Reaper Crew, a black linear holo. Love that one!!
Photos show two coats with top coat. I really enjoyed this one. But then, I love anything that glitters and sparkles!
Hope you have a fabulous day! Happy Polishing!!
Showing posts with label Orly. Show all posts
Monday, June 22, 2015
Friday, April 24, 2015
Spring Flames
Hey Y'all!! TGIF! So, who's excited for the weekend? Anyone have fun plans? Not much going on for us this weekend. The teen has rehearsals for her ballet performance next weekend, so I'll just be playing chauffer and food getter. And not just this weekend, but for the next 9 days. That's the true job of a Dance Mom!
So, y'all know how much I love doing flames, so for today I have Spring Flames for you!
I Used:
Wet-n-Wild: A Latte Love, a very light beige crème
OPI: Lost My Bikini in Molokini, a pretty, violet crème
Nailtini: Blue Magic, a bright cobalt blue crème
Orly: Choreographed Chaos, a bright pastel pink with a blue shimmer
Liner Brush
First, please forgive the big chip on my index finger. By the time the sun came out, I had worn this mani for several days and chipped it right before going to get sun photos. To start this mani, paint one coat of your base color. In this case I used Wet-n-Wild A Latte Love. Once that has dried and only working on one finger at a time, paint a second, thick coat. Then put stripes/drops of each color of your flame across your nail tip.
Then using a thin brush or toothpick, drag it through the colors towards your cuticle. Wipe off your brush, and drag from your cuticle towards the tip. Be sure to work on only one nail at a time because the polish needs to be very wet for this method. And don't forget the top coat!
I hope you have a fun weekend! Happy Polishing!!
So, y'all know how much I love doing flames, so for today I have Spring Flames for you!
I Used:
Wet-n-Wild: A Latte Love, a very light beige crème
OPI: Lost My Bikini in Molokini, a pretty, violet crème
Nailtini: Blue Magic, a bright cobalt blue crème
Orly: Choreographed Chaos, a bright pastel pink with a blue shimmer
Liner Brush
First, please forgive the big chip on my index finger. By the time the sun came out, I had worn this mani for several days and chipped it right before going to get sun photos. To start this mani, paint one coat of your base color. In this case I used Wet-n-Wild A Latte Love. Once that has dried and only working on one finger at a time, paint a second, thick coat. Then put stripes/drops of each color of your flame across your nail tip.
Then using a thin brush or toothpick, drag it through the colors towards your cuticle. Wipe off your brush, and drag from your cuticle towards the tip. Be sure to work on only one nail at a time because the polish needs to be very wet for this method. And don't forget the top coat!
I hope you have a fun weekend! Happy Polishing!!
Wednesday, April 22, 2015
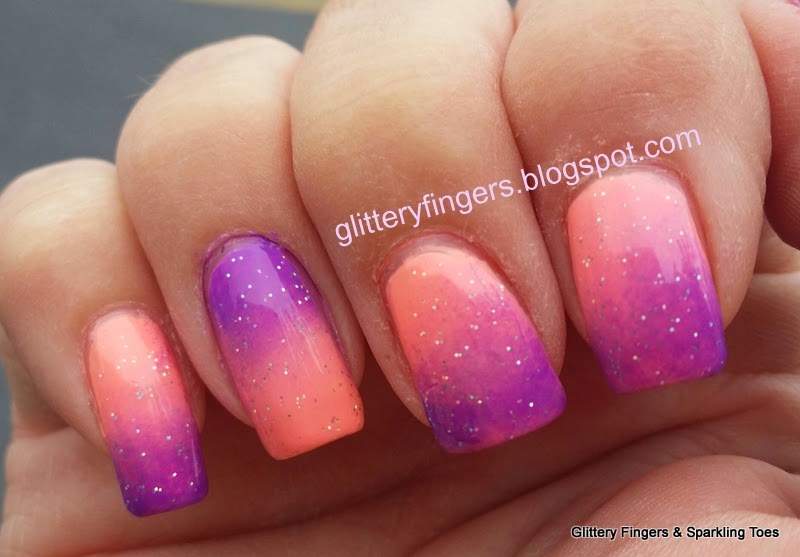
China Glaze Ultra Bright Gradient
Hey Y'all! How's your week going? Mine is going good. We finally got sun yesterday, after nine straight days of rain. But then it got down to 45 degrees last night. I can't wait until we get sun and warmth!
So during all the rain I decided I needed to brighten my nails up with this China Glaze Ultra Bright Gradient:
I Used:
China Glaze: More To Explore, an ultra bright peach neon crème
China Glaze: Plur-ple, ultra bright blue based purple neon crème
Orly: Shine On Crazy Diamond, micro holographic glitter in a clear base
Make Up Sponge
First, I love these new "Ultra Brights" from China Glaze. They are neon without being neon and without the matte/waxy finish. They are actually glossy. I guess that's why they are calling them ultra bright instead of neon, lol.
I also love the peach and purple combination! I love how they look together. My bestie liked it too...I think. She gave me the back handed compliment of, "I never would have thought to put these two colors together, but surprisingly, I like it." LOL! Nothing like a true friend to tell you the truth.
It kind of reminds me of a galaxy, but in unicorn land. Or maybe a sunset on a tropical island.
I hope you enjoyed today's mani! And I hope you have a wonderful day! Happy Polishing!!
So during all the rain I decided I needed to brighten my nails up with this China Glaze Ultra Bright Gradient:
I Used:
China Glaze: More To Explore, an ultra bright peach neon crème
China Glaze: Plur-ple, ultra bright blue based purple neon crème
Orly: Shine On Crazy Diamond, micro holographic glitter in a clear base
Make Up Sponge
First, I love these new "Ultra Brights" from China Glaze. They are neon without being neon and without the matte/waxy finish. They are actually glossy. I guess that's why they are calling them ultra bright instead of neon, lol.
I also love the peach and purple combination! I love how they look together. My bestie liked it too...I think. She gave me the back handed compliment of, "I never would have thought to put these two colors together, but surprisingly, I like it." LOL! Nothing like a true friend to tell you the truth.
It kind of reminds me of a galaxy, but in unicorn land. Or maybe a sunset on a tropical island.
I hope you enjoyed today's mani! And I hope you have a wonderful day! Happy Polishing!!
Friday, April 17, 2015
Dogwood Trees and Flowers
Hey Y'all! TGIF!! How is the weather where you are? It seems nuts in most of the USA. We had upper 70's, low 80's last week and this entire week has been cold, windy and rain. Lots of rain. I'm over it. I'm ready for the heat. And the rain isn't supposed to stop until Tuesday :( And of course, I have a ton of running around to do today and tomorrow. My blogger buddies and I have a swap this weekend and I have to go get the last few things for my person. But I adore and love her, so she's worth facing the cold and rain!
But since it is "technically" Spring, and I am in Georgia, the Dogwoods are in full bloom and that is what I have for you today:
I Used:
Sinful Colors: Love Nails, a medium, bright blue shimmer
Orly: Frosting, a white with gold shimmer
Orly: Rapture, a chocolate brown crème
Dotting Tool
Fine Liner Brush
In case you haven't seen a Dogwood tree before, I snapped this one when the teen and I stopped for lunch:
They are EVERYWHERE here! Seriously. They grow wild. I have a strong love/hate relationship with them. They are gorgeous for about two weeks a year. The rest of the year, they are a weird yellow green color. And I'm allergic to them. But my girl wanted me to do Dogwood nails so I did. I like how these turned out, but I think next time I will make more of the flowers (more white dots). But still, I did like them. Remember, you don't need a dotting tool or brush to do this design. You can use a toothpick.
I hope you enjoyed today's mani. Have a wonderful weekend! Happy Polishing!!
But since it is "technically" Spring, and I am in Georgia, the Dogwoods are in full bloom and that is what I have for you today:
I Used:
Sinful Colors: Love Nails, a medium, bright blue shimmer
Orly: Frosting, a white with gold shimmer
Orly: Rapture, a chocolate brown crème
Dotting Tool
Fine Liner Brush
In case you haven't seen a Dogwood tree before, I snapped this one when the teen and I stopped for lunch:
They are EVERYWHERE here! Seriously. They grow wild. I have a strong love/hate relationship with them. They are gorgeous for about two weeks a year. The rest of the year, they are a weird yellow green color. And I'm allergic to them. But my girl wanted me to do Dogwood nails so I did. I like how these turned out, but I think next time I will make more of the flowers (more white dots). But still, I did like them. Remember, you don't need a dotting tool or brush to do this design. You can use a toothpick.
I hope you enjoyed today's mani. Have a wonderful weekend! Happy Polishing!!
Wednesday, April 15, 2015
First Water Marble of Spring
Hey Y'all! How's your Spring weather going? Hopefully better than ours. It's been raining since Sunday! And not just a little rain, but deluges. It's the kind of rain that: 1) makes you want to sleep all day, but dang it, you have to get up and do something useful with your life, 2) makes the normally nice, warm weather both cold and muggy somehow, so you are chilly and a little sweaty, and the worse part, 3) makes all our old, beautiful trees fall over. But today's mani was done over the weekend, when we still had some sun.
So for today I have my first Water Marble of Spring:
I Used:
Orly: Key Lime Twist, a green leaning yellow ultra bright crème
Orly: Frosting, white with a gold shimmer
Ok, so I had high hopes for this water marble. The two Orly polishes looked great sitting next to each other, there was a lot of contrast between them...yeah, not so much. They both worked great in the water marble, but you can barely tell them apart. I do love these two colors, so I will be ding more with them soon; just not together.
I hope y'all are having a fabulous day! Happy Polishing!!
So for today I have my first Water Marble of Spring:
I Used:
Orly: Key Lime Twist, a green leaning yellow ultra bright crème
Orly: Frosting, white with a gold shimmer
Ok, so I had high hopes for this water marble. The two Orly polishes looked great sitting next to each other, there was a lot of contrast between them...yeah, not so much. They both worked great in the water marble, but you can barely tell them apart. I do love these two colors, so I will be ding more with them soon; just not together.
I hope y'all are having a fabulous day! Happy Polishing!!
Friday, April 3, 2015
Purple and Turquoise Swoop French Tip
Hey Y'all!! Happy Friday! How are y'all doing? It's going pretty good here...except that Mother Nature hates me. The yellow scourge is starting here in Georgia. That is literally yellow-green pollen clouds! Over the next couple of weeks, everything is going to be completely covered in the stuff. I won't see it though, what with all the sneezing, nose blowing, and itchy, swollen, watery eyes :( But on to today's post...while I can still see, lol.
Ok, the best name I could come up with for today's mani is the Swoop, lol.
I Used:
Orly: Wild Wisteria, a dark purple, wine colored crème
Orly: Steal The Spotlight, a micro turquoise/teal glitter with medium sized holographic glitter in a clear base
Sadly, the pictures aren't doing this design justice. And of course it was cloudy for days. But I started with two coats of Orly Wild Wisteria. Once that dried, I just used the brush that came with the polish and swooped Orly Steal The Spotlight onto my nail. I started near the cuticle and just swept the polish up and over to create a sort of French tip. Then went back and dabbed polish anywhere that was thin on glitter.
This was such a pretty, glittery mani. And I love the combination of teal/turquoise and purple.
I hope y'all have a wonderful day! Happy Polishing!!
Ok, the best name I could come up with for today's mani is the Swoop, lol.
I Used:
Orly: Wild Wisteria, a dark purple, wine colored crème
Orly: Steal The Spotlight, a micro turquoise/teal glitter with medium sized holographic glitter in a clear base
Sadly, the pictures aren't doing this design justice. And of course it was cloudy for days. But I started with two coats of Orly Wild Wisteria. Once that dried, I just used the brush that came with the polish and swooped Orly Steal The Spotlight onto my nail. I started near the cuticle and just swept the polish up and over to create a sort of French tip. Then went back and dabbed polish anywhere that was thin on glitter.
This was such a pretty, glittery mani. And I love the combination of teal/turquoise and purple.
I hope y'all have a wonderful day! Happy Polishing!!
Wednesday, April 1, 2015
Red and Gold Sequin and Gradient Mani
Hey Y'all!! Happy Hump Day! How is your week going? Mine is ok. It's that time of year when I'm miserable...pollen. Everywhere! I can't stop sneezing. And the worst part is that the pollen isn't even that bad yet :( But at least I still have a post for you :)
So here is today's mani:
I Used:
OPI: Over & Over A-Gwen, a red crème
OPI: Love. Angel. Music. Baby., a satin gold metallic
Orly: Lavish Bash, a micro gold glitter with holographic bar glitter in a clear base
Red and Gold Sequins
To start this mani, I painted my thumb, pinky and ring finger with OPI Over & Over A-Gwen, a pretty, bright red crème. Then I painted my index and middle fingers with OPI Love. Angel. Music. Baby., a satin finished gold metallic. Once that was all dry, I used the brush that came with the polish to dab on Orly Lavish Bash to form the gradient.
To place the sequins, I used a dotting tool and Seche Vite top coat. I just put a dot of the top coat on my nail where I wanted to place the sequin, then sunk the sequin down into the dot. Try to get the sequin as flat to your nail as you can. Otherwise, they will pop off pretty easily. Then just top off everything with top coat!
I hope you enjoyed today's mani! Happy Polishing!!
So here is today's mani:
I Used:
OPI: Over & Over A-Gwen, a red crème
OPI: Love. Angel. Music. Baby., a satin gold metallic
Orly: Lavish Bash, a micro gold glitter with holographic bar glitter in a clear base
Red and Gold Sequins
To start this mani, I painted my thumb, pinky and ring finger with OPI Over & Over A-Gwen, a pretty, bright red crème. Then I painted my index and middle fingers with OPI Love. Angel. Music. Baby., a satin finished gold metallic. Once that was all dry, I used the brush that came with the polish to dab on Orly Lavish Bash to form the gradient.
To place the sequins, I used a dotting tool and Seche Vite top coat. I just put a dot of the top coat on my nail where I wanted to place the sequin, then sunk the sequin down into the dot. Try to get the sequin as flat to your nail as you can. Otherwise, they will pop off pretty easily. Then just top off everything with top coat!
I hope you enjoyed today's mani! Happy Polishing!!
Monday, March 23, 2015
An Ombre Gradient Skittle
Hey Y'all!! Oh. My. Goodness!! I tried to get this post up on Friday, but my computer kept updating. Does anyone else keep putting off updating their computer until it has hours worth to do? No? Just me? Oh well. Happy Monday! I hope y'all had a fabulous weekend. We had a quiet one. The teen went to a friend's house and the hubby and I went out to a nice dinner. And slept! This time of year wears me out. Not only does the teen have a million things to do and a million places to be, the weather kills me. In one week we can have 30's, 80's, sun, tropical storms, wind...all leading up to everything about to be covered in an inch of pollen.
But on to today's mani! I have something I'm calling an Ombre Gradient Skittle:
I Used:
China Glaze: One Track Mind (a deep cobalt blue crème)
Orly- Tiara (small silver glitter in a clear base)
Finger Paints- Ho Ho Happy Holidays (micro silver and light blue glitter in a clear base)
Icing- Sapphire (a medium blue micro glitter in a clear base)
China Glaze- Feeling Twinkly (a dark blue glitter in a clear base)
Make Up Sponge
To start this mani, I painted two coats of China Glaze One Track Mind, a deep cobalt blue crème. Then using a make up sponge, I sponged on the glitter polishes. They are:
Pinky: Orly Tiara, a silver glitter
Ring Finger: Finger Paints Ho Ho Happy Holidays, a silver and light blue glitter
Middle Finger: Icing Sapphire, a medium blue glitter
Index Finger: China Glaze, Feeling Twinkly, a dark blue glitter
Thumb: all the above
When sponging on the glitter, start about three quarters of the way down your nail. Then go back and sponge on just the tip of your nail to give you a more concentrated glitter. For the thumb, paint stripes of the polish on the make up sponge and dab on your nail. It is really important to use a sponge at least for your thumb...the sponge will soak up the excess clear polish leaving you a more concentrated glitter. I did two coats on my thumb. Then just add the top coat.
I hope you have a fabulous day! Happy Polishing!!
But on to today's mani! I have something I'm calling an Ombre Gradient Skittle:
I Used:
China Glaze: One Track Mind (a deep cobalt blue crème)
Orly- Tiara (small silver glitter in a clear base)
Finger Paints- Ho Ho Happy Holidays (micro silver and light blue glitter in a clear base)
Icing- Sapphire (a medium blue micro glitter in a clear base)
China Glaze- Feeling Twinkly (a dark blue glitter in a clear base)
Make Up Sponge
To start this mani, I painted two coats of China Glaze One Track Mind, a deep cobalt blue crème. Then using a make up sponge, I sponged on the glitter polishes. They are:
Pinky: Orly Tiara, a silver glitter
Ring Finger: Finger Paints Ho Ho Happy Holidays, a silver and light blue glitter
Middle Finger: Icing Sapphire, a medium blue glitter
Index Finger: China Glaze, Feeling Twinkly, a dark blue glitter
Thumb: all the above
When sponging on the glitter, start about three quarters of the way down your nail. Then go back and sponge on just the tip of your nail to give you a more concentrated glitter. For the thumb, paint stripes of the polish on the make up sponge and dab on your nail. It is really important to use a sponge at least for your thumb...the sponge will soak up the excess clear polish leaving you a more concentrated glitter. I did two coats on my thumb. Then just add the top coat.
I hope you have a fabulous day! Happy Polishing!!
Wednesday, August 6, 2014
Water Marble Wednesday
Hey Y'all!! Happy Hump Day! I hope y'all are all doing good. The teen and I are feeling ugghh today For the last week, the teen and I have been fighting off a cold and today, I think the cold has won :( Summer colds are the worst.
But I do have a new post for you today! I've called it Water Marble Wednesday, just because I couldn't think of another title, lol. But here it is:
I Used:
Orly- Neon Heat (bright pink/fuchsia neon)
OPI- Amazon, Amazoff (dark teal crème)
I hope y'all enjoyed today's post! The teen and I are off to try to get some rest and take a bunch of vitamins...we can only be sick today, lol.
Happy Polishing!!
But I do have a new post for you today! I've called it Water Marble Wednesday, just because I couldn't think of another title, lol. But here it is:
I Used:
Orly- Neon Heat (bright pink/fuchsia neon)
OPI- Amazon, Amazoff (dark teal crème)
I hope y'all enjoyed today's post! The teen and I are off to try to get some rest and take a bunch of vitamins...we can only be sick today, lol.
Happy Polishing!!
Monday, July 28, 2014
Pink & Bronze Fan Brush Design
Hey Y'all!! Happy Monday! I hope you had a good weekend. We didn't do much which was a nice change. We caught up on our "America's Got Talent" shows...love that show! And just spent time loving on our fur babies and each other. Plus I spent time trying to teach my 90+ pound fur baby that she can't do the same things as the 9 pound fur baby. In other words, no Tillie, you can't run across the room and jump in Mommy's lap...you are going to squish Mommy! But I do make that fun sound when she lands on me and all the air rushes out of my body...she likes that sound.
I do have a new design for you today...I think I've finally figured out how to do a Fan Brush design:
I Used:
Studio M- Hot Zone (neon pink with blue shimmer)
Orly- Hot Tropics (neon magenta with a gold shimmer)
Sinful Colors- Gold Medal (antique gold/bronze gold metallic)
Fan Brush
I started this manicure with two coats of Studio M Hot Zone, a gorgeous neon pink with a blue shimmer. Next comes the fan brush. This takes practice, at least for me, lol. Put a little polish on a piece of paper (or foil, or paper plate) and dip your fan brush into the polish. Then dab the excess polish off. You want to remove the majority. Then, just run the fan brush vertically across the nail. Start on one side, then start on the other side of the nail.
You may have to go over the nail several times to get the look you want. I also went over the nails with the base color, using the fan brush, to make it stand out more. Once you get the look you want, top off with top coat.
I hope you enjoyed today's mani! Happy Polishing!!
I do have a new design for you today...I think I've finally figured out how to do a Fan Brush design:
I Used:
Studio M- Hot Zone (neon pink with blue shimmer)
Orly- Hot Tropics (neon magenta with a gold shimmer)
Sinful Colors- Gold Medal (antique gold/bronze gold metallic)
Fan Brush
I started this manicure with two coats of Studio M Hot Zone, a gorgeous neon pink with a blue shimmer. Next comes the fan brush. This takes practice, at least for me, lol. Put a little polish on a piece of paper (or foil, or paper plate) and dip your fan brush into the polish. Then dab the excess polish off. You want to remove the majority. Then, just run the fan brush vertically across the nail. Start on one side, then start on the other side of the nail.
You may have to go over the nail several times to get the look you want. I also went over the nails with the base color, using the fan brush, to make it stand out more. Once you get the look you want, top off with top coat.
I hope you enjoyed today's mani! Happy Polishing!!
Friday, July 25, 2014
Summer Water Marble (Neon Orange & Purple)
Hey Y'all!! TGIF!!! A bit early. The teen has a show tomorrow and I'm going to run a bunch of errands before, so I thought I would post this a little early :)
For today, I have a Neon Orange and Purple Water Marble perfect for Summer:
I Used:
Orly- Scattered (dark purple neon)
Orly- Tropical Pop (bright orange/peach neon)
For my tutorial on water marbling, CLICK HERE!!
I really love how this turned out! Be sure to work extra quickly whenever you use neons in water marbles. The polishes always dry fast in the water, but the neons dry super fast!
I hope you enjoyed today's post, and that you have a wonderful Friday! Happy Polishing!!
For today, I have a Neon Orange and Purple Water Marble perfect for Summer:
I Used:
Orly- Scattered (dark purple neon)
Orly- Tropical Pop (bright orange/peach neon)
For my tutorial on water marbling, CLICK HERE!!
I really love how this turned out! Be sure to work extra quickly whenever you use neons in water marbles. The polishes always dry fast in the water, but the neons dry super fast!
I hope you enjoyed today's post, and that you have a wonderful Friday! Happy Polishing!!
Thursday, July 24, 2014
A Pink, Purple & Turquoise Summer Dotticure
Hey Y'all!! Happy Thursday! How is your day going? Mine is ok...the teen is off to dance camp...yes again. And I've declared war on the ants in the yard. Seriously. I hate ants! If you live in the South, you understand. We have a ton of varieties and they all bite. So I've been roaming our property with a concoction I found on the internet guaranteed to end their miserable little lives! These things have built hills over 12 inches tall and over 18 inches wide, in just a couple of days...they must go!
But I did find time to bring y'all a new post, a pretty Summer Dotticure:
I Used:
Orly: Hot Tropics (neon magenta/purple with gold shimmer)
Studio M- Hot Zone (neon pink with blue shimmer)
Salon Perfect- Gone Sailing (neon turquoise shimmer)
Large and Small Dotting tool
Since I've done similar manicures recently, I won't go into the how-to-do-this (just look back a couple of designs for the tutorial). I will say that I LOVED this color combination! Very girly while still so bright! I'm going to have to try this color combination in some other designs!
I hope y'all enjoyed today's design! Have a fabulous day and Happy Polishing!!
But I did find time to bring y'all a new post, a pretty Summer Dotticure:
I Used:
Orly: Hot Tropics (neon magenta/purple with gold shimmer)
Studio M- Hot Zone (neon pink with blue shimmer)
Salon Perfect- Gone Sailing (neon turquoise shimmer)
Large and Small Dotting tool
Since I've done similar manicures recently, I won't go into the how-to-do-this (just look back a couple of designs for the tutorial). I will say that I LOVED this color combination! Very girly while still so bright! I'm going to have to try this color combination in some other designs!
I hope y'all enjoyed today's design! Have a fabulous day and Happy Polishing!!
Monday, June 9, 2014
Red Thumb 2 Stop Campaign...and Pirates!
Hey Y'all!! The fabulous Beauty-Shoes-Nails-Fun has organized the RedThumb2Stop Campaign! We've all taken the pledge to stop texting, using social media, checking email, taking photos and talking on our phones while we are driving!
While I'm not guilty of most of this, I do talk on my phone while driving, a lot. And checking my notifications at red lights. But that's over! I, along with all the fabulous bloggers below, have agreed to stop. And the Red Thumb 2 Stop is helping with that. While we continue to bring you our regular manis and nail art, we are painting our thumbs red! The idea being that the red, which should not match the rest of the mani, will remind us to STOP! It acts like a stop sign.
So here is my first contribution, a Pirate mani:
I Used:
OPI- Amazon, Amazoff (dark teal crème)
Sinful Colors- Embers Only (red jelly with silver glitter)
Konad- Black
Vivid Lacquer Stamping Plate- VL 023
Love these two polishes! OPI Amazon, Amazoff is a beautiful, dark teal crème. The pictures show two coats with top coat. The formula was perfect, as most of OPI's polishes are.
Sinful Colors Embers Only is shown with three coats and top coat. The formula was great. I used three coats to make sure there wasn't any visible nail line, but you could get away with two. While I liked Embers Only, I wish there was more glitter.
Anyway, we would love it if you joined us!! You can do that a couple of ways. Post a picture of your mani, with red thumbs, to Instagram with the hashtag: #RedThumb2Stop. Or you can post a picture of your mani to either my facebook page or email it to me (at glitteryfingers@gmail.com) and I will post it for you.
Hope y'all enjoy today's post! Happy Polishing!!
While I'm not guilty of most of this, I do talk on my phone while driving, a lot. And checking my notifications at red lights. But that's over! I, along with all the fabulous bloggers below, have agreed to stop. And the Red Thumb 2 Stop is helping with that. While we continue to bring you our regular manis and nail art, we are painting our thumbs red! The idea being that the red, which should not match the rest of the mani, will remind us to STOP! It acts like a stop sign.
So here is my first contribution, a Pirate mani:
I Used:
OPI- Amazon, Amazoff (dark teal crème)
Sinful Colors- Embers Only (red jelly with silver glitter)
Konad- Black
Vivid Lacquer Stamping Plate- VL 023
Love these two polishes! OPI Amazon, Amazoff is a beautiful, dark teal crème. The pictures show two coats with top coat. The formula was perfect, as most of OPI's polishes are.
Sinful Colors Embers Only is shown with three coats and top coat. The formula was great. I used three coats to make sure there wasn't any visible nail line, but you could get away with two. While I liked Embers Only, I wish there was more glitter.
Anyway, we would love it if you joined us!! You can do that a couple of ways. Post a picture of your mani, with red thumbs, to Instagram with the hashtag: #RedThumb2Stop. Or you can post a picture of your mani to either my facebook page or email it to me (at glitteryfingers@gmail.com) and I will post it for you.
Hope y'all enjoy today's post! Happy Polishing!!
Monday, June 2, 2014
Summer Neon Water Marble
Hey Y'all!! Happy Monday! Did you have a good weekend? We did! We went our 65+ miles to get the teen new pointe shoes. And of course, since it was so far, we had to have lunch. We went to Pappadeaux!!! I can't begin to tell you how much I LOVE that place! They have the absolute best alligator in the world! And this one had a BUFFET! Ate myself sick and I'm not even ashamed! The rest of the weekend was spent Spring cleaning and catching up on America's Got Talent.
Today I have a fun Summer Neon Water Marble for you:
I Used:
China Glaze- White on White (white crème)
Orly- Ablaze (neon orange with a micro gold shimmer)
Orly- Neon Heat (bright neon pink crème)
Studio M- Neon Greenlight (bright neon green)
For my water marble tutorial, just CLICK HERE!!!
I painted two coats of China Glaze White on White as a base. Then I used it and the other three polishes in the water marble. I added the white in the water marble to make the neons really pop.
I really love this mani. And I think it works great for Spring into Summer time!
I hope y'all have a fabulous day!! And Happy Polishing!!
Today I have a fun Summer Neon Water Marble for you:
I Used:
China Glaze- White on White (white crème)
Orly- Ablaze (neon orange with a micro gold shimmer)
Orly- Neon Heat (bright neon pink crème)
Studio M- Neon Greenlight (bright neon green)
For my water marble tutorial, just CLICK HERE!!!
I painted two coats of China Glaze White on White as a base. Then I used it and the other three polishes in the water marble. I added the white in the water marble to make the neons really pop.
I really love this mani. And I think it works great for Spring into Summer time!
I hope y'all have a fabulous day!! And Happy Polishing!!
Thursday, May 29, 2014
Neon Dots
Hey Y'all!! Ok, so yesterday stunk. Seriously. So I'm going to pretend it didn't happen and just start over today. Today is going to be a good day! Hear me Universe?? No crap today, ok? LOL
So I know that it's still "technically" Spring, but here in the southern corner of the US, it's summer. That's why I have a fun Neon Dotticure for you today:
I Used:
Orly: Tropical Pop (neon peach crème)
Orly- Saturated (dark purple neon crème)
Orly- Hot Tropics (dark magenta neon with a gold micro shimmer)
Dotting Tool
I started with painting three fingers with Orly Tropical Pop, a fun neon orangy-peach color. Then I painted my ring finger with Orly Saturated, a deep purple neon...you know I loved this color! And finally, I painted my middle finger with Orly Hot Tropics. This color is hot! It's a dark magenta neon with gold micro glitter giving it such a gorgeous shimmer.
Then using the same colors, I started dotting away skipping the base color for that nail. I used a large and small dotting tool, but you could use a toothpick and a ball point pen instead. I dotted just one half of my nail. I think the key to dotting is to overlap some of the dots. It gives it a more random look.
I hope you enjoyed today's post. And I really hope you have a fabulous day! No more bad days for us!
Happy Polishing!!
So I know that it's still "technically" Spring, but here in the southern corner of the US, it's summer. That's why I have a fun Neon Dotticure for you today:
I Used:
Orly: Tropical Pop (neon peach crème)
Orly- Saturated (dark purple neon crème)
Orly- Hot Tropics (dark magenta neon with a gold micro shimmer)
Dotting Tool
I started with painting three fingers with Orly Tropical Pop, a fun neon orangy-peach color. Then I painted my ring finger with Orly Saturated, a deep purple neon...you know I loved this color! And finally, I painted my middle finger with Orly Hot Tropics. This color is hot! It's a dark magenta neon with gold micro glitter giving it such a gorgeous shimmer.
Then using the same colors, I started dotting away skipping the base color for that nail. I used a large and small dotting tool, but you could use a toothpick and a ball point pen instead. I dotted just one half of my nail. I think the key to dotting is to overlap some of the dots. It gives it a more random look.
I hope you enjoyed today's post. And I really hope you have a fabulous day! No more bad days for us!
Happy Polishing!!
Subscribe to:
Posts (Atom)


-1.jpg)


-1.jpg)


.jpg)

.jpg)
.jpg)


-1.jpg)

-1.jpg)


-1.jpg)


-1.jpg)


-1.jpg)

-1.jpg)